QX1000 Manual II: Administrator's Guide
Administrator’s Menus
QX1000; (SW Version 5.3.x)
20
The
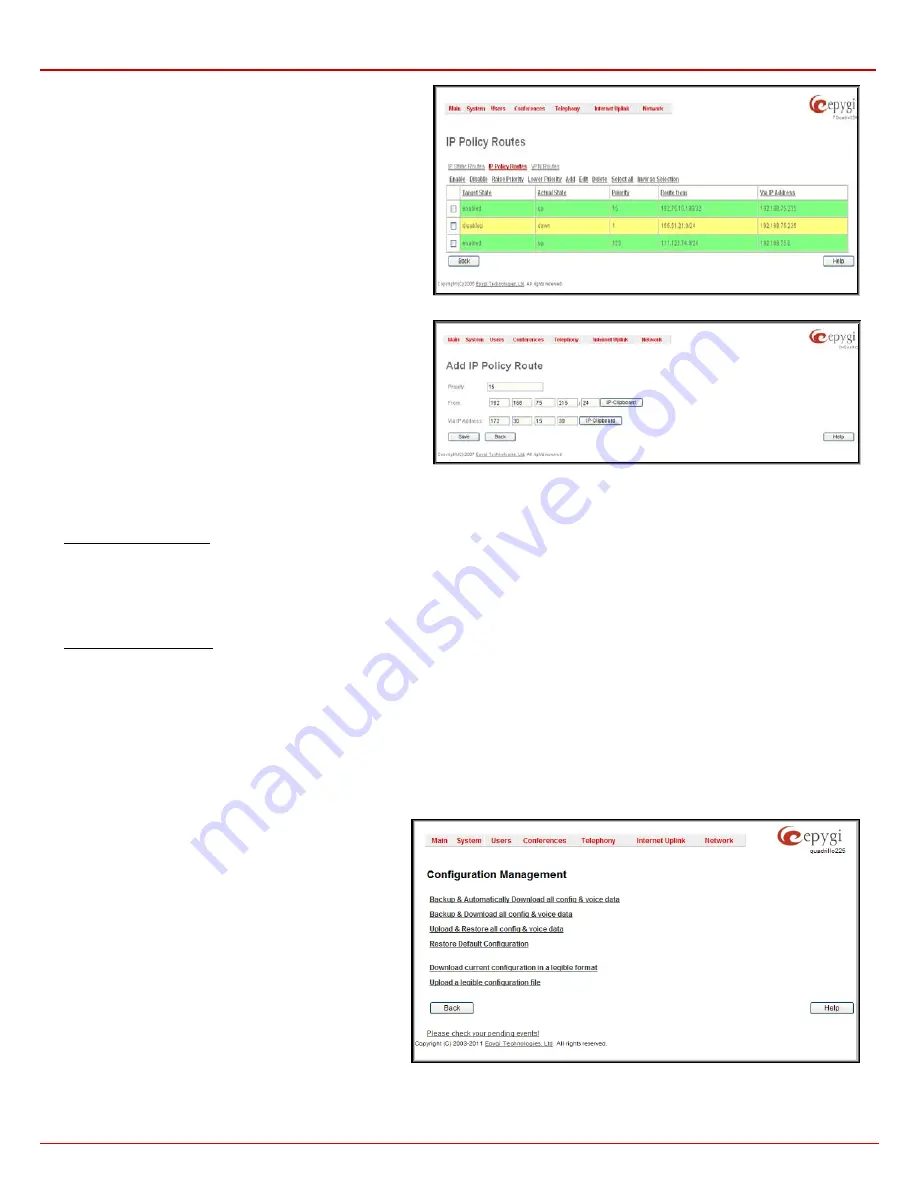
IP Policy Routes
table displays all specified IP policy routes
with their parameters:
Target State
for the state of the route
(enabled or disabled),
Actual State
for the state of the route
connection (up, down or erroneous),
Priority
for the route priority,
Route From
is where the subnet, routed packets come from and
Via IP Address
is where the router IP address incoming packets
should be routed through.
Add
opens the
Add IP Policy Route
page to establish a new
policy route.
Enable
and
Disable
are used to activate or to deactivate the
selected route(s).
Raise
Priority
and
Lower Priority
are used to increase or
decrease the priority of the selected policy route(s) by one. At
least one route should be selected to use these functions,
otherwise the error message “No record(s) selected” will appear.
Fig. II-27: IP Policy Routing table
The
Add IP Policy Route
page offers the following input options:
Priority
requires a numeric value (from 1 to 252) to define the
priority of the routing rule. The lower the number, the sooner the
routing rule will take effect (higher priority).
From
requires the packet source IP address and subnet mask of
the specified destination to match with the rule.
Via IP address
requires the IP address of the subsequent router
for IP packet forwarding.
Fig. II-28: Add IP Policy Route page
The
Enable
and
Disable
functional buttons are used to activate or to deactivate the selected route(s). At least one route should be selected to use
these functions, otherwise the error message “No record(s) selected” will appear.
To Add an IP Static Route
1.
Select the
IP Static Routes
link on the
Routing Configuration
page.
2.
Press the
Add
button on the
IP Static Routes
page. The
Add Entry
page will appear in the browser window.
3.
Enter the destination IP address and subnet mask in the
Route To
text fields. Use the
IP-Clip
button to select a previously entered IP address.
4.
Enter the router IP address into the
Via IP Address
text fields.
5.
Press the
Save
button to make the static route with these settings.
To Add an IP Policy Route
1.
Select the
IP Policy Route
s link on the
Routing Configuration
page.
2.
Press the
Add
button on the
IP Policy Routes
page. The
Add Entry
page will appear in the browser window.
3.
Specify the policy routing rule priority in the
Priority
text field.
4.
Enter the packet source IP address and subnet mask in the
From
text fields. Use the
IP-Clip
button to select a previously entered IP address.
5.
Enter the router IP address into the
Via IP Address To
text fields.
6.
Press the
Save
button to make the policy route with these settings.
Configuration Management
The
Configuration Management
page assists the administrator with managing the system configuration settings and voice data. For example, the
administrator is able to backup and download the settings to a PC and then upload and restore them back to the QX1000. Additionally, this page
provides the possibility of restoring the factory default configuration settings.
The
Backup & Automatically Download all config & voice
data
link leads to the
Automatically Backup Configuration
Settings
page where the automatic backup of the system
configuration and the voice data can be configured. The
service allows you to setup QX1000 so it will automatically
backup the system configuration and the voice data and store
it in the specified location.
Fig. II-29
:
Configuration Management page


