6-14
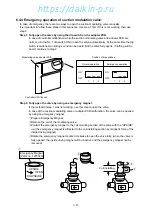
q
Remove the coil.
w
Set the emergency cap on the electronic expansion valve body.
e
Fully close the electronic expansion valve by turning the minus recessed screw of emergency cap
clockwise with miniature driver.
(Tightening torque: approx. 1 kgf
cm The torque is required to tighten the valve softly until the driver
stops turning)
r
Then slightly open the electronic expansion valve by turning the minus recessed screw of emergency
cap counter clockwise for 60˚
t
Apply a loose-free adhesive on the screw.
Recommen-
dation
*EV opening adjustment during pull-down operation
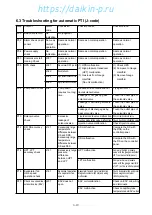
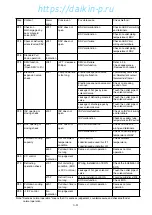
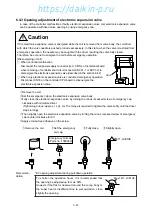
6.4.3 Opening adjustment of electronic expansion valve
In case of the controller malfunction or faulty electronic expansion valve coil, electronic expansion valve
can be operated with fixed valve opening by using emergency cap.
If the electronic expansion valve is energized while the coil is removed from valve body, the coil driver
with which the valve needle is pushed protrude excessively. In this state, when the valve is restored from
emergency operation, the needle may be caught with the driver resulting the valve fully closed.
Therefore, be sure not to energize the coil before emergency operation.
[Disenergizing of coil]
When controller malfunction
Disconnect the red power supply connector (red : CN5) on the terminal board
when removing of controller short circuit connector (SCC1-1 or SCC1-2) to
disenergize the electronic expansion valve.(described in the section 6.4.2)
When only electronic expansion valve is conducted emergency operation.
Disconnect CN18 on the controller CPU board to disenergize the
electronic expansion valve.
Caution
CN18
w
Set the emergency
coil cap.
q
Remove the coil.
e
Fully close.
r
Slightly open.
60
°
LXE10E
Emergency coil cap
(Parts no. 1080263)
To shorten the operation hours, it is recommended that
the opening be adjusted up to max. 50%.
However if the frost is observed around the comp. body or
the super heat is insufficient due to wet operation, close
slightly the opening.
Max.120
°
LXE10E
https://daikin-p.ru
Содержание LXE10E-1
Страница 161: ...7 9 https daikin p ru ...
Страница 162: ...7 14 Schematic wiring diagram LXE10E 1 7 10 https daikin p ru ...
Страница 163: ...7 15 Stereoscopic wiring diagram LXE10E 1 7 11 https daikin p ru ...

