4-12
3. Turn unit off to check the oil level. The correct
oil level range should be between the bottom to 1/8 of the
sight glass. If the level is above 1/8, oil must be removed
from the compressor. To remove oil from the compressor,
follow step d. If the level is below the bottom of the sight
glass, add oil to the compressor following step b. below.
b. Adding Oil with Compressor in System
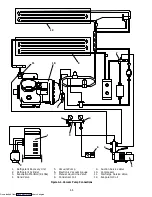
In an emergency where an oil pump is not available,
oil may be drawn into the compressor through the suction
service valve.
CAUTION
Extreme care must be taken to ensure the
manifold
common
connection
remains
immersed in oil at all times. Otherwise air and
moisture will be drawn into the compressor.
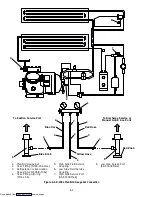
Connect the suction connection of the gauge
manifold to the compressor suction service valve port,
and immerse the common connection of the gauge
manifold in an open container of refrigeration oil. Crack
the suction service valve and gauge valve to vent a small
amount of refrigerant through the common connection
and the oil to purge the lines of air. Close the gauge
manifold valve.
With the unit running, frontseat the suction service
valve and pull a vacuum in the compressor crankcase.
SLOWLY crack the suction gauge manifold valve and oil
will flow through the suction service valve into the
compressor. Add oil as necessary.
Run unit for 20 minutes, in cooling, and check oil
level at the compressor sight glass.
c. Adding Oil to Service Replacement Compressor
NOTES
1. The correct oil charge is 3.6 liters (7.6 U.S. pints).
2. Service replacement compressors are shipped
without oil.
3. When at first adding oil to the compressor, add
only 3 liters (6.3 pints) to the compressor. Run the
unit for 20 minutes, in cooling, and check the oil
level in the compressor sight glass. Add oil as
necessary. This procedure is suggested due to the
oil that has migrated with refrigerant to other parts
of the system.
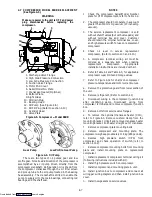
If compressor is without oil:
First, make sure that what oil does exist in the
compressor is the correct one, then add oil, (sections 1.3
and 4.10) through the suction service valve flange cavity
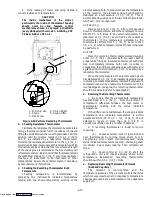
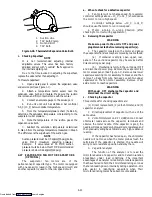
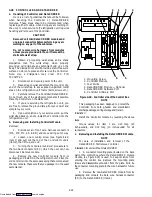
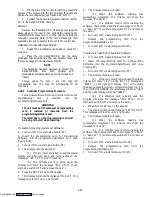
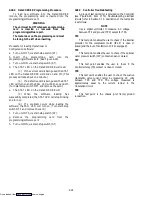
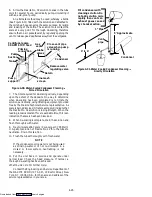
or by removing the oil fill plug. (See Figure 4-5.) Some
compressors have the oil plug located on the crankcase, at
the right or left side of the oil pump.
d. To Remove Oil From an 06DR Compressor:
1. If the oil level recorded in step a.3 is above 1/8 of
the sight glass, oil must be removed from the compressor.
2. Close (frontseat) suction service valve and pump
unit down to 1.2 to 1.3 kg/cm
@
(2 to 4 psig). Frontseat
discharge service valve and slowly bleed remaining
refrigerant.
3. Remove the oil drain plug on the bottom plate of
the compressor and drain the proper amount of oil from
the compressor to obtain the 1/8 sight glass maximum
level.
CAUTION
Care must be taken when removing the oil drain
plug, as pressure will build up inside the
compressor causing rapid oil loss.
4. Replace the drain plug securely back into the
compressor.
DO NOT FORGET TO OPEN SUCTION AND
DISCHARGE SERVICE VALVES.
5. Repeat Step a. to ensure proper oil level.
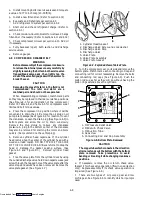
4.11 MOISTURE-LIQUID INDICATOR
When the refrigeration system is operating, the
moisture-liquid indicator provides an indication of
moisture in the system.
The indicator element is highly sensitive to moisture
and will gradually change color in direct relation to an
increase or decrease in the moisture content of the
system. The safe, caution, and unsafe system operating
conditions are then easily determined by matching the
element color with the colors displayed on the reference
label.
To change indicator or lens:
a. Pump down the unit per section 4.3 and install new
indicator or lens. Replace filter-drier.
b. Evacuate the unit per section 4.5 and add refrigerant
charge per section 4.6.
c. Start unit and after twelve hours re-check indicator.
If indicator does not indicate a safe condition, pump unit
down and change filter-drier. (Refer to section 4.12.)
4.12 FILTER-DRIER
If the sight glass appears to be flashing or bubbles are
constantly moving through the sight glass when the
suction modulation valve is fully open, the unit may have
a low refrigerant charge, or the filter-drier could be
partially plugged.
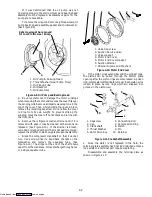
To Check Filter-Drier:
a. One test for a restricted or plugged filter-drier is by
feeling the liquid line inlet and outlet connections of the
drier cartridge. If the outlet side feels cooler than the
inlet side, then the filter-drier should be changed.
b. Another test is that the moisture-liquid indicator
shows moisture in the system. (Refer to section 4.11.)
To Replace Filter-Drier:
a. Pump unit down to 0 psi and replace filter-drier.
(Refer to section 4.3.)
b. Evacuate the unit per section 4.5 and open manual
liquid line valve.
Downloaded from
Содержание 69NT40-489
Страница 1: ...Model 69NT40 489 T 259 Rev F Downloaded from ManualsNet com search engine ...
Страница 100: ...5 9 Figure 5 4 Electrical Wiring Diagram Model 69NT40 489 2 Sheet 2 of 2 Downloaded from ManualsNet com search engine ...
Страница 141: ...5 50 Figure 5 25 Electrical Schematic Model 69NT40 489 19 Sheet 1 of 2 Downloaded from ManualsNet com search engine ...
Страница 142: ...5 51 Figure 5 25 Electrical Schematic Model 69NT40 489 19 Sheet 2 of 2 Downloaded from ManualsNet com search engine ...
Страница 149: ...5 58 Figure 5 29 Electrical Schematic Models 69NT40 489 50 Sheet 1 of 2 Downloaded from ManualsNet com search engine ...
Страница 150: ...5 59 Figure 5 29 Electrical Schematic Models 69NT40 489 50 Sheet 2 of 2 Downloaded from ManualsNet com search engine ...
Страница 157: ...5 66 Figure 5 33 Electrical Schematic Models 69NT40 489 62 Sheet 1 of 2 Downloaded from ManualsNet com search engine ...
Страница 158: ...5 67 Figure 5 33 Electrical Schematic Models 69NT40 489 62 Sheet 2 of 2 Downloaded from ManualsNet com search engine ...
Страница 161: ...5 70 Figure 5 35 Electrical Schematic Models 69NT40 489 78 Sheet 1 of 2 Downloaded from ManualsNet com search engine ...
Страница 162: ...5 71 Figure 5 35 Electrical Schematic Models 69NT40 489 78 Sheet 2 of 2 Downloaded from ManualsNet com search engine ...
Страница 165: ...5 74 Figure 5 37 Electrical Schematic Models 69NT40 489 80 Sheet 1 of 2 Downloaded from ManualsNet com search engine ...
Страница 166: ...5 75 Figure 5 37 Electrical Schematic Models 69NT40 489 80 Sheet 2 of 2 Downloaded from ManualsNet com search engine ...
Страница 169: ...5 78 Figure 5 39 Electrical Schematic Models 69NT40 489 30 31 Sheet 1 of 2 Downloaded from ManualsNet com search engine ...
Страница 170: ...5 79 Figure 5 39 Electrical Schematic Models 69NT40 489 30 31 Sheet 2 of 2 Downloaded from ManualsNet com search engine ...

