background image

1-3

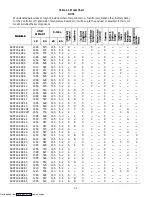
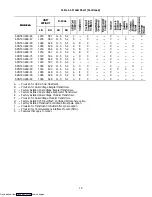
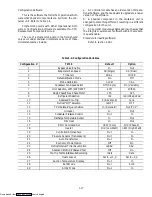
Table 1-1. Model Chart (Continued)

MODELS

UNIT

WEIGHT

R-134a

MODELS

LB

KG

LB

KG

69NT40-489-66

1250

567

11.5

5.2

X

---

X

---

---

X

---

---

---

X

69NT40-489-67

1235

560

11.5

5.2

X

---

X

---

---

X

---

X

---

---

69NT40-489-68

1385

628

11.5

5.2

A

B

X

---

---

X

---

---

---

---

69NT40-489-69

1385

628

11.5

5.2

A

E

X

---

---

X

---

---

H

---

69NT40-489-70

1250

566

11.5

5.2

A

B

X

---

---

X

---

---

---

---

69NT40-489-71

1250

567

11.5

5.2

A

B

X

---

---

X

---

---

---

---

69NT40-489-75

1310

594

11.5

5.2

---

D

X

X

---

X

---

---

---

---

69NT40-489-77

1385

628

11.5

5.2

A

C

X

---

---

X

---

---

---

---

69NT40-489-78

1220

553

11.5

5.2

A

---

---

---

---

X

---

---

---

---

69NT40-489-79

1385

628

11.5

5.2

A

C

X

---

---

X

---

---

H

---

69NT40-489-80

1330

603

11.5

5.2

A

D

X

X

---

X

X

X

---

J

69NT40-489-81

1385

628

11.5

5.2

A

E

X

---

---

X

---

---

---

---

69NT40-489-83

1385

628

11.5

5.2

A

B

X

---

---

X

---

---

---

---

69NT40-489-84

1385

628

11.5

5.2

A

E

X

---

---

X

---

---

---

---

A --- Provision for USDA Cold Treatment.

B --- Provision for Dual Voltage Integral Transformer.

C --- Factory installed Dual Voltage Integral Transformer.

D --- Factory installed Dual Voltage Evaporator Transformer.

E --- Factory installed Dual Voltage Modular Transformer.

F --- Provision for Dual Voltage Modular Transformer.

G --- Factory installed CTD Everfresh Controlled Atmosphere option.

H --- Factory installed Transfresh Controlled Atmosphere option.

I

--- Provision for Transfresh Controlled Atmosphere option.

J --- Provision for Communications Interface Module (RMU).

X --- Features that apply to model.

Downloaded from 

ManualsNet.com

 search engine

Содержание 69NT40-489

Страница 1: ...Model 69NT40 489 T 259 Rev F Downloaded from ManualsNet com search engine ...

Страница 2: ...sion Carrier Corporation P O Box 4805 Syracuse N Y 13221 SERVICE MANUAL OPERATION AND Carrier Corporation 1995 D Printed in U S A 1195 CONTAINER REFRIGERATION UNIT MODEL 69NT40 489 Downloaded from ManualsNet com search engine ...

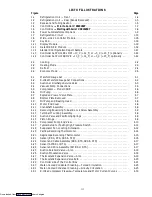
Страница 3: ...mory Cards 1 33 1 14 3 Functions 1 33 1 14 4 Status LED s 1 35 1 14 5 DataCORDER Function Codes 1 35 1 14 6 DataCORDER Alarm Codes 1 36 1 14 7 USDA Message Trip Comment 1 37 1 14 8 USDA Recording 1 37 1 14 9 Pre Trip Data Recording 1 38 1 14 10 DataCORDER Communications 1 39 1 15 USDA Cold Treatment Procedure 1 39 1 16 Humidity Control Optional 1 40 1 17 Nitrogen Feed Optional 1 40 2 OPERATION 2 1...

Страница 4: ... 4 12 Filter Drier 4 11 4 13 High Pressure Switch 4 11 4 13 1 Replacing High Pressure Switch 4 11 4 13 2 Checking High Pressure Switch 4 12 4 14 Evaporator Coil and Heater Assembly 4 12 4 15 Evaporator Fan and Motor Assembly 4 12 4 16 Evaporator Coil Heaters 4 13 4 17 Condenser Coil 4 13 4 18 Condenser Fan and Motor Assembly 4 13 4 19 Recording Thermometer Partlow 4 13 4 20 Recording Thermometer S...

Страница 5: ...ate 4 7 4 8 Bottom Plate Removed 4 7 4 9 Oil Pump and Bearing Head 4 8 4 10 Motor End Cover 4 8 4 11 Crankshaft Assembly 4 8 4 12 Removing Equalizing Tube and Lock Screw Assembly 4 9 4 13 Terminal Mounting Assembly 4 9 4 14 Suction Valve and Positioning Springs 4 9 4 15 Piston Rings 4 9 4 16 Compressor Pump End View 4 10 4 17 Typical Setup for Testing High Pressure Switch 4 12 4 18 Evaporator Fan ...

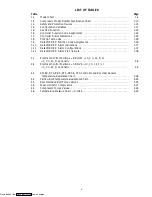
Страница 6: ... 489 67 489 70 489 71 Model 69NT40 489 13 Starting with Serial 90234597 5 36 5 19 Electrical Schematic Model 69NT40 489 26 489 52 489 60 Model 69NT40 489 1 Starting with Serial 90234597 5 38 5 20 Electrical Wiring Diagram Model 69NT40 489 26 489 52 489 60 Model 69NT40 489 1 Starting with Serial 90234597 5 40 5 21 Electrical Schematic Model 69NT40 489 3 Starting with Serial 90234597 5 42 5 22 Elect...

Страница 7: ...ons 1 37 1 11 DataCORDER Alarm Configurations 1 37 1 12 DataCORDER Alarm Pre Trip Data 1 38 2 1 Electrical Control Positions BELOW 10_C 14_F or 5_C 23_F optionally 2 6 2 2 Electrical Control Positions ABOVE 10_C 14_F or 5_C 23_F optionally 2 6 4 1 AMBS DTS RRS RTS SRS STS Controller and Recorder Sensors Temperature Resistance Chart 4 26 4 2 Partlow Bulb Temperature Resistance Chart 4 26 4 3 Recomm...

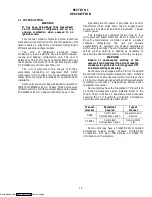
Страница 8: ...ol power The temperature controller Micro Link 2 is a microprocessor based controller Refer to section 1 12 Once the temperature controller is set at a desired container temperature the unit will operate automatically to maintain the desired temperature within very close limits The control system automatically selects cooling holding or heating as necessary to maintain the desired temperature with...

Страница 9: ...11 5 5 2 A C X X 69NT40 489 17 1250 567 11 5 5 2 A B X X X 69NT40 489 18 1385 628 11 5 5 2 A C X X 69NT40 489 19 1330 603 11 5 5 2 X D X X X X 69NT40 489 20E 1550 703 11 5 5 2 X C X X X G 69NT40 489 20M 1550 703 11 5 5 2 X X X X X G 69NT40 489 21 1385 628 11 5 5 2 C X X 69NT40 489 22 1550 703 11 5 5 2 X C X X X G 69NT40 489 23 1250 567 11 5 5 2 A B X X 69NT40 489 25 1230 567 11 5 5 2 A B X X 69NT4...

Страница 10: ... J 69NT40 489 81 1385 628 11 5 5 2 A E X X 69NT40 489 83 1385 628 11 5 5 2 A B X X 69NT40 489 84 1385 628 11 5 5 2 A E X X A Provision for USDA Cold Treatment B Provision for Dual Voltage Integral Transformer C Factory installed Dual Voltage Integral Transformer D Factory installed Dual Voltage Evaporator Transformer E Factory installed Dual Voltage Modular Transformer F Provision for Dual Voltage...

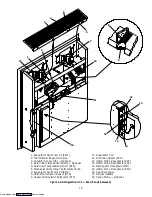
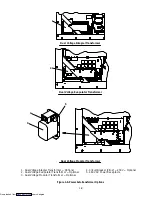
Страница 11: ...Service Valve 7 High Pressure Switch HPS 8 Compressor Sight Glass View Port 9 Serial Model No Plate 10 Power Cable s and Plug s 11 Condenser Fan Motor CM 12 Interrogator Connector 13 Fresh Air Makeup Vent 14 Mechanical Recording Thermometer Optional 15 TIR Sealing Provisions 16 Access Panel Evap Fan Motor 2 Figure 1 1 Refrigeration Unit Front 5 13 14 15 Downloaded from ManualsNet com search engine...

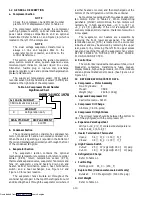
Страница 12: ...EM2 8 Defrost Termination Sensor DTS 9 Heater Termination Thermostat HTT 10 Evaporator Coil 11 Drain Pan Heater DPH 12 USDA Probe Receptacle PR3 13 USDA Probe Receptacle PR1 14 Interrogator Receptacle ICR 15 USDA Probe Receptacle PR2 16 Heat Exchanger 17 Defrost Heaters 18 Cargo Probe Optional 1 3 4 5 6 7 8 9 10 11 12 13 14 15 16 17 2 18 Figure 1 2 Refrigeration Unit Rear Panels Removed Downloaded...

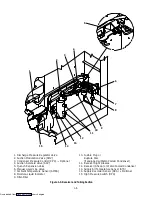
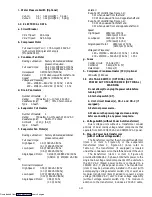
Страница 13: ... Sensor AMBS 8 Moisture Liquid Indicator 9 Filter Drier 10 Fusible Plug or Rupture Disc if equipped w Water Cooled Condenser 11 Receiver Sight Glasses 12 Receiver Shown or Water Cooled Condenser 13 Supply Air Temperature Sensor STS 14 Supply Recorder Sensor SRS Optional 15 High Pressure Switch HPS 15 1 2 3 4 5 6 7 8 9 10 11 12 13 14 Figure 1 3 Receiver and Tubing Section Downloaded from ManualsNet...

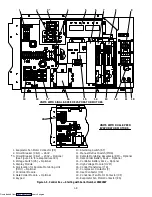
Страница 14: ... Optional 10 Keypad 11 Start Stop Switch ST 12 Manual Defrost Switch MDS 13 Remote Monitoring Receptacle RM Optional 14 DataCorder Battery Pack Optional 15 Controller Battery Pack Optional 16 High Voltage Module HVM 17 Control Transformer TR 18 Compressor Contactor C 19 Condenser Fan Motor Contactor CF 20 Evaporator Fan Motor Contactor ES 8 9 10 14 15 UNITS WITH SINGLE SPEED EVAPORATOR MOTORS UNIT...

Страница 15: ...ost Switch MDS 12 Remote Monitoring Receptacle RM Optional 13 DataCorder Battery Pack Optional 14 Controller Battery Pack Optional 15 High Voltage Module HVM 16 Control Transformer TR 17 Compressor Contactor C 18 Heat Contactor HR 19 Condenser Fan Motor Contactor CF 20 Evaporator Fan Motor Contactor ES UNITS WITH SINGLE SPEED EVAPORATOR MOTORS UNITS WITH DUAL SPEED EVAPORATOR MOTORS 20 19 18 17 16...

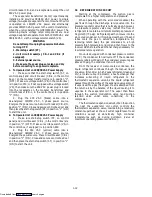
Страница 16: ...al Voltage Modular Transformer Optional 4 Circuit Breaker CB 2 230V Optional 5 460 VAC Power Receptacle Dual Voltage Integral Transformer Dual Voltage Evaporator Transformer Dual Voltage Modular Transformer 1 2 3 4 5 Figure 1 6 Power Autotransformer Options Downloaded from ManualsNet com search engine ...

Страница 17: ...or fans circulate air throughout the container by pulling air in thetop ofthe refrigerationunit and directing the air through the evaporator coil where it is either heated or cooled and then discharged out the bottom of the refrigeration unit into the container Some units are equipped with two speed evaporator fan motors Refer to Table 1 1 When transporting perishable chilled commodities the fan m...

Страница 18: ...rpm 50 hz 3450 rpm 60 hz Low Speed 1425 rpm 50 hz 1750 rpm 60 hz Single Speed Motor 2850 rpm 50 hz 3450 rpm 60 hz Voltage and Frequency 180 230 360 460 VAC 50 hz 1 25 hz 200 250 400 500 VAC 60 hz 1 5 hz g Fuses Control Circuit 15 Amps F3 Controller 5 Amps F1 F2 DataCorder 3 Amps F h Compressor Crankcase Heater CCH Optional 180 watts 460 vac 1 5 VOLTAGE SWITCH OPTIONAL AND POWER AUTOTRANSFORMER OPT...

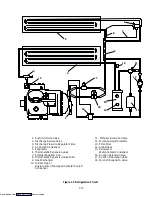
Страница 19: ... in position 1 ON Close and secure control box door and then place the start stop switch ST in position 1 ON to start the unit 1 6 REFRIGERATION CIRCUIT Starting at the compressor the suction gas is compressed to a higher temperature and pressure When operating with the air cooled condenser the gas flows through the discharge service valve into the pressure regulator valve that is normally open ho...

Страница 20: ...ulb 9 Heat Exchanger 10 Fusible Plug or Rupture Disc if equipped w Water Cooled Condenser 11 Manual Liquid Line Valve 12 Moisture Liquid Indicator 13 Filter Drier 14 Sight Glass 15 Receiver or Water Cooled Condenser 16 Suction Solenoid Valve 17 Suction Modulation Valve 18 Quench Expansion Valve 1 2 3 4 5 6 7 8 9 11 12 13 14 15 16 17 18 10 Figure 1 7 Refrigeration Circuit Downloaded from ManualsNet...

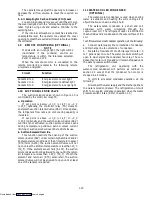
Страница 21: ...fety and protective devices listed in Table 1 3 These devices monitor the unit operating conditions and open a set of electrical contacts when an unsafe condition occurs Open safety switch contacts of one or more of the following devices IP CP HPS or IP Trans Auto will shut down the compressor Opensafety switchcontactsof deviceIP CM willshut down the condenser fan motor The entire refrigeration un...

Страница 22: ...ing of the suction solenoid valve SSV under certain high ambient and or box temperature conditions If the primary return sensor RTS fails AL56 the suction solenoid valve will not open unless the ambient temperature is less than 10_C 50_F If the ambient sensor fails AL57 the suction solenoid valve will not be allowed to open until the return air temperature is less than 1 67_C 35_F If both the ambi...

Страница 23: ...er alarm digital display identification refer to Table 1 7 e Provide a pre trip step by stepcheckout ofrefrigera tion unit performance proper component operation proper electronic and refrigeration control operation proper heater operation probe calibration and current limiting Refer to section 1 13 f Provide the ability to select or change Codes 27 to 37 and set point without AC power being hooke...

Страница 24: ...ion TITLE Default Option 1 Bypass Valve Enable In Out 2 Evaporator Fan Speed SS Single dS Dual 3 Tri Sensor dUAL tHrEE 4 Dehumidification Mode On Off 5 Probe Calibration noCal CAL 6 Condenser Fan Speed Select Off Single On Variable 7 Unit Selection 20FT 40FT 45FT 40ft 20ft 45 8 Single Phase Three Phase Motor 1Ph 3Ph 9 Refrigerant Selection r22 r12 r134a bLEnd 10 Advanced Pre Trip P Advanced none 1...

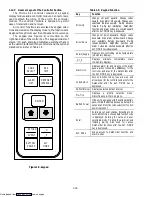
Страница 25: ...d Change codes downward Scan alarm list downward Change user selectable features downward Pre trip repeat backward DataCorder Function and Alarm Codes are scrolled downward after the ALT MODE key is depressed Return Supply Displays non controlling probe temperature momentary display _C _F Displays alternate temperature scale momentary display Alarm List Displays alarm list and clearing of the alar...

Страница 26: ...4 can be changed for set points of either 10_C 14_F or 5_C 23_F optionally NOTE When upward set point changes are made the compressor is immediately cycled through a reliability enhancement algorithm SMV is cycled between 70 to 0 to remove any refrigerant trapped in the oil This also happens when Current Limiting is first initiated at the start of P6 0 and P6 4 during Pre Trip For upward set point...

Страница 27: ...r is condensed from the air passing through the coil Removing waterfrom theair reducesthe relativehu midity When the relative humidity sensed is 2 below the set point Code 33 the controller de energizes the heat relay Thus the controller will continue to cycle heating to maintain relative humidity below the selected set point Two timers are provided in the Dehumidification mode to prevent rapid mo...

Страница 28: ...perate at full capacity which means both the suction modulation SMV and suction solenoid SSV valves are fully open unless suction solenoid override or current limiting is activated See section 1 10 for explanation of suction solenoid override To prevent on off cycling of the compressor from occurring a 3 minute compressor off time must be satisfied before the compressor will restart Under a condit...

Страница 29: ...ettings and current tables are used When the sensor is invalid the most recent valid reading is used to determine what current limit settings and current tables should be used The current limit settings and current tables will continueto bedetermined in this way until the sensor becomes valid Code 08 Mains Power Frequency The value of the main power frequency is displayed in hertz The frequency di...

Страница 30: ...mination See Figure 1 2 NOTE The following are user selectable functions The operator can change the value of these functions to meet the operational needs of the container Code 27 Defrost Interval Hours The defrost interval is the time interval between defrost cycles of which there are 5 possible selectable values 3 6 9 12 or 24 hours The factory default value is 3 hours The time interval of the ...

Страница 31: ... respiring items which donot require highairflow forremoving respirationheat Code 35 Bulb Mode Select Optional Bulb mode is a user selectable mode of operation that is an extension of normal dehumidification If dehumidification is set to Off code Cd35 will display Nor and the user will be unable to change it After a dehumidification set point has been selected andentered for code Cd33 the user may...

Страница 32: ...rm will disable all control units until the motor protector resets Also refer to code Cd29 Alarm 23 Auto Transformer Safety Optional Alarm 23 is triggered by the auto transformer internal protectoropening andwill result in thedisabling of all control units except the evaporator fans The alarm will stay active until the transformer protector resets On units with dual voltage evaporator transformer ...

Страница 33: ...utside the range of 50 to 70_C 58_F to 158_F If Alarm 55 is set and the secondary supply is the control sensor the the primary return sensor will be used for control Alarm 56 Primary Return Air Sensor Failure Alarm 56 is set by an invalid primary return sensor reading that is outside the range of 50 to 70_C 58_F to 158_F If Alarm 56 is set and the primary return is the control sensor the primary s...

Страница 34: ...ption is in the Pre Trip mode NOTE The left display of the Refrigeration Controller will alternately display P CA and set point for units with the CTD Controlled Atmosphere CA option refer to Table 1 1 1 13 PRE TRIP DIAGNOSTICS NOTE The Refrigeration Controller will be locked out of Pre Trip if the CTD Controlled Atmosphere CA option refer to Table 1 1 is in either the Vent or Pre Trip mode CAUTIO...

Страница 35: ... default display and normal operating mode Any test may be interrupted by pressing the UP ARROW This will return the user to the test selection mode described above and all machinery outputs will be de energized While given tests from Auto 1 are running PX X will be on the left display where the X s indicate the test number and sub test The right display will show a countdown time in minutes and s...

Страница 36: ...orator fan as determined by the Evaporator Fan speed select configuration variable P3 0 Low Speed Evaporator Fan On Test Setup The low speed Evaporator Fan is turned on a current draw test is done after sixty 60 seconds Pass Fail Criteria Passes if change in current draw is in the range specified P3 1 Low Speed Evaporator Fan Off Test Setup The low speed Evaporator Fan is turned off a current draw...

Страница 37: ...ss than or equal to ambient temperature plus 5_C 41_F D Condenser pressure transducer CPT or discharge pressure sensor DPT pressure exceeds 27 42 kg cm2 390 psig P7 1 High Pressure Switch Close Test Requirements Test P7 0 must pass for this test to execute Setup The condenser fan is started and a 60 second timer is started Pass Fail Criteria If the high pressure switch closes within the 60 second ...

Страница 38: ...est fails the display will read P100 FAIL P10 1 Frozen Mode Pull Down Test Setup When the container temperature is greater than or equal to the 45_F set point which was set in the frozen mode heat test the left display will read P101 theright display will showthe returnair temperature and the set point will then be changed to 17 7_C 0_F The unit will then have a maximum of 3 hours to pull the cont...

Страница 39: ... with other modules such as the Temperature Con troller CTD Controlled Atmosphere CA Controller etc b Log data at 15 30 60 or 120 minute intervals c Record DataCorder alarms and display through theTemperatureControllerdigital display identification Refer to Table 1 10 d Store at least one years worth of data based on continuous unit operation at factory default settings Factory default settings ar...

Страница 40: ...aCorder will support the download of code via a memory card using the software port See Figure 1 11 b Keypad Display Interface The DataCorder uses the controller module display and keypad The display formats and data are read from the DataCorder asthey areneeded Dynamicdata isread from the DataCorder once every second Data to be written to the DataCorder is sent oncethe editingsession is complete ...

Страница 41: ...ration software card h Data Recording Mode The DataCorder recording mode is labeled as Standard To examine an example of a report using a standard configuration see Figure 1 12 Generic Mode The generic recording mode is used for special applications i e CTD Controlled Atmosphere option Standard Mode The standard recording mode allows the user to configure the DataCorder to monitor data using one o...

Страница 42: ...order powers up properly then this LED will indicate an active alarm condition that has been detected The alarm LED should turn on when an active alarm is detected and be off when the alarm goes inactive CODE TEST 1 Data Memory Test 2 Program Memory Test 3 Watchdog Timer Test 4 Timer Test 5 Programmable Timers Test 6 Analog to Digital Converter Test If an alarm occurs then the LED will beon solidu...

Страница 43: ...red dC 30 Date of last Trip start dC 31 Battery Test dC 32 Time Hour Minute dC 33 Date Month Day dC 34 Date Year dC 35 Cargo Probe Calibration Value 1 14 6 DataCorder Alarm Codes The Alarm List Display Mode is entered by pressing the ALT MODE ALARM LIST keys whilein Set Point Selection or Default Display mode The user will be able to display any alarms archived in the Alarm Queue If no alarms othe...

Страница 44: ...igured for USDA recording however do not wish to install the probes for every trip If a probe alarm is configured to be On then its associated alarm is always enabled This means that as long as the probe remains in circuit plugged in the alarm willnot beactivated Probeswith thisconfiguration have alarms that act like the alarms for the supply and return recorder sensors It is presumed that normal ...

Страница 45: ...Result Change in currents for Phase A B and C 5 0 Supply Return Probe Test Pass Fail Skip Result STS RTS 5 1 Primary Secondary Supply Probe Test Pass Fail Skip Result STS Secondary STS 6 0 Compressor On Pass Fail Skip Result Change in currents for Phase A B and C 6 2 Suction Modulation Valve Open Pass Fail Skip Result STS RTS Is current limit in effect Y N 6 4 Suction Modulation Valve Closed Pass ...

Страница 46: ... DataCorder memory and thus meet USDA criteria refer to section 1 14 8 The following is a summary of the steps required to initiate a USDA Cold Treatment a Pre cool the container to the treatment temperature or below b The product should be pre cooled to treatment temperature c Install the DataCorder module battery pack d Probe calibration is achieved by ice bathing the three USDA probes and perfo...

Страница 47: ...ve 10_C 14_F or 5_C 23_F optionally 5 Container relative humidity is above 2 of code Cd33 setting If all 5 factors are met the humidity control circuit energizes the heaters and heat light b For testing purposes WARNING Beware of rotating evaporator fan when conducting following test 1 Set the controller set pointer within 2_C 3 6_F of container supply air temperature 2 Change the set point of cod...

Страница 48: ...larms Reported USDA SUMMARY LEGEND DATE 15Apr94 23 49 Trip Start SP Setpoint Change PS PE Pretrip Start End NEW SN Controller Rep dal DataCorder Alm NEW SW Software Upgrade DS Defrost Start DHS DHE Dehumid Start End NEW ID Container ID OFF Power Loss COMM NetWork Off DE Defrost End AL Alarm Activity TS Trip Start BATT Power Loss Setp SupAir RetAir Figure 1 12 Standard Configuration Report Sample D...

Страница 49: ...3 Controller Set Point BELOW 10_C 14_F or 5_C 23_F optionally SET POINT FALLING TEMPERATURE RISING TEMPERATURE 1 5_C 2 7_F 1_C 1 8_F 0 5_C 0 9_F 0 20_C 20_C 1 5_C 2 7_F 1_C 1 8_F 0 5_C 0 9_F HEATING HEATING MODULATING COOLING AIR CIRCULATION ONLY AIR CIRCULATION ONLY MODULATING COOLING NOTE For In range Tolerance Refer to section 1 12 5 Code 30 For Economy Mode refer to section 2 4 5 Figure 1 14 C...

Страница 50: ...ounterclockwise until stylus lifter locks in position and stylus has made contact with chart Then close door f Open control box door Check for loose electrical connections or hardware g Check color of moisture liquid indicator h Check oil level in compressor sight glass i Start refrigeration unit Refer to section 2 3 2 2 STARTING AND STOPPING INSTRUCTIONS CAUTION Make sure that the unit circuit br...

Страница 51: ...etting the controller above 10_C 14_F or 5_C 23_F optionally on units with two speed motors will place the motors in high speed Contactor EF energized a Cooling See Figure 2 1 With decreasing supply air temperature and if the supply air is above set point the unit will be cooling with the condenser fan motor compressor motor and evaporator fan motors energized Also at this time the cool light is i...

Страница 52: ... controller set point is above 10_C 14_F or 5_C 23_F optionally as relay TH is electronically locked out to prevent heating when the controller set point is below 10_C 14_F or 5_C 23_F optionally If the air temperature decreases 0 5_C 0 9_F below controller set point TH closes and the system enters the heating mode which is designed to raise the container air temperature When TH closes power flows...

Страница 53: ...2 4 CONTROL TRANSFORMER 18 Volt Energized Circuit 24 Volt Energized Circuit De energized Circuit Figure 2 2 Heating Mode Downloaded from ManualsNet com search engine ...

Страница 54: ...ermination sensor DTS causes the controller to interrupt the defrost cycle and the unit returns to its normal function NOTE Defrost will be terminated if the Controlled Atmosphere CA option Pre Trip mode is initiated Defrost will be locked out if CA is in Pre Trip The 54 5_C 130_F heat termination thermostat HTT will open the circuit if the defrost mode does not terminateat 25 6_C 78_F Thecontroll...

Страница 55: ...t up to 1 30 amps at full modulation During this cooling mode a running sum of the temperature differential supply air temperature set point is kept When the supply air falls below set point thedifferentialisnegative The longersupply airremains below set point the more negative the running sum becomes When the supply air temperature decreases to 0 2_C below set point and the running sum is less th...

Страница 56: ... 10_C 14_F or the optional setting of 5_C 23_F Table 2 2 Electrical Control Positions ABOVE 10_C 14_F or 5_C 23_F optionally CONTROL CIRCUIT COOLING HOLDING ZONE Dehumidification HEATING DEFROST Compressor Contactor C Energized De energized Energized De energized De energized Condenser Fan Motor Contactor CF Energized De energized Energized De energized De energized Single Speed Evaporator Motor R...

Страница 57: ...rounded motor windings 4 7 Compressor seized 4 7 Voltage switch VS not wired properly Check 3 2 UNIT RUNS BUT HAS INSUFFICIENT COOLING Compressor Compressor valves defective 4 7 Refrigeration System Abnormal pressures 3 7 Temperature controller malfunction 3 9 Evaporator fan or motor defective 4 15 Suction modulation valve malfunction 4 25 Suction solenoid valve malfunction 1 10 4 24 3 3 UNIT OPER...

Страница 58: ...n 3 9 Defective wiring Replace Loose terminal connections Tighten Low line voltage 1 5 3 5 UNIT WILL NOT TERMINATE HEATING Unit fails to stop Temperature controller improperly set Reset heating Temperature controller malfunction 3 9 Heater termination switch remains closed along with the heat relay 4 14 3 6 UNIT WILL NOT DEFROST PROPERLY Will not initiate Defrost timer malfunction 1 12 5 defrost a...

Страница 59: ...s Heat exchanger defective Replace tend to equalize when unit Compressor valves defective 4 8 is operating Compressor cycling stopped Check 3 8 ABNORMAL NOISE OR VIBRATIONS Compressor Loose mounting bolts Tighten Worn bearings 4 7 Worn or broken valves 4 7 Liquid slugging 3 11 Insufficient oil 4 10 Condenser or Bent loose or striking venturi Check Evaporator Fan Worn motor bearings 4 15 4 18 Bent ...

Страница 60: ... compressor held open by foreign material 4 26 Fluctuating suction Improper bulb location or installation 4 26 pressure Low superheat setting 4 26 c 3 12 POWER AUTOTRANSFORMER MALFUNCTION Unit will not start Circuit breaker CB 2 tripped Check Power transformer internal protector open 4 22 Power transformer defective 4 22 Power source not turned ON Check 3 13 EVAPORATOR MOTOR TRANSFORMER MALFUNCTIO...

Страница 61: ...ir it will need to be evacuated to remove contaminants and air as follows a Midseat both hand valves b Connect the utility hose yellow to a vacuum pump c Evacuate to 10 inches of vacuum d Charge with R 134a to a slightly positive pressure of 0 1 kg cm 1 0 psig e The gauge set is now ready for use 2 Connect the high side field service coupling backseated to the discharge service valve port or the m...

Страница 62: ... Coupling 6 Low Side Field Service Coupling 7 High Side Service Port SAE J639 Male 8 Low Side Service Port SAE J639 Male 7 7 8 1 2 3 4 5 6 To Suction Service Port To Discharge Service or Manual Liquid Line Ports 2 2 2 3 3 4 Red Hose Yellow Hose Blue Hose Red Knob Blue Knob 8 Figure 4 2 R 134a Manifold Gauge Set Connection Downloaded from ManualsNet com search engine ...

Страница 63: ...The unit may need to be cycled several times to achive this reading 3 Frontseat close the suction service valve and the refrigerant will be trapped between the compressor suction service valve and the liquid line valve 4 Before opening up any part of the system a slight positive pressure should be indicated on the pressure gauge If a vacuum is indicated emit refrigerant by cracking the liquid line...

Страница 64: ...The correct amount of refrigerant may be added by observing the scales Refer to section 4 6 4 6 REFRIGERANT CHARGE 4 6 1 Checking the Refrigerant Charge NOTES 1 Set the controller set point to 25_C 13_F to ensure that the suction modulation valve is fully open when checking operation of unit 2 The refrigerant level should only be checked when the unit is running with the suction modulation valve f...

Страница 65: ...cap d Connect charging line between suction service valve port and cylinder of refrigerant 134a Open VAPOR valve e Partially frontseat turn clockwise the suction service valve and slowly add charge until the refrigerant appears at the proper level refer to section 4 6 1 Downloaded from ManualsNet com search engine ...

Страница 66: ...and Valve 5 Vacuum Pump 6 Electronic Vacuum Gauge 7 Manual Liquid Line Valve 8 Condenser Coil 9 Suction Service Valve 10 Compressor 11 Discharge Service Valve 12 Evaporator Coil 1 2 5 6 12 11 10 8 7 9 4 4 3 4 Figure 4 4 Vacuum Pump Connections Downloaded from ManualsNet com search engine ...

Страница 67: ...eplacement compressor 4 Check oil level in service replacement compressor Refer to sections 1 3 and 4 10 5 A compressor terminal wiring kit must be ordered as a separate item when ordering replacement compressor Appropriate installation instructions are included with kit 6 Refer to Table 4 4 and Table 4 5 for applicable compressor wear limits and torque values 7 Refer to Figure 4 32 for charts on ...

Страница 68: ...r end more quickly Some units do not have this plug b Remove cylinder head capscrews If the cylinder head is stuck tap the center of the cylinder head with a wooden or lead mallet DO NOT STRIKE THE SIDE OF THE CYLINDER HEAD Becareful not to dropthe head or damage the gasket sealing surface See Figure 4 5 and Figure 4 7 Remove cylinder head gasket c Free the valve plate from the cylinder deck by us...

Страница 69: ...s not easily removed replace the strainer Install newgaskets uponreassembly i Block the compressor crankshaft so that it cannot turn Use a screw driver to bend back the tabs on the lockwasher and remove the equalizer tube See Figure 4 12 The slinger at the end of the shaft draws vapor from the crankcase It may discharge through a tee or a single equalizer tube 1 2 3 4 5 6 7 1 Valve Capscrew 2 Suct...

Страница 70: ...charge Valves If the valve seats look damaged or worn replace valve plate assembly Always use new valves because it is difficult to reinstall used discharge valves so that they will seat as before removal Any valve wear will cause leakage for this reason Suction valves are positioned by dowel pins see Figure 4 14 and will assume their original position when reinstalled No two valves are likely to ...

Страница 71: ... crankcase The pump should mount flush with the crankcase and should be oriented as shown in Figure 4 16 c Align the gasket and install the eight capscrews inthe mounting flange Refer to Table 4 5 for applicable torque values 3 Install rotor with key Screw on equalizer tube and lock screw assembly with lock washer and bend over tabs of lock washer Assemble suction strainer to motor and cover and b...

Страница 72: ...6DR Compressor 1 If the oil level recorded in step a 3 is above 1 8 of the sight glass oil must be removed from the compressor 2 Close frontseat suction service valve and pump unit down to 1 2 to 1 3 kg cm 2 to 4 psig Frontseat discharge service valve and slowly bleed remaining refrigerant 3 Remove the oil drain plug on the bottom plate of the compressor and drain the proper amount of oil from the...

Страница 73: ...similar cleaner following manufacturer s instructions The two drain pan hoses connected to the drain pan are routed behind the condenser fan motor and compressor Thedrainpan line s must beopen toensure adequate drainage To Replace Evaporator Coil a Pump unit down See Figure 1 3 refer to section 4 3 b With power OFF and power plug removed remove the screws securing the panel covering the evaporator...

Страница 74: ...with a coat of Tectyl before installing in unit The condenser fan rotates counterclockwise viewed from front of unit and pulls air through the the condenser coil and discharges horizontally through the front of the unit a Open condenser fan screen guard b Loosen square head set screws 2 on fan Thread sealer has been applied to set screws at installation Then disconnect wiring from motor junction b...

Страница 75: ... the temperature indicated by the thermometer differs from 0_C 32_F by more than 0 6_C 1_F when compressor cycles off rezeroing must be performed Unit Off Place the recording thermometer element sensing bulb in 0_C 32_F ice water bath Ice water bath is prepared by filling an insulated container of sufficient size to completely immerse bulb with ice cubes or chipped ice then filling voids between i...

Страница 76: ... zone b Calibration 1 Install new chart on platen 2 Place recorder bulb in ice bath 0 0 2_C 32 0 35_F Remove rear upper panel to remove bulb Leave bulb immersed in ice bath for 10 minutes 3 After 10 minutes rotate the chart by hand and check the stylus indicated temperature Do not touch stylus during the checkout procedure 4 If adjustment is required loosen setscrew cross recessed head Using a 7 m...

Страница 77: ... voltage selector switch The transformer is defective if voltage is not available 4 23 SENSOR CHECKOUT PROCEDURE AMBS DTS RRS RTS SRS STS An accurate ohmmeter must be used to check the resistance values shown in Table 4 1 Due to the variations and inaccuracies in ohmmeters thermometers or other test equipment a reading within 2 of the chart value would indicate a good sensor If a sensor is defecti...

Страница 78: ...ive sensor and discard c Cut one wire of the remaining two wires from step b above 25 4 mm 1 0 inch shorter than the other wire d Cut one replacement sensor wire back 25 4 mm 1 0 inch See Figure 4 23 e Strip back insulation on all wiring 6 35mm 1 4 inch Sensor 25 4 mm 1 0 inch 6 35mm 1 4 inch Mounting Stud Figure 4 23 Sensor AMBS or DTS f Slide two small pieces of heat shrink tubing overeach wire ...

Страница 79: ...tion modulation valve with theenclosing tubekit CTDP N 14 50021 01 be sure not to remove items 7 8 10 See Figure 4 26 Proper alignment of these items is achieved only at the factory 1 2 3 4 5 6 7 8 9 10 11 1 Coil Nut 2 Coil Nut O ring 3 Coil Housing 4 Solenoid Coil Sleeve 5 Solenoid Coil 6 Enclosing Tube Assy 7 Piston 8 Top Return Spring 9 Valve Body 10 Bottom Return Spring 11 Filter Figure 4 26 S...

Страница 80: ...ss capillary tube is secured to the power head assembly and wrapped with Presstite 2 Make sure that the thermal bulb is tightly secured to the suction line and wrapped with Presstite a Removing Expansion Valve See Figure 4 27 6 2 5 3 7 1 4 1 Power Assembly 2 Body Flange Gaskets 3 Seat Gasket 4 Bulb 5 Cage Assembly 6 Body Flange 7 Body Flange Screws Figure 4 27 Thermostatic Expansion Valve Alco 1 P...

Страница 81: ...should cause the motor to run in low speed 2 Motor running in wrong direction after checking for correct wiring application b Removing the capacitor WARNING Make sure power to the unit is OFF and power plug disconnected before removing capacitor s 1 The capacitor located on the motor and above theevaporator fandeck may be removedby twomethods a If container is empty open upper rear panel of the un...

Страница 82: ...ler Module Removal 1 Disconnect all front wire harness connectors MA MB MC KA KB and move wiring out of way 2 Loosen one mountig screw see Figure 4 29 item 1 and pull out the top of the Controller module item2 then lift up and out 3 Turning the module around wiil give access to the two back connectors EC which the user can now disconnect Remove module 4 Remove the new Controller module from its pa...

Страница 83: ...ective card is being used the Display will blink the message bAd CArd Turn start stop switch OFF and remove the card e Press the ENTER key on the keypad f The Display will show the message Pro SoFt This message will last for up to one minute g The Display module will read 1 When the software loading has successfully completed the Display will show the message Pro donE 2 If a problem occurs while l...

Страница 84: ...ile loading the software the FAIL LED will turn on Turn start stop switch OFF and remove the card f Turn unit OFF via start stop switch ST g Remove the programming card from the programming software port h Turn unit ON via start stop switch ST 4 28 3 Controller Trouble Shooting A group of test points tp is provided on the Controller see Figure 4 29 item 3 for trouble shooting electrical circuits r...

Страница 85: ...No 32 is being used for the first time the local Oakite Technical Service representative should be called in for their suggestions in planning the procedure They will show you how to do the work with a minimum dismantling of equipment how to estimate the time and amount of compound required how to prepare the solution how to control and conclude the de scaling operation by rinsing and neutralizing...

Страница 86: ...ive As scale is being dissolved titrate readings will indicate that the Oakite No 32 solution is losing strength When the reading remains constant for a reasonable time this is an indication that scale has been dissolved 8 When de scaling is complete drain the solution and flush thoroughly with water 9 Next circulate a 56 7 gram 2 ounce per 3 785 liter 1 U S gallon solution of Oakite No 22 thru th...

Страница 87: ...4 00 65 18 3 1348 72 75 23 9 1050 14 80 26 7 929 87 85 29 4 825 21 90 32 2 733 93 95 35 0 654 12 100 37 8 584 19 105 40 6 522 79 Table 4 3 Recommended Bolt Torque Values BOLT DIA THREADS TORQUE MKG FREE SPINNING 4 6 8 10 1 4 5 16 3 8 7 16 1 2 9 16 5 8 3 4 40 32 32 24 20 18 16 14 13 12 11 10 5 2 in lbs 9 6 in lbs 20 in lbs 23 in lbs 75 in lbs 11 ft lbs 20 ft lbs 31 ft lbs 43 ft lbs 57 ft lbs 92 ft ...

Страница 88: ...aring Journal Diameter 1 3735 34 8869 0020 0 0508 CONNECTING ROD 1 3768 34 9707 0020 0 0508 Piston Pin Bearing 0 6878 17 4701 0010 0 0254 CRANKPIN DIAMETER 1 3735 34 8869 0025 0 0635 Throw 1 072 27 2288 1 070 27 1780 THRUST WASHER Thickness 0 154 3 9116 0 1520 03 8608 0250 0 6350 CYLINDERS Bore 2 0010 50 8254 0020 0 0508 Piston Diameter 1 9860 50 4444 0020 0 0508 Piston Pin Diameter 0 6873 17 4574...

Страница 89: ... Oil Pump Drive Segment 12 16 1 66 2 21 Unloader Valve Cover Plate Plate End 16 20 2 21 2 77 Bearing Head 5 16 18 16 20 2 21 2 77 Terminal Block Cap Screws 5 16 18 20 30 2 77 4 15 Suction Valve 20 30 2 77 4 15 Discharge Valve Pump End Bearing Head 3 8 16 40 50 5 53 6 92 Bottom Plate Crankcase Compressor Foot 3 8 16 40 50 5 53 6 92 Cylinder Head 7 16 14 55 60 7 61 8 30 Motor End Cover Crankcase 5 8...

Страница 90: ... 18 64 1 4 51 4 42 6 21 3 7 26 26 70 21 71 1 5 00 4 90 4 20 4 6 32 32 75 24 78 7 5 53 5 43 2 19 5 6 39 39 80 27 86 7 6 10 5 98 0 18 6 5 46 45 85 29 95 3 6 70 6 57 2 17 7 6 53 52 90 32 104 3 7 33 7 19 4 16 8 6 60 59 95 35 114 0 8 01 7 86 6 14 9 7 68 67 100 38 124 2 8 73 8 56 8 13 10 8 76 74 105 41 135 0 9 49 9 31 10 12 12 0 84 83 110 43 146 4 10 29 10 09 12 11 13 2 93 91 115 46 158 4 11 14 10 92 14...

Страница 91: ...43 3 37 8 32 2 26 7 21 1 15 6 _F _C _F Bar Bar 5 5 6 9 8 3 9 7 11 0 12 4 13 8 15 2 16 6 19 3 20 7 22 0 97 83 69 55 41 28 14 0 14 28 41 35_F 1 7_C Box SSV closed 35_F 1 7_C Box SSV closed 0_F 17 8_C Box SSV open 35_F 1 7_C Box SSV closed 0_F 17 8_C Box SSV open _F 48 9 43 3 37 8 32 2 26 7 21 1 15 6 _C 48 9 43 3 37 8 32 2 26 7 21 1 15 6 _C Ambient Air Temperature psig 48 9 43 3 37 8 32 2 26 7 21 1 1...

Страница 92: ... the unit is OFF and power plug disconnected before replacing the compressor WARNING Before disassembly of the compressor make sure to relieve the internal pressure very carefully by slightly loosening the bolts on both service valve flanges blank valve pads then lightly tap the sides of the valve flanges pads with a hammer to break the seal CAUTION Use only Carrier Transicold approvedPolyol Ester...

Страница 93: ...5 2 Figure 5 1 Electrical Schematic Models 69NT40 489 489 11 Model 69NT40 489 1 Prior to Serial 90234597 Sheet 1 of 2 Downloaded from ManualsNet com search engine ...

Страница 94: ...5 3 Figure 5 1 Electrical Schematic Models 69NT40 489 489 11 Model 69NT40 489 1 Prior to Serial 90234597 Sheet 2 of 2 Downloaded from ManualsNet com search engine ...

Страница 95: ...5 4 Figure 5 2 Electrical Wiring Diagram Models 69NT40 489 489 11 Model 69NT40 489 1 Prior to Serial 90234597 Sheet 1 of 2 Downloaded from ManualsNet com search engine ...

Страница 96: ...5 5 Figure 5 2 Electrical Wiring Diagram Models 69NT40 489 489 11 Model 69NT40 489 1 Prior to Serial 90234597 Sheet 2 of 2 Downloaded from ManualsNet com search engine ...

Страница 97: ...5 6 Figure 5 3 Electrical Schematic Model 69NT40 489 2 Sheet 1 of 2 Downloaded from ManualsNet com search engine ...

Страница 98: ...5 7 Figure 5 3 Electrical Schematic Model 69NT40 489 2 Sheet 2 of 2 Downloaded from ManualsNet com search engine ...

Страница 99: ...5 8 Figure 5 4 Electrical Wiring Diagram Model 69NT40 489 2 Sheet 1 of 2 Downloaded from ManualsNet com search engine ...

Страница 100: ...5 9 Figure 5 4 Electrical Wiring Diagram Model 69NT40 489 2 Sheet 2 of 2 Downloaded from ManualsNet com search engine ...

Страница 101: ...5 10 Figure 5 5 Electrical Schematic Model 69NT40 489 10 Model 69NT40 489 3 Prior to Serial 90234597 Sheet 1 of 2 Downloaded from ManualsNet com search engine ...

Страница 102: ...5 11 Figure 5 5 Electrical Schematic Model 69NT40 489 10 Model 69NT40 489 3 Prior to Serial 90234597 Sheet 2 of 2 Downloaded from ManualsNet com search engine ...

Страница 103: ...5 12 Figure 5 6 Electrical Wiring Diagram Model 69NT40 489 10 Model 69NT40 489 3 Prior to Serial 90234597 Sheet 1 of 2 Downloaded from ManualsNet com search engine ...

Страница 104: ...5 13 Figure 5 6 Electrical Wiring Diagram Model 69NT40 489 10 Model 69NT40 489 3 Prior to Serial 90234597 Sheet 2 of 2 Downloaded from ManualsNet com search engine ...

Страница 105: ...5 14 Figure 5 7 Electrical Schematic Models 69NT40 489 4 489 7 489 8 489 29 Model 69NT40 489 13 Prior to Serial 90234597 Sheet 1 of 2 Downloaded from ManualsNet com search engine ...

Страница 106: ...5 15 Figure 5 7 Electrical Schematic Models 69NT40 489 4 489 7 489 8 489 29 Model 69NT40 489 13 Prior to Serial 90234597 Sheet 2 of 2 Downloaded from ManualsNet com search engine ...

Страница 107: ...5 16 Figure 5 8 Electrical Wiring Diagram Models 69NT40 489 4 489 7 489 8 489 29 Model 69NT40 489 13 Prior to Serial 90234597 Sheet 1 of 2 Downloaded from ManualsNet com search engine ...

Страница 108: ...5 17 Figure 5 8 Electrical Wiring Diagram Models 69NT40 489 4 489 7 489 8 489 29 Model 69NT40 489 13 Prior to Serial 90234597 Sheet 2 of 2 Downloaded from ManualsNet com search engine ...

Страница 109: ...5 18 Figure 5 9 Electrical Schematic Models 69NT40 489 5 489 9 Prior to Serial 90234597 Sheet 1 of 2 Downloaded from ManualsNet com search engine ...

Страница 110: ...5 19 Figure 5 9 Electrical Schematic Models 69NT40 489 5 489 9 Prior to Serial 90234597 Sheet 2 of 2 Downloaded from ManualsNet com search engine ...

Страница 111: ...5 20 Figure 5 10 Electrical Wiring Diagram Models 69NT40 489 5 489 9 Prior to Serial 90234597 Sheet 1 of 2 Downloaded from ManualsNet com search engine ...

Страница 112: ...5 21 Figure 5 10 Electrical Wiring Diagram Models 69NT40 489 5 489 9 Prior to Serial 90234597 Sheet 2 of 2 Downloaded from ManualsNet com search engine ...

Страница 113: ...5 22 Figure 5 11 Electrical Schematic Model 69NT40 489 6 489 75 Sheet 1 of 2 Downloaded from ManualsNet com search engine ...

Страница 114: ...5 23 Figure 5 11 Electrical Schematic Model 69NT40 489 6 489 75 Sheet 2 of 2 Downloaded from ManualsNet com search engine ...

Страница 115: ...5 24 Figure 5 12 Electrical Wiring Diagram Model 69NT40 489 6 489 75 Sheet 1 of 2 Downloaded from ManualsNet com search engine ...

Страница 116: ...5 25 Figure 5 12 Electrical Wiring Diagram Model 69NT40 489 6 489 75 Sheet 2 of 2 Downloaded from ManualsNet com search engine ...

Страница 117: ...5 26 Figure 5 13 Electrical Schematic Model 69NT40 489 12 Prior to Serial 90234597 Sheet 1 of 2 Downloaded from ManualsNet com search engine ...

Страница 118: ...5 27 Figure 5 13 Electrical Schematic Model 69NT40 489 12 Prior to Serial 90234597 Sheet 2 of 2 Downloaded from ManualsNet com search engine ...

Страница 119: ...5 28 Figure 5 14 Electrical Wiring Diagram Model 69NT40 489 12 Prior to Serial 90234597 Sheet 1 of 2 Downloaded from ManualsNet com search engine ...

Страница 120: ...5 29 Figure 5 14 Electrical Wiring Diagram Model 69NT40 489 12 Prior to Serial 90234597 Sheet 2 of 2 Downloaded from ManualsNet com search engine ...

Страница 121: ...5 30 Figure 5 15 Electrical Schematic Model 69NT40 489 12 Starting with Serial 90234597 Sheet 1 of 2 Downloaded from ManualsNet com search engine ...

Страница 122: ...5 31 Figure 5 15 Electrical Schematic Model 69NT40 489 12 Starting with Serial 90234597 Sheet 2 of 2 Downloaded from ManualsNet com search engine ...

Страница 123: ...5 32 Figure 5 16 Electrical Wiring Diagram Model 69NT40 489 12 Starting with Serial 90234597 Sheet 1 of 2 Downloaded from ManualsNet com search engine ...

Страница 124: ...5 33 Figure 5 16 Electrical Wiring Diagram Model 69NT40 489 12 Starting with Serial 90234597 Sheet 2 of 2 Downloaded from ManualsNet com search engine ...

Страница 125: ...17 Electrical Schematic Models 69NT40 489 17 489 23 489 25 489 59 489 61 489 64 489 66 489 67 489 70 489 71 Model 69NT40 489 13 Starting with Serial 90234597 Sheet 1 of 2 Downloaded from ManualsNet com search engine ...

Страница 126: ...17 Electrical Schematic Models 69NT40 489 17 489 23 489 25 489 59 489 61 489 64 489 66 489 67 489 70 489 71 Model 69NT40 489 13 Starting with Serial 90234597 Sheet 2 of 2 Downloaded from ManualsNet com search engine ...

Страница 127: ... Electrical Wiring Diagram Models 69NT40 489 17 489 23 489 25 489 59 489 61 489 64 489 66 489 67 489 70 489 71 Model 69NT40 489 13 Starting with Serial 90234597 Sheet 1 of 2 Downloaded from ManualsNet com search engine ...

Страница 128: ... Electrical Wiring Diagram Models 69NT40 489 17 489 23 489 25 489 59 489 61 489 64 489 66 489 67 489 70 489 71 Model 69NT40 489 13 Starting with Serial 90234597 Sheet 2 of 2 Downloaded from ManualsNet com search engine ...

Страница 129: ...5 38 Figure 5 19 Electrical Schematic Model 69NT40 489 26 489 52 489 60 Model 69NT40 489 1 Starting with Serial 90234597 Sheet 1 of 2 Downloaded from ManualsNet com search engine ...

Страница 130: ...5 39 Figure 5 19 Electrical Schematic Model 69NT40 489 26 489 52 489 60 Model 69NT40 489 1 Starting with Serial 90234597 Sheet 2 of 2 Downloaded from ManualsNet com search engine ...

Страница 131: ...5 40 Figure 5 20 Electrical Wiring Diagram Model 69NT40 489 26 489 52 489 60 Model 69NT40 489 1 Starting with Serial 90234597 Sheet 1 of 2 Downloaded from ManualsNet com search engine ...

Страница 132: ...5 41 Figure 5 20 Electrical Wiring Diagram Model 69NT40 489 26 489 52 489 60 Model 69NT40 489 1 Starting with Serial 90234597 Sheet 2 of 2 Downloaded from ManualsNet com search engine ...

Страница 133: ...5 42 Figure 5 21 Electrical Schematic Model 69NT40 489 3 Starting with Serial 90234597 Sheet 1 of 2 Downloaded from ManualsNet com search engine ...

Страница 134: ...5 43 Figure 5 21 Electrical Schematic Model 69NT40 489 3 Starting with Serial 90234597 Sheet 2 of 2 Downloaded from ManualsNet com search engine ...

Страница 135: ...5 44 Figure 5 22 Electrical Wiring Diagram Model 69NT40 489 3 Starting with Serial 90234597 Sheet 1 of 2 Downloaded from ManualsNet com search engine ...

Страница 136: ...5 45 Figure 5 22 Electrical Wiring Diagram Model 69NT40 489 3 Starting with Serial 90234597 Sheet 2 of 2 Downloaded from ManualsNet com search engine ...

Страница 137: ...ical Schematic Models 69NT40 489 14 489 15 489 18 489 21 489 54 489 56 489 58 489 63 489 65 489 68 489 77 79 83 Models 69NT40 489 5 489 9 Starting with Serial 90234597 Sheet 1 of 2 Downloaded from ManualsNet com search engine ...

Страница 138: ...ical Schematic Models 69NT40 489 14 489 15 489 18 489 21 489 54 489 56 489 58 489 63 489 65 489 68 489 77 79 83 Models 69NT40 489 5 489 9 Starting with Serial 90234597 Sheet 2 of 2 Downloaded from ManualsNet com search engine ...

Страница 139: ...l Wiring Diagram Models 69NT40 489 14 489 15 489 18 489 21 489 54 489 56 489 58 489 63 489 65 489 68 489 77 79 83 Models 69NT40 489 5 489 9 Starting with Serial 90234597 Sheet 1 of 2 Downloaded from ManualsNet com search engine ...

Страница 140: ...l Wiring Diagram Models 69NT40 489 14 489 15 489 18 489 21 489 54 489 56 489 58 489 63 489 65 489 68 489 77 79 83 Models 69NT40 489 5 489 9 Starting with Serial 90234597 Sheet 2 of 2 Downloaded from ManualsNet com search engine ...

Страница 141: ...5 50 Figure 5 25 Electrical Schematic Model 69NT40 489 19 Sheet 1 of 2 Downloaded from ManualsNet com search engine ...

Страница 142: ...5 51 Figure 5 25 Electrical Schematic Model 69NT40 489 19 Sheet 2 of 2 Downloaded from ManualsNet com search engine ...

Страница 143: ...5 52 Figure 5 26 Electrical Wiring Diagram Model 69NT40 489 19 Sheet 1 of 2 Downloaded from ManualsNet com search engine ...

Страница 144: ...5 53 Figure 5 26 Electrical Wiring Diagram Model 69NT40 489 19 Sheet 2 of 2 Downloaded from ManualsNet com search engine ...

Страница 145: ...5 54 Figure 5 27 Electrical Schematic Models 69NT40 489 20E 489 20M 489 22 Sheet 1 of 2 Downloaded from ManualsNet com search engine ...

Страница 146: ...ured to single voltage ignore references to Power Auto Transformer and related components i e CB2 VS etc NOTE Figure 5 27 Electrical Schematic Models 69NT40 489 20E 489 20M 489 22 Sheet 2 of 2 Downloaded from ManualsNet com search engine ...

Страница 147: ...d to single voltage ignore references to Power Auto Transformer and related components i e CB2 VS etc NOTE Figure 5 28 Electrical Wiring Diagram Models 69NT40 489 20E 489 20M 489 22 Sheet 1 of 2 Downloaded from ManualsNet com search engine ...

Страница 148: ...d to single voltage ignore references to Power Auto Transformer and related components i e CB2 VS etc NOTE Figure 5 28 Electrical Wiring Diagram Models 69NT40 489 20E 489 20M 489 22 Sheet 2 of 2 Downloaded from ManualsNet com search engine ...

Страница 149: ...5 58 Figure 5 29 Electrical Schematic Models 69NT40 489 50 Sheet 1 of 2 Downloaded from ManualsNet com search engine ...

Страница 150: ...5 59 Figure 5 29 Electrical Schematic Models 69NT40 489 50 Sheet 2 of 2 Downloaded from ManualsNet com search engine ...

Страница 151: ...5 60 Figure 5 30 Electrical Wiring Diagram Models 69NT40 489 50 Sheet 1 of 2 Downloaded from ManualsNet com search engine ...

Страница 152: ...5 61 Figure 5 30 Electrical Wiring Diagram Models 69NT40 489 50 Sheet 2 of 2 Downloaded from ManualsNet com search engine ...

Страница 153: ...5 62 Figure 5 31 Electrical Schematic Models 69NT40 489 51 489 69 489 81 489 84 Sheet 1 of 2 Downloaded from ManualsNet com search engine ...

Страница 154: ...5 63 Figure 5 31 Electrical Schematic Models 69NT40 489 51 489 69 489 81 489 84 Sheet 2 of 2 Downloaded from ManualsNet com search engine ...

Страница 155: ...5 64 Figure 5 32 Electrical Wiring Diagram Models 69NT40 489 51 489 69 489 81 489 84 Sheet 1 of 2 Downloaded from ManualsNet com search engine ...

Страница 156: ...5 65 Figure 5 32 Electrical Wiring Diagram Models 69NT40 489 51 489 69 489 81 489 84 Sheet 2 of 2 Downloaded from ManualsNet com search engine ...

Страница 157: ...5 66 Figure 5 33 Electrical Schematic Models 69NT40 489 62 Sheet 1 of 2 Downloaded from ManualsNet com search engine ...

Страница 158: ...5 67 Figure 5 33 Electrical Schematic Models 69NT40 489 62 Sheet 2 of 2 Downloaded from ManualsNet com search engine ...

Страница 159: ...5 68 Figure 5 34 Electrical Wiring Diagram Models 69NT40 489 62 Sheet 1 of 2 Downloaded from ManualsNet com search engine ...

Страница 160: ...5 69 Figure 5 34 Electrical Wiring Diagram Models 69NT40 489 62 Sheet 2 of 2 Downloaded from ManualsNet com search engine ...

Страница 161: ...5 70 Figure 5 35 Electrical Schematic Models 69NT40 489 78 Sheet 1 of 2 Downloaded from ManualsNet com search engine ...

Страница 162: ...5 71 Figure 5 35 Electrical Schematic Models 69NT40 489 78 Sheet 2 of 2 Downloaded from ManualsNet com search engine ...

Страница 163: ...5 72 Figure 5 36 Electrical Wiring Diagram Models 69NT40 489 78 Sheet 1 of 2 Downloaded from ManualsNet com search engine ...

Страница 164: ...5 73 Figure 5 36 Electrical Wiring Diagram Models 69NT40 489 78 Sheet 2 of 2 Downloaded from ManualsNet com search engine ...

Страница 165: ...5 74 Figure 5 37 Electrical Schematic Models 69NT40 489 80 Sheet 1 of 2 Downloaded from ManualsNet com search engine ...

Страница 166: ...5 75 Figure 5 37 Electrical Schematic Models 69NT40 489 80 Sheet 2 of 2 Downloaded from ManualsNet com search engine ...

Страница 167: ...5 76 Figure 5 38 Electrical Wiring Diagram Models 69NT40 489 80 Sheet 1 of 2 Downloaded from ManualsNet com search engine ...

Страница 168: ...5 77 Figure 5 38 Electrical Wiring Diagram Models 69NT40 489 80 Sheet 2 of 2 Downloaded from ManualsNet com search engine ...

Страница 169: ...5 78 Figure 5 39 Electrical Schematic Models 69NT40 489 30 31 Sheet 1 of 2 Downloaded from ManualsNet com search engine ...

Страница 170: ...5 79 Figure 5 39 Electrical Schematic Models 69NT40 489 30 31 Sheet 2 of 2 Downloaded from ManualsNet com search engine ...

Страница 171: ...5 80 Figure 5 40 Electrical Wiring Diagram Models 69NT40 489 30 31 Sheet 1 of 2 Downloaded from ManualsNet com search engine ...

Страница 172: ...5 81 Figure 5 40 Electrical Wiring Diagram Models 69NT40 489 30 31 Sheet 2 of 2 Downloaded from ManualsNet com search engine ...
Отзывы: