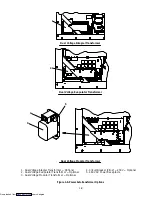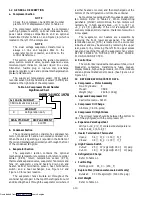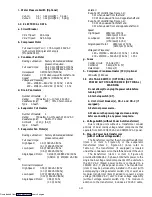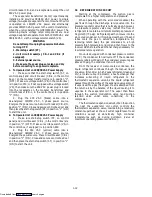
1-12
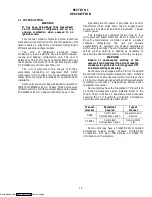
circuit breaker CB-2, and a receptacle to accept the unit
460 VAC power plug.
The evaporator transformer (item 2) is permanently
installed and provides 380/460 VAC power to single
voltage (two-speed) evaporator fan motors when the unit
is operated on 190/230 VAC power and alternately
provides 190/230 VAC power to the control transformer
when the unit is operated from 380/460 VAC power. The
remaining mains voltage rated components are dual
voltage designs that operate from both 190/230 VAC and
380/460 VAC via the voltage selector switch (VS).
WARNING
Do not attempt to unplug the power cable before
turning OFF:
1. Start-stop switch (ST).
2. Unit circuit breaker(s), CB-1 and CB-2 (if
equipped).
3. External power source.
4. Make sure the power plugs are clean and dry
before connecting to any power receptacle.
c. To Operate Unit on 190/230 VAC Power Supply
1. Make sure that the start-stop switch (ST, on
control panel) and circuit breaker (CB-2, in the control
box or on the modular transformer) are in position “0”
(OFF). Make sure voltage switch (VS, in the control box)
is in position 230; or if not equipped with a voltage switch
(VS), then make sure the 460 VAC power plug is locked
into the receptacle on the modular transformer and
circuit breaker (CB-1, in the control box) is in position
“1” (ON).
2. Plug the 230 VAC (black) cable into a
de-energized 190/230 VAC, 3 phase power source.
Energize the power source. Set circuit breaker (CB-2) to
position “1” (ON). Close and secure control box door and
then place the start-stop switch (ST) in position “1” (ON)
to start the unit.
d. To Operate Unit on 380/460 VAC Power Supply
1. Make sure start-stop switch (ST, on control
panel) and circuit breaker (CB-1, in the control box) are
in position “0” (OFF). Make sure voltage switch (VS, in
the control box, if equipped) is in position 460.
2. Plug the 460 VAC (yellow) cable into a
de-energized 380/460 VAC, 3 phase power source.
Energize the power source. Place circuit breaker (CB-1)
in position “1” (ON). Close and secure control box door
and then place the start-stop switch (ST) in position “1”
(ON) to start the unit.
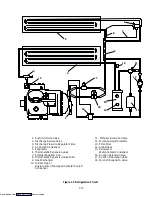
1.6 REFRIGERATION CIRCUIT
Starting at the compressor, the suction gas is
compressed to a higher temperature and pressure.
When operating with the
air-cooled condenser,
the
gas flows through the discharge service valve into the
pressure regulator valve that is normally open, however,
the pressure regulator valve may restrict the flow of
refrigerant to maintain a minimum discharge pressure of
5
kg/cm
@
(70 psig). Refrigerant gas then moves into the
air-cooled condenser. Air flowing across the coil fins and
tubes cools the gas to saturation temperature. By
removing latent heat, the gas condenses to a high
pressure/high temperature liquid and then flows to the
receiver which stores the additional charge necessary for
low temperature operation.
On units equipped with condenser pressure control
(CPC), the condenser fan will cycle off if the condenser
pressure is below 130 psig. If the condenser pressure goes
above 200 psig, the condenser fan will cycle on.
From the receiver or water-cooled condenser, the
liquid refrigerant continues through the manual liquid
line valve, filter-drier (which keeps refrigerant clean and
dry), a moisture-liquid indicator, a heat exchanger that
increases subcooling of liquid refrigerant to the
thermostatic expansion valve. As the liquid refrigerant
passes through the orifice of the expansion valve some of
it vaporizes into a gas (flash gas). Heat is absorbed from
the return air by the balance of the liquid causing it to
vaporize in the evaporator coil. The vapor then flows
through the suction modulation valve (and suction
solenoid valve under some conditions) to the
compressor.
The thermostatic expansion valve bulb on the suction
line near the evaporator coil outlet, controls the
thermostatic expansion valve, maintaining a relatively
constant superheat at the coil outlet regardless of load
conditions except at abnormally high container
temperatures such as during pulldown (valve at
maximum operating pressure condition).
Downloaded from
Содержание 69NT40-489
Страница 1: ...Model 69NT40 489 T 259 Rev F Downloaded from ManualsNet com search engine ...
Страница 100: ...5 9 Figure 5 4 Electrical Wiring Diagram Model 69NT40 489 2 Sheet 2 of 2 Downloaded from ManualsNet com search engine ...
Страница 141: ...5 50 Figure 5 25 Electrical Schematic Model 69NT40 489 19 Sheet 1 of 2 Downloaded from ManualsNet com search engine ...
Страница 142: ...5 51 Figure 5 25 Electrical Schematic Model 69NT40 489 19 Sheet 2 of 2 Downloaded from ManualsNet com search engine ...
Страница 149: ...5 58 Figure 5 29 Electrical Schematic Models 69NT40 489 50 Sheet 1 of 2 Downloaded from ManualsNet com search engine ...
Страница 150: ...5 59 Figure 5 29 Electrical Schematic Models 69NT40 489 50 Sheet 2 of 2 Downloaded from ManualsNet com search engine ...
Страница 157: ...5 66 Figure 5 33 Electrical Schematic Models 69NT40 489 62 Sheet 1 of 2 Downloaded from ManualsNet com search engine ...
Страница 158: ...5 67 Figure 5 33 Electrical Schematic Models 69NT40 489 62 Sheet 2 of 2 Downloaded from ManualsNet com search engine ...
Страница 161: ...5 70 Figure 5 35 Electrical Schematic Models 69NT40 489 78 Sheet 1 of 2 Downloaded from ManualsNet com search engine ...
Страница 162: ...5 71 Figure 5 35 Electrical Schematic Models 69NT40 489 78 Sheet 2 of 2 Downloaded from ManualsNet com search engine ...
Страница 165: ...5 74 Figure 5 37 Electrical Schematic Models 69NT40 489 80 Sheet 1 of 2 Downloaded from ManualsNet com search engine ...
Страница 166: ...5 75 Figure 5 37 Electrical Schematic Models 69NT40 489 80 Sheet 2 of 2 Downloaded from ManualsNet com search engine ...
Страница 169: ...5 78 Figure 5 39 Electrical Schematic Models 69NT40 489 30 31 Sheet 1 of 2 Downloaded from ManualsNet com search engine ...
Страница 170: ...5 79 Figure 5 39 Electrical Schematic Models 69NT40 489 30 31 Sheet 2 of 2 Downloaded from ManualsNet com search engine ...

