SPLITTING TRACK SENDS
Each channel has up to four track
sends although by default only one is
enabled.
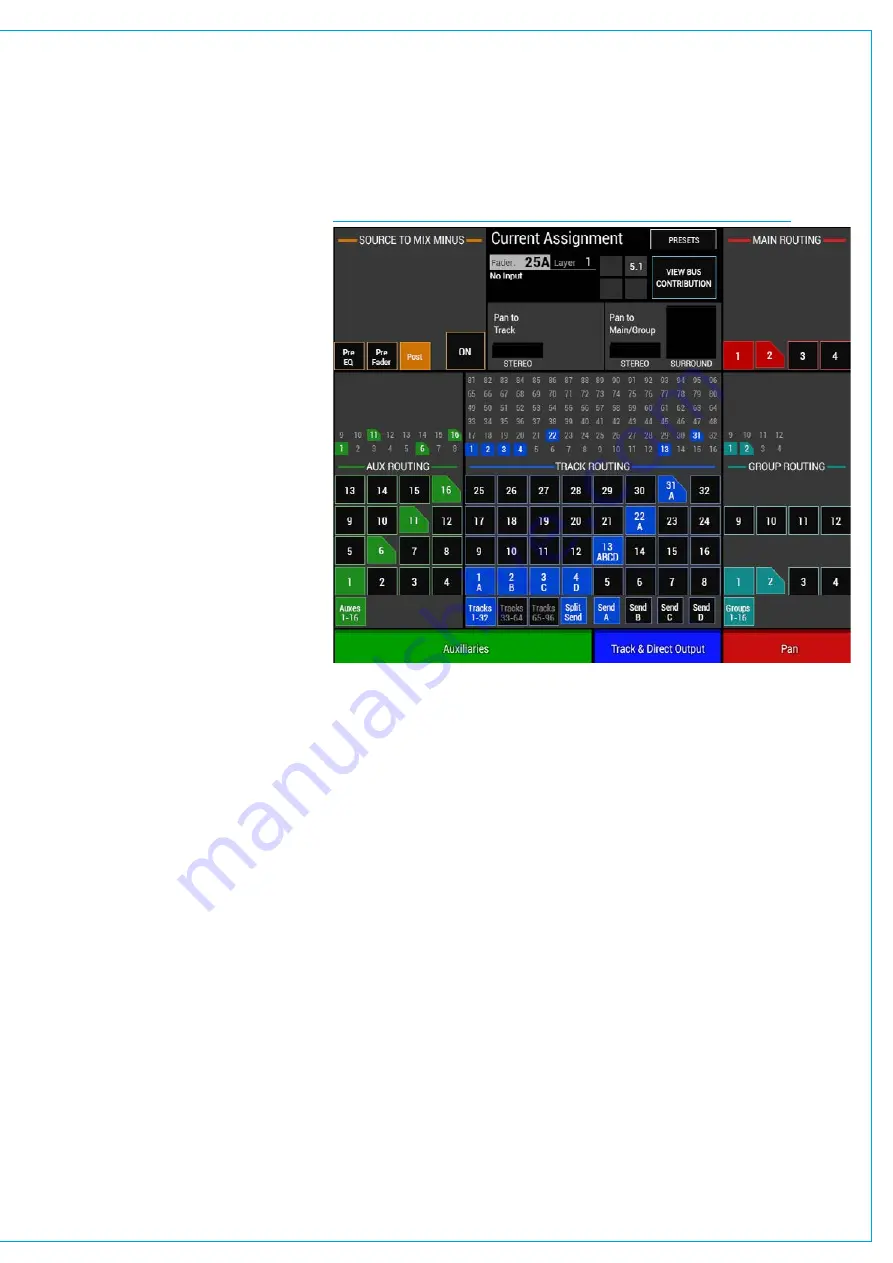
To enable the four sends, touch the SPLIT
SEND button below the track routing
buttons. This will enable four more
buttons for selecting the required send
(A, B, C or D) as shown in Fig 1.
Select one of these sends and then create
or remove routing to tracks as required.
A letter will appear below the track
number when a route is made to indicate
which send it is associated with.
Each of the four sends has an individual
level control and can be selected by
pushing the relevant rotary control to
appear in the ‘Selected’ button cells at the
bottom of the panel.
This enables access to a wider range of
controls for that specific send such as pre
or post fade.
Removingsends
If a channel has been routed to a track
using send C then send C must be
selected when removing the route. Only
routes made with the currently selected
send may be removed.
In order for the track routing to be
collapsed back into just one send, all
routes from sends B, C and D must be
removed. The SPLIT SEND button can
now be touched again to remove the three
unused send controls.
Partialsends
Note:
If individual legs of a 5.1 or Stereo
path are routed to a bus the corner of
the box is cut off to show that it is only
partially routed, as shown in Fig 1 for Aux
16.
Track 13 in Fig 1 shows that all the legs
have been routed L/R to Send A, C to
Send B, Lfe to Send C and LsRs to Send
D which is why it shows as a fully routed
button image.
FIG 1 - ROUTING SCREEN
Содержание Artemis
Страница 7: ...calrec com Putting Sound in the Picture ARTEMIS INFORMATION ...
Страница 11: ...calrec com Putting Sound in the Picture ARTEMIS INTRODUCTION ...
Страница 17: ...calrec com Putting Sound in the Picture ARTEMIS CONTROL OVERVIEW ...
Страница 29: ...calrec com Putting Sound in the Picture ARTEMIS CONTROL PANEL MODES ...
Страница 36: ...36 ARTEMIS Digital Broadcast Production Console Control Panel Modes WILDABLE CONTROLS ...
Страница 39: ...calrec com Putting Sound in the Picture ARTEMIS GETTING SIGNALS INTO ARTEMIS ...
Страница 69: ...calrec com Putting Sound in the Picture ARTEMIS PROCESSING AUDIO ...
Страница 93: ...calrec com Putting Sound in the Picture ARTEMIS ROUTING AUDIO ...
Страница 109: ...calrec com Putting Sound in the Picture ARTEMIS PASSING SIGNALS OUT OF ARTEMIS ...
Страница 117: ...calrec com Putting Sound in the Picture ARTEMIS MONITORING ...
Страница 132: ...132 ARTEMIS Digital Broadcast Production Console Monitoring ...
Страница 133: ...calrec com Putting Sound in the Picture ARTEMIS COMMUNICATIONS ...
Страница 138: ...138 ARTEMIS Digital Broadcast Production Console ...
Страница 139: ...calrec com Putting Sound in the Picture ARTEMIS METERING ...
Страница 148: ...148 ARTEMIS Digital Broadcast Production Console ...
Страница 149: ...calrec com Putting Sound in the Picture ARTEMIS SHOWS MEMORIES AND PRESETS ...
Страница 163: ...calrec com Putting Sound in the Picture ARTEMIS CONSOLE FACILITIES ...
Страница 168: ...168 ARTEMIS Digital Broadcast Production Console ...
Страница 169: ...calrec com Putting Sound in the Picture ARTEMIS EXTERNAL INTERFACING ...
Страница 180: ...180 ARTEMIS Digital Broadcast Production Console External Interfacing ...
Страница 181: ...calrec com Putting Sound in the Picture ARTEMIS SYSTEM STATUS ...
Страница 184: ...184 ARTEMIS Digital Broadcast Production Console ...
Страница 185: ...calrec com Putting Sound in the Picture ARTEMIS GLOSSARY OF TERMINOLOGY ...
Страница 191: ...calrec com Putting Sound in the Picture ARTEMIS FEATURES BY SOFTWARE VERSION ...


