223
Shared Folders
"share" (for both Windows and Mac computers). The recycle bin is enabled
on "share" by default.
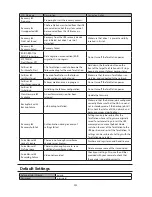
DHCP Client
Normally, the TeraStation will get its IP address automatically from a DHCP
server on the network.
If no DHCP server is available, then an IP address will be assigned as follows:
IP Address: 169.254.xxx.xxx (xxx is assigned randomly when booting the
TeraStation.)
Subnet Mask: 255.255.0.0
Registered Groups
"hdusers", "admin", and "guest"
You cannot edit or delete these default groups.
Microsoft Network Group Settings
WORKGROUP
Ethernet Frame Size
1500 bytes (not including 14 bytes of header and 4 bytes of FCS)
AFP
Enabled
FTP
Disabled
NTP
Enabled
Print Server
Enabled
WebAccess
Disabled
Time Machine
Disabled
TeraSearch
Disabled
RAID Mode
8-drive, 6-drive, and 4-drive models: RAID 5
2-drive models: RAID 1
Specifications
Check the Buffalo website for information about the latest products and specifications.
LAN Port
Interface
IEEE 802.3ab (1000BASE-T)
IEEE 802.3u (100BASE-TX)
IEEE 802.3 (10BASE-T)
Transfer Speed
1000 Mbps full duplex (auto-negotiation)
100 Mbps full duplex/half duplex (auto-negotiation)
10 Mbps full duplex/half duplex (auto-negotiation)
Number of Ports
2 ports (supports Auto-MDIX)
Connector Type
RJ-45 8-pin
Protocol
TCP/IP
Access Method
CSMA/CD
File Sharing
SMB/CIFS, AFP, FTP/SFTP, NFS, HTTP/HTTPS
Management
HTTP/HTTPS
Jumbo Frames
1500, 4084, 7404, and 9216 byte modes are
supported.
(not including 14 bytes of header and 4 bytes of FCS)
USB Port
8-drive models, 6-drive models, and 4-drive rackmount models: USB 2.0 Port (Series A)
x 2, USB 3.0 Port (Series A) x 3
4-drive desktop models and 2-drive models: USB 2.0 Port (Series A) x 2, USB 3.0 Port
(Series A) x 2
Note:
Supported USB devices include Buffalo USB hard drives, USB UPS devices, and
printers.
UPS Port
UPS Port (D-SUB 9 pin (Male)) x 1
Note:
Compatible UPS are manufactured by Omron or APC.
Содержание TeraStation WSS 5000
Страница 10: ...9 Chapter 1 Installation Diagrams TS5800D TS5800DN TS5800DWR µ µ µ µ TS5600D TS5600DN µ µ µ µ ...
Страница 60: ...59 6 Click Edit under NAS Volume 7 Click Create Volume ...
Страница 67: ...66 2 Select the TeraStation name from the drop down menu of Target and click Register iSCSI Device 3 Click OK ...
Страница 88: ...87 2 Click to the right of Backup 3 Click List of LinkStations and TeraStations ...
Страница 90: ...89 3 Click Create New Job Note Up to 8 backup jobs can be configured ...
Страница 104: ...103 18Click Time Machine ...
Страница 105: ...104 19Click Select Backup Disk 20Select the TeraStation then click Use Disk ...
Страница 116: ...115 3 Click Create New Job ...
Страница 117: ...116 4 Select backup settings such as date and time to run 5 Click Add 6 Click Browse under Backup Source Folder Name ...
Страница 128: ...127 3 Click Edit 4 Click Browse 5 Select the shared folder that you want to make available to iTunes then click OK ...
Страница 131: ...130 9 Click Open Squeezebox The Squeezebox s settings will open ...
Страница 136: ...135 4 Open the License tab then click Activate Free License To deactivate the license click ...
Страница 138: ...137 3 Click Next 4 Click Find Cameras ...
Страница 144: ...143 2 Select the search criteria on the left side of the search screen then click Search ...
Страница 145: ...144 3 The search results are displayed Click a thumbnail to start the media viewer ...
Страница 191: ...190 4 Click Edit Note The settings of the PHP language interpreter can be changed from Edit php ini 5 Click Browse ...


