221
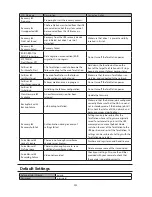
LCD Message
Description
Corrective Action
RAID I18
ARRAYx Rebuilding
Rebuilding RAID array x.
Note:
Transfer speeds are slower during
the rebuilding process.
-
RAID I19
ARRAYx 0 Filling
Writing 0s to RAID array x, erasing all
data.
-
RAID I20
DISKx Formatting
Formatting hard drive x.
-
RAID I21
DISKx Checking
Checking hard drive x.
-
RAID I22
DISKx 0 Filling
Erasing the data for hard drive x.
-
SYSTEM I25
F/WUPDATING
Updating the TeraStation firmware.
Note:
Do not turn off the power during
the updating process.
-
Web Setting I26
Initializing
Initializing all settings.
-
USB Diskx I27
Checking
Checking USB hard drive x.
-
USB Diskx I28
Formatting
Formatting USB hard drive x.
-
Press FuncSW I31
New Diskx ready
Displayed when pressing the Function
button to rebuild the RAID after replacing
hard drive x.
Press the Function button to rebuild the
RAID array.
Set From Web I32
New Diskx ready
Displayed after replacing hard drive x
when the RAID needs to be rebuilt in
Settings or formatting is necessary.
In Settings, either rebuild the RAID array or
format the hard drive.
Replication I33
ReplicateFailure
An error occurred in replication, or
synchronization between the main
TeraStation and the backup TeraStation
failed during failover configuration.
In Settings, navigate to
Backup
-
Replication
and choose "Resync" to execute
resynchronization. If the error is displayed
again, contact Buffalo technical support for
assistance.
Virus alert I34
Virus detected
A virus scan found a virus.
Once the virus is removed from the
quarantine folder, the message is no
longer displayed. If the antivirus software
is configured to delete viruses from the
quarantine folder automatically, then the
message will not be displayed.
Cartridgex I35
Location error
A hard drive set as a media cartridge has
been installed in the drive x slot.
Connect to the slot that was set as a media
cartridge.
Cartridgex I36
Decryption error
Media cartridge cannot be decrypted.
The media cartridge may have been
encrypted by a TeraStation other than
this product.
Connect to the TeraStation that performed
encryption to decrypt.
Recovery I37
SystemRecovering
System recovery in progress.
-
Recovery I38
RecoveryFinished
System recovery is complete.
-
Recovery I39
Change Boot
System recovery from the USB recovery
device is complete.
Change the boot mode switch on the rear
to HDD.
Recovery I40
DataWillDeleted
Beginning recovery. All data in the drive 1
will be deleted.
-
Recovery I41
PushFuncToStart
Pressing the function button on the front
will start the recovery process.
-
Содержание TeraStation WSS 5000
Страница 10: ...9 Chapter 1 Installation Diagrams TS5800D TS5800DN TS5800DWR µ µ µ µ TS5600D TS5600DN µ µ µ µ ...
Страница 60: ...59 6 Click Edit under NAS Volume 7 Click Create Volume ...
Страница 67: ...66 2 Select the TeraStation name from the drop down menu of Target and click Register iSCSI Device 3 Click OK ...
Страница 88: ...87 2 Click to the right of Backup 3 Click List of LinkStations and TeraStations ...
Страница 90: ...89 3 Click Create New Job Note Up to 8 backup jobs can be configured ...
Страница 104: ...103 18Click Time Machine ...
Страница 105: ...104 19Click Select Backup Disk 20Select the TeraStation then click Use Disk ...
Страница 116: ...115 3 Click Create New Job ...
Страница 117: ...116 4 Select backup settings such as date and time to run 5 Click Add 6 Click Browse under Backup Source Folder Name ...
Страница 128: ...127 3 Click Edit 4 Click Browse 5 Select the shared folder that you want to make available to iTunes then click OK ...
Страница 131: ...130 9 Click Open Squeezebox The Squeezebox s settings will open ...
Страница 136: ...135 4 Open the License tab then click Activate Free License To deactivate the license click ...
Страница 138: ...137 3 Click Next 4 Click Find Cameras ...
Страница 144: ...143 2 Select the search criteria on the left side of the search screen then click Search ...
Страница 145: ...144 3 The search results are displayed Click a thumbnail to start the media viewer ...
Страница 191: ...190 4 Click Edit Note The settings of the PHP language interpreter can be changed from Edit php ini 5 Click Browse ...


