


219
Chapter 12 Appendix
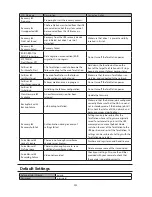
LCD Display
The LCD display can be cycled through different modes by pressing the display button on the front of the
TeraStation. Also, the items displayed can be configured at
Management
-
Notifications
-
Front Panel Display Settings
in Settings.
Modes
LCD Message
Description
Corrective Action
LINK SPEED
Note:
When an
Ethernet cable
is connected
to LAN Port 2,
"LINK SPEED 2"
is displayed.
LINK SPEED
No LINK
Not connected to network.
Connect an Ethernet
cable to the LAN
port.
LINK SPEED
10 Mbps HALF
Connected at 10 Mbps half duplex.
-
LINK SPEED
10 Mbps FULL
Connected at 10 Mbps full duplex.
-
LINK SPEED
100 Mbps HALF
Connected at 100 Mbps half duplex.
-
LINK SPEED
100 Mbps FULL
Connected at 100 Mbps full duplex.
-
LINK SPEED
1000 Mbps
Connected at 1000 Mbps full duplex.
-
Series Name
/ Firmware
Version
TS5400D
Ver. x.xx
Displays the series name and the firmware
version.
Note:
This is an example for 4-drive TeraStation
models. Depending on the unit model you
are using, the series name may be displayed
differently.
-
Hostname / IP
Address
TSxxxxx xxx
192.168.11.150
Displays the hostname and IP address. At the
end of the IP address, F (fixed IP address) or D
(IP address automatically acquired from a DHCP
server) is displayed.
Note:
When an Ethernet cable is connected to
LAN port 2, "NETWORK2" is displayed in the
hostname section.
-
Calendar / Clock
DATE TIME
2012/1/1 11:11
Displays the date and time set in the TeraStation. -
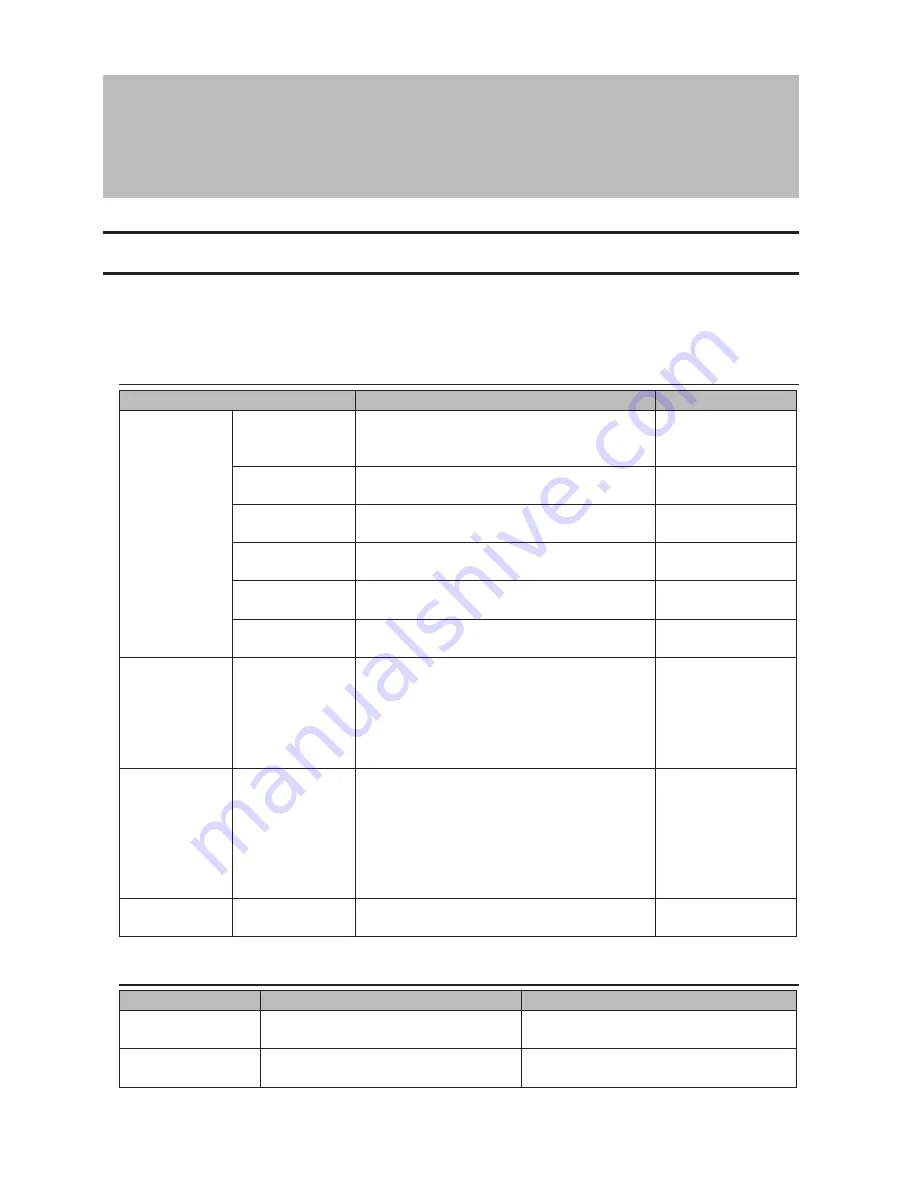
Errors
LCD Message
Description
Corrective Action
BOOT FAIL
Hard drive not found.
Contact Buffalo technical support for
assistance.
SYSTEM Error E04
Can't Load Krnl!
The firmware is corrupted.
Contact Buffalo technical support for
assistance.
Содержание TeraStation WSS 5000
Страница 10: ...9 Chapter 1 Installation Diagrams TS5800D TS5800DN TS5800DWR µ µ µ µ TS5600D TS5600DN µ µ µ µ ...
Страница 60: ...59 6 Click Edit under NAS Volume 7 Click Create Volume ...
Страница 67: ...66 2 Select the TeraStation name from the drop down menu of Target and click Register iSCSI Device 3 Click OK ...
Страница 88: ...87 2 Click to the right of Backup 3 Click List of LinkStations and TeraStations ...
Страница 90: ...89 3 Click Create New Job Note Up to 8 backup jobs can be configured ...
Страница 104: ...103 18Click Time Machine ...
Страница 105: ...104 19Click Select Backup Disk 20Select the TeraStation then click Use Disk ...
Страница 116: ...115 3 Click Create New Job ...
Страница 117: ...116 4 Select backup settings such as date and time to run 5 Click Add 6 Click Browse under Backup Source Folder Name ...
Страница 128: ...127 3 Click Edit 4 Click Browse 5 Select the shared folder that you want to make available to iTunes then click OK ...
Страница 131: ...130 9 Click Open Squeezebox The Squeezebox s settings will open ...
Страница 136: ...135 4 Open the License tab then click Activate Free License To deactivate the license click ...
Страница 138: ...137 3 Click Next 4 Click Find Cameras ...
Страница 144: ...143 2 Select the search criteria on the left side of the search screen then click Search ...
Страница 145: ...144 3 The search results are displayed Click a thumbnail to start the media viewer ...
Страница 191: ...190 4 Click Edit Note The settings of the PHP language interpreter can be changed from Edit php ini 5 Click Browse ...