


196
Creating an Initialization Drive
A system initialization drive will restore the settings on your TeraStation to their factory defaults. You can initialize
them without logging in to Settings. Follow the steps below to create a system initialization drive.
Notes:
•
Normally, making and using the system initialization drive will not affect data. However, always back up your
data regularly!
•
This USB drive can be used to recover the system if your TeraStation doesn't boot at all. In this case, if the data
partition is damaged, then all your data will be deleted by the recovery process.
1
Insert a 1 GB or larger USB flash drive (not included) into a USB 2.0 port on the TeraStation.
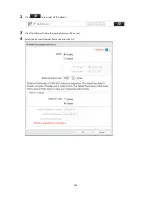
2
In Settings, navigate to
Management
-
Restore/Erase
-
USB Options
.
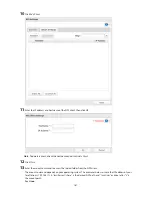
3
Select
Create a USB drive for initializing settings
.
Note:
All data on the USB flash drive will be erased!
4
Select the USB memory device from "Target USB drive", then click
Execute
.
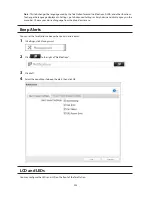
5
Enter the 4 digit confirmation number and click
OK
. The TeraStation will create the initialization drive. This will
take about a minute.
6
When the "finished" dialog opens, the USB initialization drive is ready to use. Dismount the USB drive before
unplugging it. See "Dismounting Drives" in chapter 4 for the instructions on dismounting drives.
Initializing with the USB Drive
To initialize the settings on your TeraStation with the USB drive as created above, follow the procedure below.
Note:
If using the initialization drive to initialize, the unit's current firmware version will be changed to the
version used to create the initialization drive.
1
Create a USB "initialization drive" as described above.
2
Insert the USB drive into a USB 2.0 port (not a USB 3.0 port) on the TeraStation. Make sure that no other USB
drives are connected to any USB ports on the TeraStation.
3
Set the boot mode switch to "USB".
4
Press the power button to turn on the TeraStation.
5
When the I41 message appears on the LCD panel, press the function button.
6
It will take several minutes for initializing the settings. The TeraStation will shut down when it's finished.
7
After shutdown, the I39 message is displayed.
8
Set the boot mode switch to "HDD" position.
9
Press the power button to start the TeraStation.
Содержание TeraStation WSS 5000
Страница 10: ...9 Chapter 1 Installation Diagrams TS5800D TS5800DN TS5800DWR µ µ µ µ TS5600D TS5600DN µ µ µ µ ...
Страница 60: ...59 6 Click Edit under NAS Volume 7 Click Create Volume ...
Страница 67: ...66 2 Select the TeraStation name from the drop down menu of Target and click Register iSCSI Device 3 Click OK ...
Страница 88: ...87 2 Click to the right of Backup 3 Click List of LinkStations and TeraStations ...
Страница 90: ...89 3 Click Create New Job Note Up to 8 backup jobs can be configured ...
Страница 104: ...103 18Click Time Machine ...
Страница 105: ...104 19Click Select Backup Disk 20Select the TeraStation then click Use Disk ...
Страница 116: ...115 3 Click Create New Job ...
Страница 117: ...116 4 Select backup settings such as date and time to run 5 Click Add 6 Click Browse under Backup Source Folder Name ...
Страница 128: ...127 3 Click Edit 4 Click Browse 5 Select the shared folder that you want to make available to iTunes then click OK ...
Страница 131: ...130 9 Click Open Squeezebox The Squeezebox s settings will open ...
Страница 136: ...135 4 Open the License tab then click Activate Free License To deactivate the license click ...
Страница 138: ...137 3 Click Next 4 Click Find Cameras ...
Страница 144: ...143 2 Select the search criteria on the left side of the search screen then click Search ...
Страница 145: ...144 3 The search results are displayed Click a thumbnail to start the media viewer ...
Страница 191: ...190 4 Click Edit Note The settings of the PHP language interpreter can be changed from Edit php ini 5 Click Browse ...