


252
DSView Installer/User Guide
To add the task:
1.
From the Tasks window, click
Add
. The Add Task Wizard will appear. Click
Next
.
2.
The Select Task to Add window will open.
a.
Select
Export audit log to a comma separated values (.CSV) file
from the drop-
down menu.
b.
Type a 1-64 character name for the task.
c.
Click
Next
.
3.
The Select When to Run the Task window will open. Select a time to run the task (see
on page 246 for more information), then click
Next
.
4.
The Specify Export Audit Log Properties window will open.
a.
Type the directory in which to create the audit log, which may be a local drive on the
DSView software server or at a location specified by a UNC path. The directory name
must be entered in case sensitive text if your operating system supports case
sensitive filenames.
b.
Click
Login required to access shared drive location
if the location specified is a network
drive that requires a log in. Then, type the username and password and confirm the
password of a user account that has read/write access to the network share location. The
Location field cannot be set to a mapped network drive. It must be set to either a physical
local drive or a shared network location specified as a UNC path.
c.
Click
Use date and time for file naming
to append the date and time (in military time) to
the end of the audit log file. For example, if you are creating the audit log file on October
1, 2004 at 10:04 pm, the file created will be named auditlog1001042204.csv.
If an audit log exists in the specified directory and you do not use this option, it will be
overwritten when the new audit log is created.
d.
Click
Next
.
5.
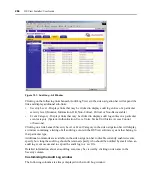
The Select Audit Log Columns to Export window will open. Add or remove the columns of
information that you wish to export. See
Customizing the Audit Log window
on page 264 for
more information.
To add a column of information:
•
Select the column to export from the Available Columns list. Multiple columns may be
selected by pressing
Ctrl
or
Shift
while clicking on the column names.
•
Click
Add
. The column(s) will be moved to the Columns to Export list.
To remove a column of information:
•
Select the column to remove from the Columns to Export list. Multiple columns may be
selected by pressing
Ctrl
or
Shift
while clicking on the column names.
•
Click
Remove
. The column(s) will be moved to the Available Columns list.
To change the order in which exported columns are listed in the output .csv file, select the
columns in the Columns to Export list and use the up and down arrows to move the selected
Содержание DSView
Страница 4: ......
Страница 12: ...x DSView Installer User Guide ...
Страница 18: ...xvi DSView Installer User Guide ...
Страница 50: ...32 DSView Installer User Guide ...
Страница 90: ...72 DSView Installer User Guide ...
Страница 154: ...136 DSView Installer User Guide ...
Страница 210: ...192 DSView Installer User Guide ...
Страница 232: ...214 DSView Installer User Guide ...
Страница 248: ...230 DSView Installer User Guide ...
Страница 357: ......


