


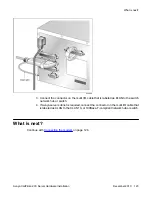


Before you begin
Before you can connect the CD-ROM or tape drive, ensure that you have completed the
following tasks:
1. Install the intermediate SCSI cable.
For
See
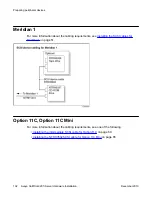
Meridian 1
Installing the SCSI cables for Meridian 1
on
page 51.
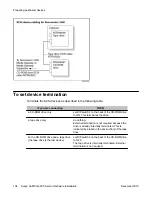
Option 11C
Installing the intermediate SCSI cable for
Option 11C
on page 60.
Option 11C Mini
Installing the NTRH3502 SCSI cable for Option
11C Mini
Communication Server 1000
Installing the NTRH3502 SCSI cable for
Communication Server 1000
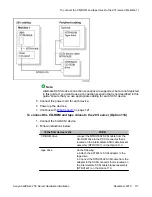
2. Set the SCSI ID and device termination settings as described in
•
Setting the CD-ROM drive SCSI ID and DIP switches
•
Setting SCSI device termination
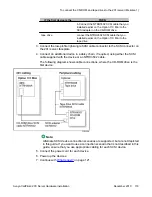
Selecting the procedure for your switch
IF you are working with
THEN see
a large Meridian 1 switch (such as
Option 51)
To connect the CD-ROM and tape drives to the 201i
server (Meridian 1)
on page 116.
Option 11C
the corresponding procedure in section
To connect the CD-ROM and tape drives to the 201i
server (Meridian 1)
on page 116.
Option 11C Mini
on page 118.
Communication Server 1000
Before you begin
Avaya CallPilot
®
201i Server Hardware Installation
December 2010 115
Содержание CallPilot 201i
Страница 1: ...Avaya CallPilot 201i Server Hardware Installation 5 0 NN44200 301 01 03 December 2010 ...
Страница 8: ...8 Avaya CallPilot 201i Server Hardware Installation December 2010 ...
Страница 28: ...About the 201i server 28 Avaya CallPilot 201i Server Hardware Installation December 2010 ...
Страница 106: ...Preparing peripheral devices 106 Avaya CallPilot 201i Server Hardware Installation December 2010 ...
Страница 128: ...Connecting peripheral devices to the 201i server 128 Avaya CallPilot 201i Server Hardware Installation December 2010 ...