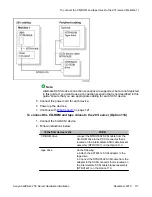
IF the first device is the
THEN
b. Connect the NTRH3502 SCSI cable that you
installed earlier on the Option 11C Mini to the
SCSI adapter on the CD-ROM drive.
tape drive
connect the NTRH3502 SCSI cable that you
installed earlier on the Option 11C Mini to the
tape drive.
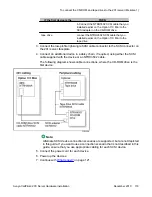
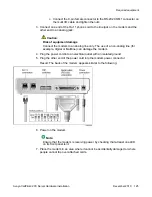
3. Connect the low-profile right-angle SCSI cable connector to the SCSI connector on
the 201i server faceplate.
4. Connect an additional device in a daisy chain, if required, using either the SCSI
cable supplied with the device or an NTRH3502 cable.
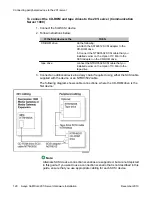
The following diagram shows cable connections, where the CD-ROM drive is the
first device:
Note:
Alternate SCSI device connection scenarios are supported, but are not depicted
in this guide. If you want to use a connection scenario that is not described in this
guide, ensure that you use appropriate cabling for each SCSI device.
5. Connect the power cord for each device.
6. Power up the devices.
7. Continue with
To connect the CD-ROM and tape drives to the 201i server (Meridian 1)
Avaya CallPilot
®
201i Server Hardware Installation
December 2010 119
Содержание CallPilot 201i
Страница 1: ...Avaya CallPilot 201i Server Hardware Installation 5 0 NN44200 301 01 03 December 2010 ...
Страница 8: ...8 Avaya CallPilot 201i Server Hardware Installation December 2010 ...
Страница 28: ...About the 201i server 28 Avaya CallPilot 201i Server Hardware Installation December 2010 ...
Страница 106: ...Preparing peripheral devices 106 Avaya CallPilot 201i Server Hardware Installation December 2010 ...
Страница 128: ...Connecting peripheral devices to the 201i server 128 Avaya CallPilot 201i Server Hardware Installation December 2010 ...


