


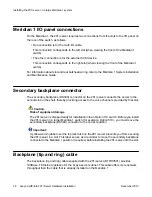


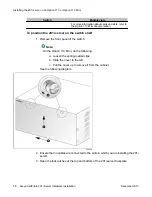

6. Gently press the pin connector into the socket until it is fully seated.
7. Remove the yellow backplane warning label from the top lock latch on the 201i
server.
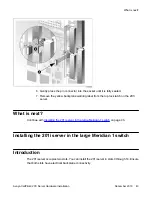
What is next?
Continue with
Installing the 201i server in the large Meridian 1 switch
Installing the 201i server in the large Meridian 1 switch
Introduction
The 201i server occupies two slots. You can install the 201i server in slots 0 through 14. Ensure
that both slots have electrical backplane connectivity.
What is next?
Avaya CallPilot
®
201i Server Hardware Installation
December 2010 43
Содержание CallPilot 201i
Страница 1: ...Avaya CallPilot 201i Server Hardware Installation 5 0 NN44200 301 01 03 December 2010 ...
Страница 8: ...8 Avaya CallPilot 201i Server Hardware Installation December 2010 ...
Страница 28: ...About the 201i server 28 Avaya CallPilot 201i Server Hardware Installation December 2010 ...
Страница 106: ...Preparing peripheral devices 106 Avaya CallPilot 201i Server Hardware Installation December 2010 ...
Страница 128: ...Connecting peripheral devices to the 201i server 128 Avaya CallPilot 201i Server Hardware Installation December 2010 ...