


Installing the monitor, keyboard, and mouse
Introduction
You must connect the monitor, keyboard, and mouse to the 201i server so that you can:
• observe the 201i server startup process.
• run the Configuration Wizard.
• perform initial administration after installation.
Note:
The 201i server is not intended to operate with permanent monitor, keyboard, and mouse
connections. Once you have successfully started and configured the 201i server, remove
the monitor, keyboard, and mouse. For day-to-day administration, use a web browser on a
PC that is connected to the ELAN subnet or Avaya server subnet.
Hardware requirement
Caution:
Risk of equipment damage
The mouse connector on the 201i faceplate is a PS/2 connector. If you plan to use a USB
mouse with USB-to-PS/2 converter, you must also use the Avaya-supplied 4-inch PS/2
extension cable (A0855616).
Without the extension cable, the USB-to-PS/2 mouse connector is partially blocked by the
monitor connector.
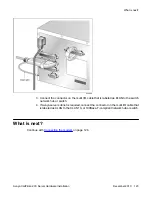
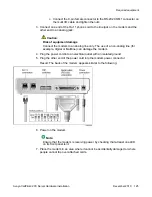
PS/2 extension cable
The following diagram shows the PS/2 extension cable connected between the 201i server
and the USB mouse with USB-to-PS/2 converter.
Installing the monitor, keyboard, and mouse
Avaya CallPilot
®
201i Server Hardware Installation
December 2010 113
Содержание CallPilot 201i
Страница 1: ...Avaya CallPilot 201i Server Hardware Installation 5 0 NN44200 301 01 03 December 2010 ...
Страница 8: ...8 Avaya CallPilot 201i Server Hardware Installation December 2010 ...
Страница 28: ...About the 201i server 28 Avaya CallPilot 201i Server Hardware Installation December 2010 ...
Страница 106: ...Preparing peripheral devices 106 Avaya CallPilot 201i Server Hardware Installation December 2010 ...
Страница 128: ...Connecting peripheral devices to the 201i server 128 Avaya CallPilot 201i Server Hardware Installation December 2010 ...