


Chapter 5: Installing the 201i server in an
Option 11C or Option 11C Mini
In this chapter
Installing the 201i server in the Option 11C or Option 11C Mini switch
Section A: Installing Option 11C cables
on page 60
Installing the intermediate SCSI cable for Option 11C
Section B: Installing Option 11C Mini cables
Installing the NTRH3502 SCSI cable for Option 11C Mini
on page 65
Installing cables on the back of the Option 11C Mini cabinet
Installing the 201i server in the Option 11C or Option 11C
Mini switch
Introduction
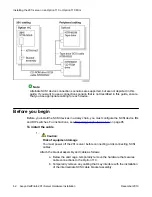
The 201i server occupies physical and electrical slots. The 201i server must be installed in two
peripheral equipment slots as follows:
Switch
Eligible slots
Option 11C
Slots 1 through 9 in any cabinet
Option 11C Mini
A pair of consecutive slots in any cabinet
Note:
You cannot install the 201i server in slots 0 or 4,
because these slots are dedicated to other cards.
Avaya CallPilot
®
201i Server Hardware Installation
December 2010 57
Содержание CallPilot 201i
Страница 1: ...Avaya CallPilot 201i Server Hardware Installation 5 0 NN44200 301 01 03 December 2010 ...
Страница 8: ...8 Avaya CallPilot 201i Server Hardware Installation December 2010 ...
Страница 28: ...About the 201i server 28 Avaya CallPilot 201i Server Hardware Installation December 2010 ...
Страница 106: ...Preparing peripheral devices 106 Avaya CallPilot 201i Server Hardware Installation December 2010 ...
Страница 128: ...Connecting peripheral devices to the 201i server 128 Avaya CallPilot 201i Server Hardware Installation December 2010 ...