


Installing cables on the back of the Option 11C Mini cabinet
Introduction
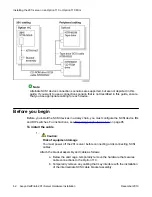
The following items connect to the back of the Option 11C Mini cabinet:
• multi I/O cable (NTRH0912)
• Option 11C Mini power cord with two ferrites
You must connect the multi I/O cable first before connecting the power cord, because the power
cord routes over the multi I/O cable connection.
To connect the cables
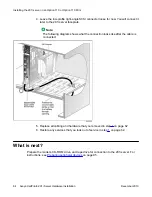
1. On the rear of the Option 11C Mini cabinet, locate the connector associated with
the first slot occupied by the 201i server.
2. Connect the NTRH0912 multi I/O cable as follows:
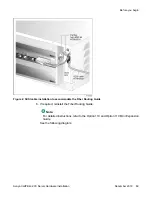
a. Loosen the connector's Velcro fastening strap.
b. Connect the amphenol connector on the NTRH0912 multi I/O cable to
the connector on the back of the Option 11C Mini cabinet.
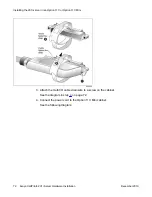
c. Secure the connection by tightening the retaining screw and Velcro
fastening strap of the connector.
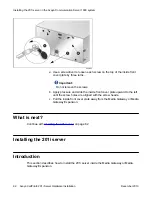
The following diagram shows how to secure the multi I/O cable connection:
Installing cables on the back of the Option 11C Mini cabinet
Avaya CallPilot
®
201i Server Hardware Installation
December 2010 71
Содержание CallPilot 201i
Страница 1: ...Avaya CallPilot 201i Server Hardware Installation 5 0 NN44200 301 01 03 December 2010 ...
Страница 8: ...8 Avaya CallPilot 201i Server Hardware Installation December 2010 ...
Страница 28: ...About the 201i server 28 Avaya CallPilot 201i Server Hardware Installation December 2010 ...
Страница 106: ...Preparing peripheral devices 106 Avaya CallPilot 201i Server Hardware Installation December 2010 ...
Страница 128: ...Connecting peripheral devices to the 201i server 128 Avaya CallPilot 201i Server Hardware Installation December 2010 ...