


Note:
Alternate SCSI device connection scenarios are supported, but are not depicted in this
guide. If you want to use a connection scenario that is not described in this guide, ensure
that you use appropriate cabling for each device.
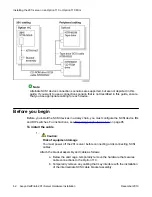
Before you begin
Before you install the SCSI devices in a daisy chain, you must configure the SCSI device IDs
and DIP switches. For instructions, refer to
on page 95.
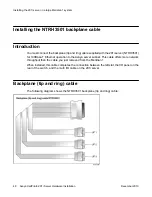
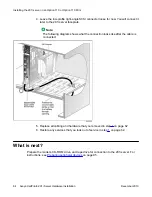
To install the SCSI cables for Meridian 1
1. Thread the SCSI connector end of the NTRH1408 cable from the front of the
Meridian 1 along the bottom of the shelf to either the left or the right access channel.
2. Leave the low-profile right-angle SCSI connector hanging for now. You will connect it
later to the 201i server faceplate.
Note:
The following diagram shows what the connection looks like after the cable is
connected:
Before you begin
Avaya CallPilot
®
201i Server Hardware Installation
December 2010 53
Содержание CallPilot 201i
Страница 1: ...Avaya CallPilot 201i Server Hardware Installation 5 0 NN44200 301 01 03 December 2010 ...
Страница 8: ...8 Avaya CallPilot 201i Server Hardware Installation December 2010 ...
Страница 28: ...About the 201i server 28 Avaya CallPilot 201i Server Hardware Installation December 2010 ...
Страница 106: ...Preparing peripheral devices 106 Avaya CallPilot 201i Server Hardware Installation December 2010 ...
Страница 128: ...Connecting peripheral devices to the 201i server 128 Avaya CallPilot 201i Server Hardware Installation December 2010 ...