


Required equipment
To move the secondary backplane connector, you need a Phillips No. 1 screwdriver. A pair of
needle-nosed pliers can also be helpful for removing the pin connector.
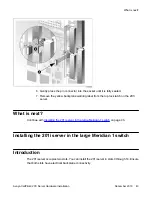
To prepare the 201i server for installation in a Meridian 1 switch
1. Remove the secondary backplane pin connector.
The pin connector has four pins. If necessary, use needle-nosed pliers to remove it.
2. Remove the top and bottom screws that hold the secondary backplane connector
in place on the stiffening cage.
3. Loosen the middle screw, and then align the outside pair of screw holes on the
bracket with the matching pair on the stiffening cage.
4. Replace and alternately tighten all screws until the connector is evenly and securely
fastened.
See the following diagram:
Required equipment
Avaya CallPilot
®
201i Server Hardware Installation
December 2010 41
Содержание CallPilot 201i
Страница 1: ...Avaya CallPilot 201i Server Hardware Installation 5 0 NN44200 301 01 03 December 2010 ...
Страница 8: ...8 Avaya CallPilot 201i Server Hardware Installation December 2010 ...
Страница 28: ...About the 201i server 28 Avaya CallPilot 201i Server Hardware Installation December 2010 ...
Страница 106: ...Preparing peripheral devices 106 Avaya CallPilot 201i Server Hardware Installation December 2010 ...
Страница 128: ...Connecting peripheral devices to the 201i server 128 Avaya CallPilot 201i Server Hardware Installation December 2010 ...