


80
Serial Communication and Command Set
9.2.4
Local/Daylight Savings Time Setup Commands
Return Daylight Saving/Summer Time Settings
Command:
0DT
0DT returns the current Daylight Saving / Summer Time Settings to the connected RS-232C port
(Modes: OFF, ON, or AUTO).
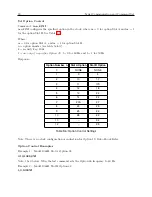
Response:
Mode
:AUTO
C
START :02:00 Second SUN of MAR
C
STOP :02:00 First SUN of NOV
C
Set Daylight Saving/Summer Time Mode
Command:
1,mDT
1,mDT activates the Daylight Saving mode, where m = 0 – 2, with 0 = OFF, 1 = ON, and 2 =
AUTO. When OFF this time adjust feature does not add the specified offset to local time display
and output. With m = 1 (ON), the Daylight Saving / Summertime feature is always on. With m
= 2, the Daylight Saving / Summertime feature will automatically change at the specified dates
and times. To complete the Daylight Saving / Summer Time setup, you must also use the “Set
Daylight Saving Auto Start” and “Stop” commands that follow below.
Response:
C
Set Daylight Saving/Summer Auto Start Time
Command:
2,w,x,y,zDT
2,w,x,y,zDT sets the starting (Start) date and time for Daylight Saving / Summer Time AUTO
setting.
Where: w = Month (0 through 11), with 0 = Jan, 1 = Feb, ... 11 = Dec.
x = WeekOfMonth (0 through 5), with 0 = First, 1 = Second, 2, = Third,
3 = Last, 4 = Second from Last, and 5 = Third from Last.
y = DayOfWeek (0 through 6), with 0 = Sun, 1 = Mon, . . . , 6 = Sat.
z = Minutes after midnight z (0 through 1440).
Response:
C
Set Daylight Saving/Summer Auto Stop Time
Command:
3,w,x,y,zDT
3,w,x,y,zDT sets the ending (Stop) date and time for Daylight Saving / Summer Time AUTO
setting.
Where: w = Month (0 through 11), with 0 = Jan, 1 = Feb, ... 11 = Dec.
x = WeekOfMonth (0 through 5), with 0 = First, 1 = Second, 2, = Third,
3 = Last, 4 = Second from Last, and 5 = Third from Last.
y = DayOfWeek (0 through 6), with 0 = Sun, 1 = Mon, . . . , 6 = Sat.
z = Minutes after midnight z (0 through 1440).
Response:
C
Содержание 1088A
Страница 4: ...iv ...
Страница 6: ...vi ...
Страница 18: ...xviii LIST OF FIGURES ...
Страница 23: ...1 4 Attaching Rack Mount Ears to 1088A B Series Clocks 3 Figure 1 2 Attaching Rack Mount Ears ...
Страница 24: ...4 Unpacking the Clock ...
Страница 32: ...12 Front and Rear Panels ...
Страница 38: ...18 Connecting Inlet Power Input and Output Signals ...
Страница 41: ...4 1 GPS Antenna Installation 21 Figure 4 2 Antenna Mounting Bracket Figure 4 3 Antenna Mounting with AS0044600 ...
Страница 46: ...26 GPS Antenna and Cable Information ...
Страница 48: ...28 Setting Internal Jumpers Figure 5 1 Model 1088B Main Board ...
Страница 76: ...56 The Setup Menus ...
Страница 112: ...92 Serial Communication and Command Set ...
Страница 127: ...B 4 Physical Dimensions 107 Figure B 1 Suggested Mounting of the AS0094500 Surge Arrester ...
Страница 128: ...108 Using Surge Arresters ...
Страница 137: ...C 5 Option 04 Parallel BCD Output 117 C 5 2 Option 04 Firmware Setup Figure C 2 Option 04 Firmware Setup ...
Страница 145: ...C 5 Option 04 Parallel BCD Output 125 Figure C 4 Option 04 Output Jumper Settings ...
Страница 146: ...126 Options List Figure C 5 Option 04 Board Layout and Jumper Locations ...
Страница 165: ...C 12 Option 17 Parallel BCD Output and Second RS 232 Port 145 Figure C 11 Option 17 Output Jumper Settings ...
Страница 166: ...146 Options List Figure C 12 Option 17 Board Layout and Jumper Locations ...
Страница 176: ...156 Options List C 14 5 Typical Network Configuration Figure C 15 Option 18 Network Configuration ...
Страница 187: ...C 16 Option 20A Four Fiber Optic Outputs 167 Figure C 22 Option 20A Jumper Locations ...
Страница 194: ...174 Options List Figure C 24 Option 23 Internal Jumper Setup ...
Страница 196: ...176 Options List Figure C 25 Option 27 Jumper Locations ...
Страница 214: ...194 Options List Figure C 28 Option 29 Connector Signal Locations ...
Страница 270: ...250 Options List ...


