4.4 Technical Details on GPS, Antennas and Cables
23
4.4
Technical Details on GPS, Antennas and Cables
4.4.1
Antenna Cable
Length and Loss Considerations
Standard Antenna Cable
The standard antenna cable assembly included with the clock is constructed using a 15-meter
(50-foot) length of RG-6 type low-loss coaxial cable, terminated with male Type F connectors.
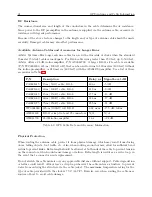
Optional lengths of RG-6 coax are separately available for longer runs; see Table 4.2, Cable Data
and Accessory Information.
Effects of Cable Parameters
To receive GPS signals and properly operate the clock, the type and length of the cable are impor-
tant. Due to their effect on specific parameters described in the following paragraphs, any changes
to the length and/or type of antenna cable should be made carefully. Damaged cables may also
affect performance.
Cable Delay
The velocity factor and the physical length of the cable determine cable delay. During the initial
factory calibration of the clock, a value for cable delay (based upon the length and type of cable
supplied) is entered into the clock memory. Firmware uses this figure to counteract the effect that
the delay has upon GPS timing accuracy. The value entered for a standard 15-meter cable is 60
nanoseconds. For other cable options, the delay is tabulated below. The formula for calculating
cable delay is:
(4.1)
T
=
λ
1
CKv
+ 1
ns
Where:
T = Cable delay, in nanoseconds;
λ
= Cable length, in meters;
C = Speed of light (3
×
10
8
meters per second);
Kv = Nominal velocity of propagation (0.85).
One nanosecond is added to the calculated value to account for the length and velocity factor of
the short connecting cable inside of the clock.
Attenuation
Attenuation depends upon the cable length, and the loss per unit length. The total attenuation
must be limited to 21 dB (maximum) at the GPS L1 frequency of 1575.42 MHz. Loss up to 42 dB
can be accommodated with the separately available 21-dB in-line preamplifier (P/N AS0044700).
Содержание 1088A
Страница 4: ...iv ...
Страница 6: ...vi ...
Страница 18: ...xviii LIST OF FIGURES ...
Страница 23: ...1 4 Attaching Rack Mount Ears to 1088A B Series Clocks 3 Figure 1 2 Attaching Rack Mount Ears ...
Страница 24: ...4 Unpacking the Clock ...
Страница 32: ...12 Front and Rear Panels ...
Страница 38: ...18 Connecting Inlet Power Input and Output Signals ...
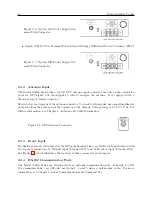
Страница 41: ...4 1 GPS Antenna Installation 21 Figure 4 2 Antenna Mounting Bracket Figure 4 3 Antenna Mounting with AS0044600 ...
Страница 46: ...26 GPS Antenna and Cable Information ...
Страница 48: ...28 Setting Internal Jumpers Figure 5 1 Model 1088B Main Board ...
Страница 76: ...56 The Setup Menus ...
Страница 112: ...92 Serial Communication and Command Set ...
Страница 127: ...B 4 Physical Dimensions 107 Figure B 1 Suggested Mounting of the AS0094500 Surge Arrester ...
Страница 128: ...108 Using Surge Arresters ...
Страница 137: ...C 5 Option 04 Parallel BCD Output 117 C 5 2 Option 04 Firmware Setup Figure C 2 Option 04 Firmware Setup ...
Страница 145: ...C 5 Option 04 Parallel BCD Output 125 Figure C 4 Option 04 Output Jumper Settings ...
Страница 146: ...126 Options List Figure C 5 Option 04 Board Layout and Jumper Locations ...
Страница 165: ...C 12 Option 17 Parallel BCD Output and Second RS 232 Port 145 Figure C 11 Option 17 Output Jumper Settings ...
Страница 166: ...146 Options List Figure C 12 Option 17 Board Layout and Jumper Locations ...
Страница 176: ...156 Options List C 14 5 Typical Network Configuration Figure C 15 Option 18 Network Configuration ...
Страница 187: ...C 16 Option 20A Four Fiber Optic Outputs 167 Figure C 22 Option 20A Jumper Locations ...
Страница 194: ...174 Options List Figure C 24 Option 23 Internal Jumper Setup ...
Страница 196: ...176 Options List Figure C 25 Option 27 Jumper Locations ...
Страница 214: ...194 Options List Figure C 28 Option 29 Connector Signal Locations ...
Страница 270: ...250 Options List ...


