Carl Zeiss
Left Tool Area and Hardware Control Tools
Lightsheet Z.1
52
000000-1790-528
02/2013
3.2.6
Specimen Navigator Tool
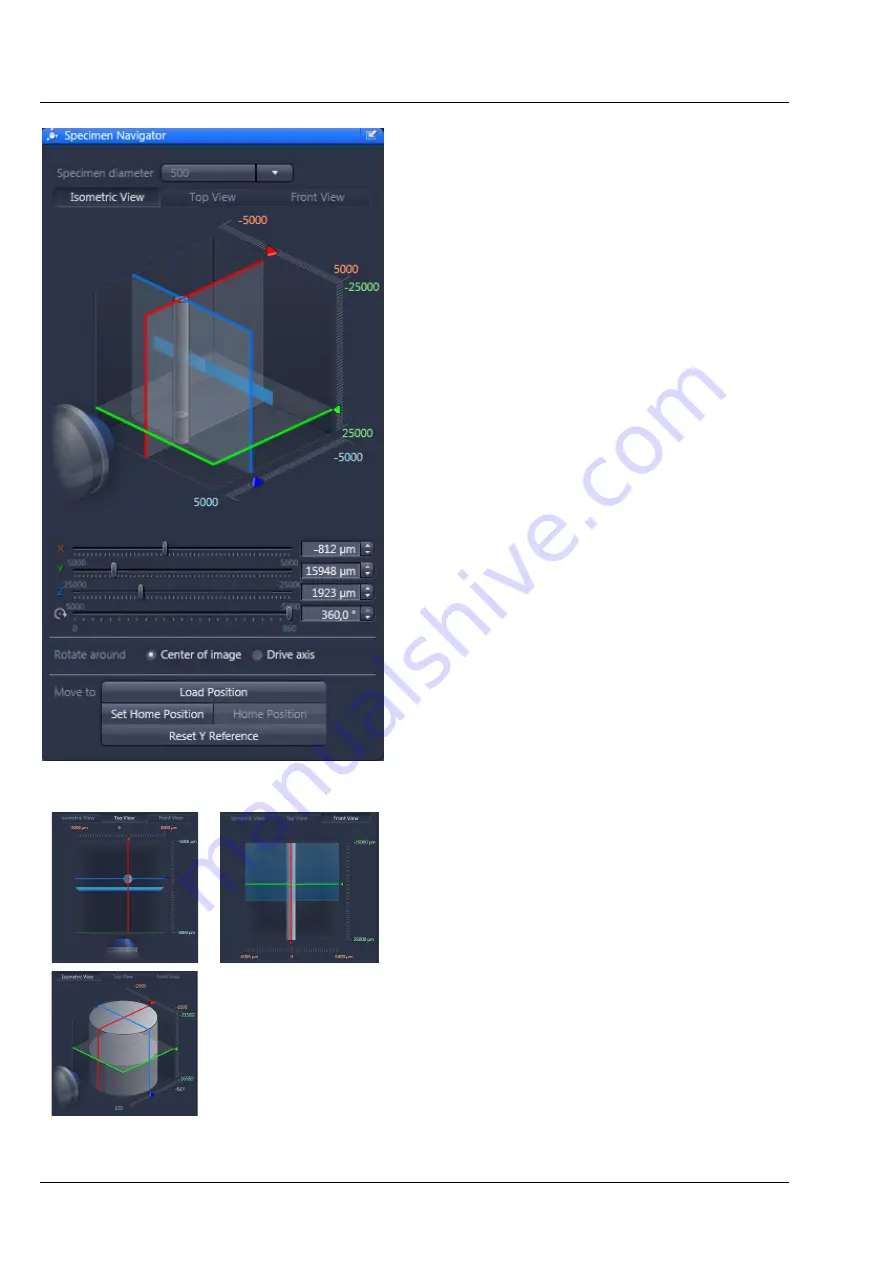
To position the sample holder for imaging the
Specimen Navigator
tool window is available
(Fig. 69).
Here the relative positions of the sample (light-grey
cylinder), the illumination light-sheet (light-blue), as
well as the x-axis (red), y-axis (green), and z-axis
(blue) are graphically displayed. You can chose
between an
Isometric View
, a
Top View
, or a
Front View
for orientation.
In all of these Views, you can zoom into the
graphical display by once clicking into the graphic
with the left mouse button and afterwards
pressing the
Ctrl
key on your keyboard (Fig. 70).
For additional zooming, press the Ctrl with the
Shift key. The zoom will last as long as the key or
combination of keys are pressed. To remain in the
zoom mode, press the right Alt key. The zoom will
remain until the Ctrl key is pressed again.
To move the sample holder in x-, y-, or z- direction
you can either place the mouse over the according
colored line in the graphic, hold it with the left
mouse button and drag it into the required
position; or you can use the sliders and spin boxes
for each axis below the graphic. To rotate the
sample holder, use the slider or spin box.
There are two options for rotating the sample.
With
Rotate around Center of image
selected,
the x and y positions are additionally corrected for
rotational movement to keep the sample within
the chosen field of view when rotating. This can be
helpful when the sample is not in the center of the
embedding medium. If the option
Rotate around
Drive axis
is chosen, the sample holder is rotated
around its main axis without any correctional
movements for the other axis.
Fig. 69
Specimen Navigator tool window
Fig. 70
Zoom into the Isometric, Top and
Front View
Summary of Contents for Lightsheet Z.1
Page 1: ...Lightsheet Z 1 Operating Manual February 2013 ZEN 2012 black edition ...
Page 4: ......
Page 170: ......
Page 427: ...Lightsheet Z 1 Overview ...


