background image

8-24

IM 703155-01E

Marker Measurement

8.

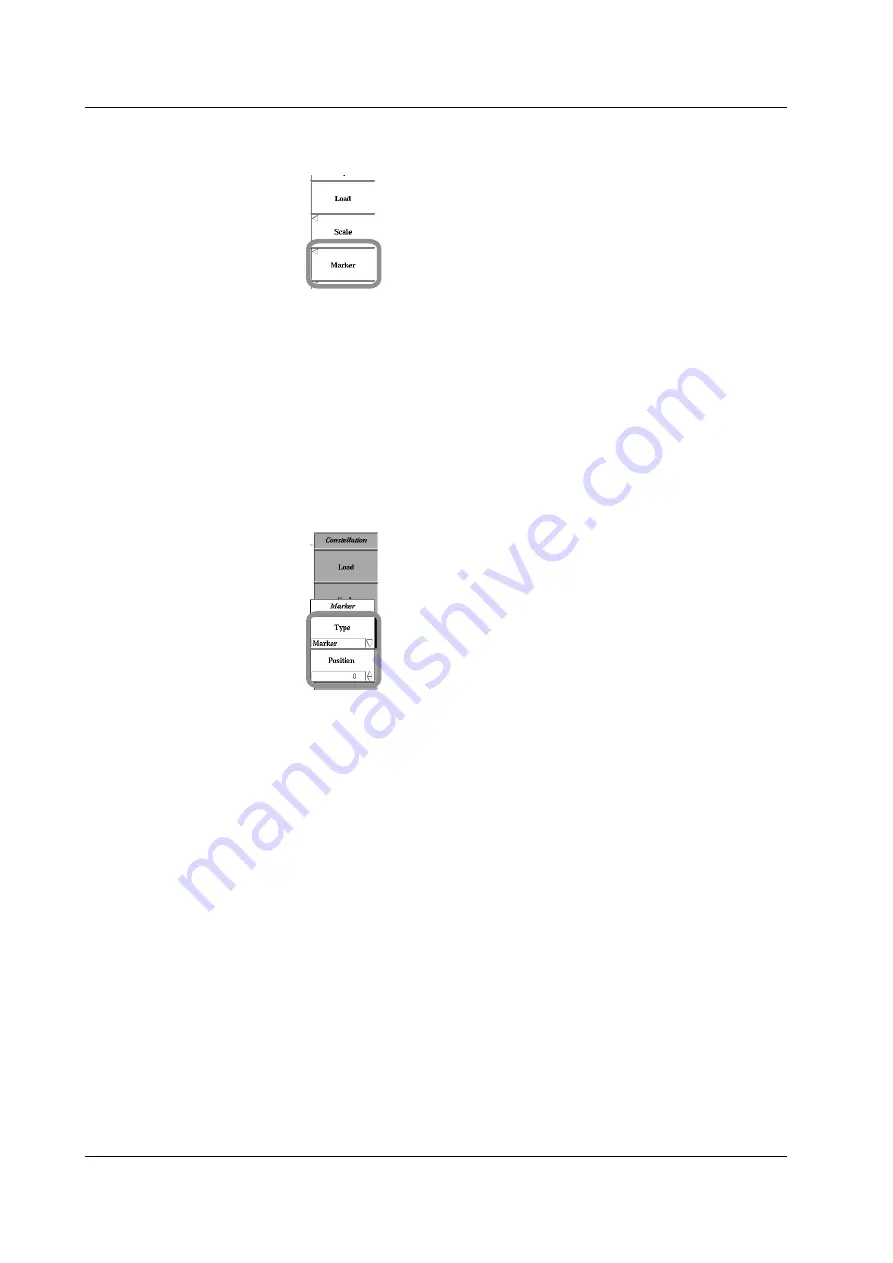
Press the 

Marker

 soft key.  The Marker menu appears.

Selecting the Marker Type

9.

Press the 

Type

 soft key.  Possible choices are displayed.

10.

Use 

rotary knob & SELECT

 to select OFF or Marker.

• If you select OFF, the marker is not shown on the display, and you cannot set

the marker.

• If you select Marker, proceed to step 11 on the next page.

Executing Marker Measurement

11.

Press the 

Position

 soft key.

12.

Enter the marker position using the 

numeric keys & ENTER

.  The marker

position and the amplitudes of I and Q are displayed.

For the setup procedures on the Configure menu, see section 8.6.

8.4  Constellation Display

Summary of Contents for VB8300

Page 1: ...User s Manual Yokogawa Electric Corporation VB8300 Baseband Signal Generator IM 703155 01E 1st Edition...

Page 2: ...ng YOKOGAWA products YOKOGAWA provides registered users with a variety of information and services Please allow us to serve you best by completing the product registration form accessible from our hom...

Page 3: ...prior notice as a result of continuing improvements to the instrument s performance and functions The figures given in this manual may differ from those that actually appear on your screen Every effor...

Page 4: ...288 128 Mpoint 8 channels 4 output terminal sets single ended output Power cord D UL CSA Standard power cord Part No A1006WD Maximum rated voltage 125 V Maximum rated current 7 A F VDE Standard Power...

Page 5: ...ly The optional accessories below are available for purchase separately BNC cable 366924 1 m 366925 2 m 50 terminator 700976 Software Software Utilities for Model Supported Modulation Function and Des...

Page 6: ...d by the instrument may be impaired Yokogawa Electric Corporation assumes no liability for the customer s failure to comply with these requirements The following symbols are used on this instrument Da...

Page 7: ...ounding Never cut off the internal or external protective earth wire or disconnect the wiring of the protective earth terminal Doing so poses a potential shock hazard Do Not Operate with Defective Pro...

Page 8: ...bols displayed characters and terminology are used to distinguish the procedures from their explanations Procedure Follow the numbered steps All procedures are written with inexperienced users in mind...

Page 9: ...3 3 3 Connecting the Power Supply 3 5 3 4 Turning the Power Switch ON OFF 3 6 3 5 Connecting the Waveform Output Cables 3 8 3 6 Setting the Date Time and Time Zone 3 9 3 7 Displaying the Setup Menu a...

Page 10: ...Saving Loading Setup Data 10 4 10 3 Loading Waveform Data 10 8 10 4 Saving and Loading Sequence Lists 10 10 10 5 Saving the Screen Image Data 10 14 10 6 Deleting Files and Directories 10 17 10 7 Copyi...

Page 11: ...er 14 Troubleshooting Maintenance and Inspection 14 1 Troubleshooting 14 1 14 2 Messages and Corrective Actions 14 2 14 3 Performing a Self Test 14 6 14 4 Checking the System Status 14 9 14 5 Replacin...

Page 12: ...SHIFT key The keys enter the shifted state when you press the SHIFT key and illuminate the green indicator located above the SHIFT key The setup menu marked in purple above the panel keys can be selec...

Page 13: ...1 2 IM 703155 01E Top Panel Handles Inlet holes Section 3 2 There are also inlet holes on the bottom panel Outlet holes Section 3 2 1 1 Front Panel Rear Panel and Top Panel...

Page 14: ...5 6 chapters 7 and 8 Used to select the output terminal set OUT1 to OUT4 on the screen that appears when the WAVE key or SEQ key is pressed Executing Signal Output START STOP Key Section 6 2 Starts s...

Page 15: ...est and remote control Displays error logs and the VB8300 system status firmware and the presence absence of options SHIFT MISC PRINT Key Chapter 9 Prints screen images and saves screen image data PRE...

Page 16: ...n the power ON OFF Connect the waveform output cables Load the waveform data Reference signal Clock signal Gain phase offset etc Edit sequence as necessary Start trigger Waveform Spectrum display CCDF...

Page 17: ...hesized Vector Signal Generator RF signal Circuit or device under test Baseband signal Waveform data generation and data conversion VB8300 CF card USB memory PC Serial RS 232 Control the VB8300 using...

Page 18: ...IAL RS 232 VIDEO OUT I I Q Q Sequence Controller AWGN AWGN LPF 6 M 30 M 100 M THRU Trigger Out Trigger In Trigger Sampling Clock Sequence Trigger Controller Trigger signal OUT1 OUT4 SEQ Trigger SMPLG...

Page 19: ...og signal by the D A converter passes through a low pass filter select 6 MHz 30 MHz 100 MHz or Through in which unneeded frequency components are removed Then a differential offset voltage is added to...

Page 20: ...m memory in order according to the sequence list Then the data is output The selected waveform data is transmitted loaded from the internal hard disk CF card or USB memory to the waveform memory and t...

Page 21: ...ile binary data CSV data or raw data can be loaded to a waveform memory from the internal hard disk CF card or USB memory Registering Multiple Waveform Data Files to a Sequence List and Loading the Fi...

Page 22: ...0 points for a single period a sine waveform with a frequency of 1 MHz is output If you select external clock the VB8300 generates waveforms by synchronizing to the external clock signal frequency Gai...

Page 23: ...edures see section 5 4 For each output terminal set OUT you can set the angles of the I and Q axes of the output waveform You can use this to simulate the phase error of a vector modulator demodulator...

Page 24: ...section 5 4 You can add AWGN Additive White Gaussian Noise to the output waveform on each output terminal set Because the AWGN is added as a digital signal before the D A converter DAC see the block d...

Page 25: ...T STOP key on the front panel the VB8300 enters the trigger wait state Waveform generation starts when an external start trigger signal is detected at the CLOCK START IN terminal on the rear panel Pre...

Page 26: ...STOP Key Press the START STOP key on the front panel once to start waveform generation Press the key again to stop Start Waveform Generation on a Start Trigger Waveform generation start on an externa...

Page 27: ...ered Waveform data stored on the internal hard disk binary data CSV data or raw data Elements Up to 128 file names of waveform data can be registered Data Length Displays the data length of the wavefo...

Page 28: ...nt waveform a switch is made to the next element When the Repeat Count Is Finite When a sequence trigger is activated while outputting the element waveform the waveform of the element is output the sp...

Page 29: ...o the trigger bus If both the trigger source and the sampling clock source are selected the sequence trigger signal is output from the trigger bus in sync with the sampling clock source when the trigg...

Page 30: ...s X as the amplitude of the instantaneous power Constellation Display For procedures see section 8 4 Displays a diagram with the vertical axis Y as the amplitude of Q and the horizontal axis X as the...

Page 31: ...from the VB8300 internal hard disk by accessing the VB8300 using FTP from a PC on the network This function can be used on a PC running an FTP client function Preset of Settings For procedures see sec...

Page 32: ...l You can arbitrarily select the signals to be summed from the output terminal sets OUT and the external signal input terminal ANALOG SUM EXT IN The amplitude of the signal that is output from the ANA...

Page 33: ...top of the power cord The power cord should also be kept away from any heat sources When unplugging the power cord from the outlet never pull by the cord itself Always hold and pull by the plug If the...

Page 34: ...ith both hands as shown in the figure below and move it with care Cleaning When wiping off dirt from the case or operation panel turn OFF the power switch and remove the power cord from the outlet The...

Page 35: ...pendicular to the bottom surface of the instrument If you are not using the stand return it to the original position while pressing the leg section of the stand inward If you are installing the instru...

Page 36: ...sunlight or near heat sources Where an excessive amount of soot steam dust or corrosive gas is present Near strong magnetic field sources Near high voltage equipment or power lines Where the level of...

Page 37: ...and protective grounding cannot be furnished do not use the instrument Connecting the Power Cord 1 Check that the main power switch on the rear panel of the instrument is turned OFF 2 Connect the pow...

Page 38: ...MAX 50 60 Hz FUSE 250 V T 5 A CAUTION OFF EVENT OUT 0 1 ON WARNING SUFFIX NO Made Hard disk drive installed To prevent damage do not vibration or shock to the in when the power is ON Do not operate w...

Page 39: ...the Standby Power Switch to the Standby Position and the Standby Procedure Setting the Standby Power Switch to the Standby Position Push the standby power switch on the front panel to return it to th...

Page 40: ...Output Terminal Sets OUT 1 OUT 2 suffix code 0644 or 1284 OUT 1 50 I I Q Q OUT 2 50 I I Q Q Single Ended Output Mode 4 Output Terminal Sets OUT 1 OUT 2 OUT 3 OUT 4 suffix code 0648 or 1288 OUT 1 50 OU...

Page 41: ...T 3 OUT 4 REMOTE UNLOCK OFF PRESET SHIFT 1 Press MISC The Misc menu appears 2 Press the System soft key The System menu is displayed 3 Press the Date Time soft key The Date Time menu appears Setting t...

Page 42: ...red date time and time zone are activated the entered time is displayed at the upper left corner of the screen If you exit from the Date Time menu without pressing the Set soft key the specified date...

Page 43: ...y the setup menu marked in purple above the pressed key is displayed This operation is indicated as SHIFT panel key in this manual Setup Procedure Basics There are mainly 7 types of operations possibl...

Page 44: ...for the menu the item that turns blue changes This method is used in the procedural explanations in this manual Each time you press the or key arrow key the item that turns light blue changes Turn th...

Page 45: ...s the or key to select the desired digit The digit shown in yellow is selected 3 Turn the rotary knob to set the value As the value of the selected digit is increased a carry over occurs As the value...

Page 46: ...of the corresponding numeric key As necessary use the or key to move to the desired position erase the entered value using the BACKSPACE key and reenter the value Entry box 3 Press the ENTER key The s...

Page 47: ...ked in purple above the pressed key is entered If you press the SHIFT key to turn on the green indicator above the SHIFT key and then press the same numeric key repeatedly the purple character above t...

Page 48: ...be accessed from the PC 1 Upload the waveform data files to the VB8300 hard disk The figure below is an example in which files are uploaded from the PC to the VB8300 whose Samba settings are as follow...

Page 49: ...be loaded to the waveform memory are registered The name of the selected file appears in the entry box 5 Press SELECT to confirm The cursor moves to the entry box To cancel the operation press RESET...

Page 50: ...oad waveform data from the VB8300 internal hard disk to the waveform memory set the directory to the VB8300 internal hard disk show in the Selection box and then select the waveform data file Loadable...

Page 51: ...m data file to be loaded to the waveform memory or the sequence list file in which the file names of the waveform data to be loaded to the waveform memory are registered The name of the selected file...

Page 52: ...can be loaded Sequence list file seq extension Waveform data file Raw data raw extension ASCII data csv extension Binary data bin extension Note When loading waveform data to the waveform memory the l...

Page 53: ...Ext Explanation The VB8300 generates waveforms by synchronizing to the internal or external clock signal The internal clock signal is generated based on the 10 MHz reference signal You can select whet...

Page 54: ...VB8300 generates waveforms by synchronizing to the internal or external clock signal You can select this clock signal Int Generates waveforms by synchronizing to the internal clock signal Ext Generate...

Page 55: ...soft key 3 Enter the clock signal frequency using numeric keys ENTER Explanation The VB8300 generates waveforms by synchronizing to the internal or external clock signal Of the two clock signals you c...

Page 56: ...of which to set the gain phase IQ gain ratio quadrature offset voltage offset or low pass filter Setting the Gain 3 Press the Gain soft key 4 Enter the gain using numeric keys ENTER The gain of the ou...

Page 57: ...oltage using numeric keys ENTER The Comm I Comm Q Diff I or Diff Q of the output waveform in the Wave View list is set to the specified value Diff I and Diff Q do not appear on single ended output mod...

Page 58: ...Vp p is set to 0 dB Selectable range 20 0 to 6 0 dBm in 0 1 dB steps Default value 0 0 dB Phase You can set the rotation angle amount of phase shift on the IQ plane of the output waveform Selectable...

Page 59: ...to the I and Q waveforms An offset voltage that is negative to I and Q is added to I _ and Q _ Selectable range 100 0 to 100 0 mV in 0 2 mV steps Default value 0 0 mV Differential offset cannot be sp...

Page 60: ...requency Selectable range 130 to 80 dBm Hz in 1 dBm Hz steps However the minimum value setting is 130 10 log10 300 fs Here fs is the clock frequency in MHz Default value 100 dBm Hz Note If a sequence...

Page 61: ...ess WAVE The Wave menu appears 2 Press the Next soft key 3 Press any key from OUT 1 to OUT 4 to select the output waveform to be set 4 Press the Clock Shift soft key 5 Enter the output shift using num...

Page 62: ...e procedure see section 3 7 or 3 8 BACK SPACE DISPLAY ON OFF KEY LOCK INITIALIZE HDD OPTION PRINT MISC FILE CLOCK MANUAL TRIG WAVE SEQ TRIG DISP OUT 1 OUT 2 OUT 3 OUT 4 REMOTE UNLOCK OFF PRESET SHIFT...

Page 63: ...terminals on the rear panel The analog signal output from output terminal sets OUT1 to 4 is turned OFF You can set the waveform output for each output terminal set OUT1 to 4 For detailed specification...

Page 64: ...OFF You can set the method of starting waveform generation ON When you press the START STOP key the VB8300 enters the trigger wait state Then when an external start trigger signal is detected waveform...

Page 65: ...m generation is in progress while the green indicator above the START STOP key is ON Waveform generation stops Stopping after the Waveform Data Loaded in the Waveform Memory Is Output Waveform generat...

Page 66: ...UT When the low pass filter is set to Through Input output signal timing chart VB8300 T1 T2 T1 Approx 5 ns T2 Approx 35 ns CLOCK IN Note If the external clock input of the VB8300 is used the signal re...

Page 67: ...eference signal input output terminal 10 MHz REF OUT and 10 MHz REF IN see section 13 3 VB8300 or VB8000 VB8300 or VB8000 10 MHz REF OUT rear panel 10 MHz REF OUT rear panel 10 MHz REF IN rear panel C...

Page 68: ...be stored on the VB8300 internal hard disk CF card or USB memory For the procedure of creating saving sequence lists see section 7 2 or 7 3 1 Press SEQ The Sequence menu appears 2 Press any of OUT1 t...

Page 69: ...the case of the CF card compact is displayed Entry box Displays the directory or file name selected using the rotary knob You can also enter the file name Explanation Before carrying out the procedure...

Page 70: ...dure starts with the display that appears when the sequence list is loaded as explained in section 7 1 If the sequence list is not loaded or if the sequence list has not been created the Element No 1...

Page 71: ...nsert soft key A blank line is added to the element selected in step 4 The following parameters are entered for the blank line that is added Waveform data Element box Blank Data length Length box Blan...

Page 72: ...ming the selection in step 12 and 13 press SELECT again The Element box shows the file name of the selected waveform data The Length box shows the data length of the selected waveform data Indicates t...

Page 73: ...shows Go to Top in the sequence list in step 4 on page 7 4 select 1time or Infin and proceed to step 17 16 Enter the repeat count using numeric keys ENTER The repeat count is valid when Times is sele...

Page 74: ...e Sampling Clock Source 4 Press the Sampling Clock Source soft key Possible choices are displayed 5 Use rotary knob SELECT to select the sampling clock source from OFF to EXT Example in which OUT2 is...

Page 75: ...Element Be careful because a confirmation message does not appear when you are deleting an element 6 Press the Delete soft key The selected element is deleted Proceed to step 8 Copying Pasting an Ele...

Page 76: ...and sequence lists can be edited in the same fashion as explained earlier 3 Press the Display Sequence Table soft key to return to the sequence edit screen of each output terminal set The words Displ...

Page 77: ...o wait for the sequence trigger Wait Trig box OFF Editing the Element Waveform data You can select either of the following choices for each element No Sig Period Registered as a no signal period perio...

Page 78: ...not set to trigger wait is being output the trigger is invalid You cannot select the sampling clock source if the trigger source is not selected For both the trigger source and sampling clock source t...

Page 79: ...ames of waveform data or no signal periods To actually generate the waveform the waveform data must be loaded in the waveform memory To load the waveform data to the waveform memory according to the o...

Page 80: ...FT 1 Press SEQ The Sequence menu appears 2 Press any of OUT1 to OUT4keys to select the sequence list to be saved 3 Press the Sequence File soft key The Sequence File menu appears 4 Press the Save File...

Page 81: ...Explanation You can save the sequence list to the VB8300 internal hard disk CF card or USB memory The sequence list applies to one output terminal set Sequence List Format That Can Be Saved The sequen...

Page 82: ...select the file to be displayed The name of the selected file appears in the entry box 4 Press SELECT to confirm The cursor moves to the entry box To cancel the operation press RESET When cancelled t...

Page 83: ...al X axes as voltage and time data points respectively Selecting the Waveform Trace to be Displayed 8 Press the Trace soft key Possible choices are displayed 9 Use rotary knob SELECT to select I Q or...

Page 84: ...e Auto Scale of the Vertical Axis 9 Press the Y Axis Auto Scale soft key Auto scale is executed The vertical scale is set so that the maximum and minimum values of the waveform data in the vertical di...

Page 85: ...ct OFF or Marker If you select OFF the marker is not shown on the display and you cannot set the marker If you select Marker proceed to step 11 Executing Marker Measurement 11 Press the Position soft...

Page 86: ...data bin extension Waveform Display The waveform data stored on the VB8300 internal hard disk CF card or USB memory can be displayed as waveforms with the vertical and horizontal axes as voltage and t...

Page 87: ...Div 1 00 V 1Div 0 50 V When Y Axis Div is changed from 1 00 V to 0 50 V Vertical position mark Ground level mark Vertical Axis Auto Scale Y Axis Auto Scale The vertical scale is set so that the maximu...

Page 88: ...ale X Axis Auto Scale The horizontal scale is set so that all of the data points of the waveform data fit on the waveform display frame Marker Measurement Marker Type You can select the marker type fr...

Page 89: ...knob to select the file to be displayed The name of the selected file appears in the entry box 4 Press SELECT to confirm The cursor moves to the entry box To cancel the operation press RESET When canc...

Page 90: ...The FFT Setting menu appears Selecting the Time Window 9 Press the Window soft key Possible choices are displayed 10 Select the time window using rotary knob SELECT Selecting the Number of Computed Po...

Page 91: ...y 12 Enter the upper limit of the vertical axis using numeric keys ENTER Setting the Voltage or Power Level per Grid 11 Press the Y Axis Div V soft key If you selected dBm in step 10 press the Y Axis...

Page 92: ...e Frequency Auto Scale soft key Auto scale is executed The horizontal scale is set so that the result of the spectrum computation fits on the waveform display frame Marker Measurement 8 Press the Mark...

Page 93: ...computed points from below 64 128 256 512 1024 2048 and 4096 Computation Begin Point You can set the start point in the following range Selectable range 0 to 1999999 points in 1 point steps You cannot...

Page 94: ...Points on the previous page Default value 0 0 Unit kHz or MHz Horizontal Display Range Frequency Span You can set the range of frequencies displayed between the left and right edges of the waveform d...

Page 95: ...from below OFF The marker is not shown on the display and you cannot set the marker Marker You can display the position and data voltage or power level of the marker Marker Output terminal set Wavefor...

Page 96: ...the rotary knob to select the file to be displayed The name of the selected file appears in the entry box 4 Press SELECT to confirm The cursor moves to the entry box To cancel the operation press RESE...

Page 97: ...of the instantaneous power that exceeds the average power and the horizontal axis X as the amplitude of the instantaneous power Setting the CCDF Computation Selecting the Computation Begin Point 8 Pr...

Page 98: ...ulated value of the instantaneous power that exceeds the average power which is computed from the waveform data fits on the waveform display frame Setting the Display Begin Point of the Horizontal Axi...

Page 99: ...not shown on the display and you cannot set the marker If you select Marker proceed to step 11 Executing Marker Measurement 11 Press the Position soft key 12 Enter the marker position using the numeri...

Page 100: ...specified number of computed points is met Default value 0 point Number of Computed Points Samples You can set the number of points in the following range Selectable range 1 to 10000 points in 1 point...

Page 101: ...at is calculated from the waveform data fits on the waveform display frame Y Top Value X Begin Value X End Value 1 0E 0 1 0E 1 1 0E 2 1 0E 3 1 0E 4 Display example when Y Top Value 1 Y Div 4 Divided i...

Page 102: ...Turn the rotary knob to select the file to be displayed The name of the selected file appears in the entry box 4 Press SELECT to confirm The cursor moves to the entry box To cancel the operation press...

Page 103: ...Setting the Vertical Y and Horizontal X Axes 8 Press the Scale soft key The Scale menu appears Setting the Vertical Scale 9 Press the Y Axis Mag soft key 10 Enter the vertical scale using numeric keys...

Page 104: ...t key Auto scale is executed The horizontal scale is set so that the amplitude of I of the waveform data in the horizontal direction fits on the waveform display frame Setting the Display Begin Point...

Page 105: ...ker If you select OFF the marker is not shown on the display and you cannot set the marker If you select Marker proceed to step 11 on the next page Executing Marker Measurement 11 Press the Position s...

Page 106: ...e range 0 1 to 100 0 in 0 1 steps Initial value 1 5 Vertical Axis Auto Scale Y Axis Auto Scale The vertical scale is set so that the amplitude of Q of the waveform data in the vertical direction fits...

Page 107: ...ype from below OFF The marker is not shown on the display and you cannot set the marker Marker The marker position and the amplitudes of I and Q can be displayed Marker Output terminal set Waveform da...

Page 108: ...the rotary knob to select the file to be displayed The name of the selected file appears in the entry box 4 Press SELECT to confirm The cursor moves to the entry box To cancel the operation press RESE...

Page 109: ...amplitude and the horizontal axis X as the data length Selecting the Waveform Trace to be Displayed 8 Press the Trace soft key Possible choices are displayed 9 Use rotary knob SELECT to select I Q or...

Page 110: ...he amplitude of the loaded waveform data in the vertical direction fits on the waveform display frame Setting the Data Length 9 Press the Eye Length soft key 10 Enter the data length the number of dat...

Page 111: ...select OFF or Marker If you select OFF the marker is not shown on the display and you cannot set the marker If you select Marker proceed to step 11 Executing Marker Measurement 11 Press the Position...

Page 112: ...8 6 Waveform to Be Displayed You can select the number of computed points from below I Displays only the I waveform Q Displays only the Q waveform Both Displays both the I and Q waveforms If the I an...

Page 113: ...t values Begin Point 0 point End Point 256 point Horizontal Axis Auto Scale X Axis Auto Scale The horizontal scale is set so that all of the data points of the waveform data fit on the waveform displa...

Page 114: ...AL TRIG WAVE SEQ TRIG DISP OUT 1 OUT 2 OUT 3 OUT 4 REMOTE UNLOCK OFF PRESET SHIFT This section explains the common display format when displaying the waveform data Depending on the Waveform Spectrum C...

Page 115: ...le soft key to select ON or OFF Explanation Display Interpolation The waveform data is digital data A space may appear between data points when the waveform is displayed You can select the type of int...

Page 116: ...hide the labels for the displayed waveforms Waveform label ON Waveform label OFF Displaying Scale Values You can select whether to show or hide the scale values when displaying waveforms Scale value O...

Page 117: ...TION PRINT MISC FILE CLOCK MANUAL TRIG WAVE SEQ TRIG DISP OUT 1 OUT 2 OUT 3 OUT 4 REMOTE UNLOCK OFF PRESET SHIFT Connecting a USB Printer 1 Connect the VB8300 and a USB printer using a USB cable For d...

Page 118: ...creen image is printed on the USB printer Explanation You can print the screen image to a USB printer via the USB interface Connecting a USB Printer To connect a USB printer to the VB8300 connect a US...

Page 119: ...int Color You can set the print color to color black and white or reversed black and white OFF The screen image is printed in black and white Color The screen image is printed in color Reverse The bla...

Page 120: ...OCK MANUAL TRIG WAVE SEQ TRIG DISP OUT 1 OUT 2 OUT 3 OUT 4 REMOTE UNLOCK OFF PRESET SHIFT Connecting to the Network 1 After making a network connection see section 11 1 enter TCP IP settings see secti...

Page 121: ...ibed in this section Network connection Section 11 1 TCP IP settings Section 11 2 Settings for printing screen images to a network printer Section 11 3 Printing is possible on a printer or via a print...

Page 122: ...e way in If you don t the VB8300 may not detect it correctly Eject button Access indicator CF card MO DE L SU FFIX NO Hard disk drive instal To prevent damage vibration or shock to when the power is O...

Page 123: ...move the USB memory pull it out from the port If you remove the CF card or USB memory without carrying out step 3 the CF card or USB memory will remain detected If this happens carry out step 3 The CF...

Page 124: ...the CF card or USB memory If the VB8300 does not detect the CF card or USB memory format it on your PC Select FAT or FAT32 for the file system when formatting Data Sizes of the CF Card That Can Be Use...

Page 125: ...Procedure To exit the menu during operation press ESC located above the soft keys In the procedural explanation below the phrase rotary knob SELECT and numeric keys ENTER may be used These phrases ind...

Page 126: ...ON in step 5 you cannot enter the file name To cancel the directory selection or the entered file name press RESET When cancelled the cursor moves to the file list display area 11 Press SELECT The da...

Page 127: ...he selected file is loaded Indicates the directory of the file shown The display here does not change even if you change the directory to be shown To move to a higher level directory select here and t...

Page 128: ...e name Storage Medium and Directory The selected save destination or load source is shown in the Selection box in the Save File or Load File dialog box Save destination or Selection box load source In...

Page 129: ...nmounting it first may destroy the data on the CF card or USB memory Procedure To exit the menu during operation press ESC located above the soft keys In the procedural explanation below the phrase ro...

Page 130: ...ayed File list display area Selection display Displays the selected directory name In the case of the top directory of the internal hard disk a slash is displayed In the case of the CF card compact is...

Page 131: ...ural explanation below the phrase rotary knob SELECT and numeric keys ENTER may be used These phrases indicate procedures for selecting setting items and entering values character strings and units Fo...

Page 132: ...N in step 7 you cannot enter the file name To cancel the directory selection or the entered file name press RESET When cancelled the cursor moves to the file list display area 13 Press SELECT The data...

Page 133: ...n the selected file is loaded Indicates the directory of the file shown The display here does not change even if you change the directory to be shown To move to a higher level directory select here an...

Page 134: ...ber of characters and the type of characters that can be used are as follows Number of characters Up to 255 characters Characters that can be used 0 to 9 A to Z a to z and A period cannot be used as t...

Page 135: ...below the phrase rotary knob SELECT and numeric keys ENTER may be used These phrases indicate procedures for selecting setting items and entering values character strings and units For details on the...

Page 136: ...keys ENTER If you turn auto naming ON in step 11 you cannot enter the file name To cancel the directory selection or the entered file name press RESET When cancelled the cursor moves to the file list...

Page 137: ...Auto Naming When Auto Naming is turned ON files are created with a three digit number from 000 to 999 automatically added to the file name The common portion of the file name before the number is fix...

Page 138: ...300 see section 10 1 Removing the CF card or USB memory without unmounting it first may destroy the data on the CF card or USB memory Procedure To exit the menu during operation press ESC located abov...

Page 139: ...level directory select here and then press the SELECT key twice quickly If you select compact or usbmem and press the SELECT key twice quickly the data on the CF card or USB memory is displayed File...

Page 140: ...8300 see section 10 1 Removing the CF card or USB memory without unmounting it first may destroy the data on the CF card or USB memory Procedure To exit the menu during operation press ESC located abo...

Page 141: ...ation area To cancel the operation press RESET When cancelled the cursor moves to the file list display area in the Destination area 8 After confirming the selection in step 6 and 7 use numeric keys E...

Page 142: ...es You can copy a selected file one at a time You can also copy directories one at a time If a directory contains other directories folders or files the contents of the directory are also copied Note...

Page 143: ...10 1 Removing the CF card or USB memory without unmounting it first may destroy the data on the CF card or USB memory Procedure To exit the menu during operation press ESC located above the soft keys...

Page 144: ...t display area in the Destination area 8 After confirming the selection in step 6 and 7 use numeric keys ENTER to enter the file or directory name 9 Press SELECT The renaming of the file or directory...

Page 145: ...keys ENTER To cancel the selection of the directory in which the new directory will be created or the entered directory name press RESET When cancelled the cursor moves to the file list display area 7...

Page 146: ...le and Directory Names The number of characters and the type of characters that can be used are as follows Number of characters Up to 255 characters Characters that can be used 0 to 9 A to Z a to z an...

Page 147: ...inter Samba server DHCP and DNS 100 120 220 240 V AC 300 VA MAX 50 60 Hz FUSE 250 V T 5 A OFF IQ DIGITAL OUT EVENT OUT 0 1 ON WARNING Do not operate without reading safety precautions in user s manual...

Page 148: ...or STP cable to the ETHERNET 100BASE T terminal on the rear panel 2 Connect the other end of the UTP or STP cable to a hub or router 3 Likewise connect the PC to a hub or router 4 Turn the VB8300 ON...

Page 149: ...MANUAL TRIG WAVE SEQ TRIG DISP OUT 1 OUT 2 OUT 3 OUT 4 REMOTE UNLOCK OFF PRESET SHIFT Displaying the TCP IP Setup Menu 1 Press MISC The Misc menu appears 2 Press the Network soft key The Network menu...

Page 150: ...255 Setting the Broadcast Segment If you turned DHCP OFF in step 4 carry out the procedure below to set the broadcast segment 9 Press the Broadcast soft key An entry box appears 10 Enter the broadcast...

Page 151: ...n name 18 Press the Domain Name soft key An entry box appears 19 Enter the domain name using numeric keys ENTER Setting the DNS Server Address If DHCP was set to OFF in step 4 and DNS was set to ON in...

Page 152: ...r network administrator This parameter is automatically configured in environments using DHCP Subnet Mask You can set the mask value used when determining the subnet network address from the IP addres...

Page 153: ...esses can be specified primary and secondary If the primary DNS server is down the secondary DNS server is automatically looked up for the mapping of the host name domain name and IP address Domain Na...

Page 154: ...UT 1 OUT 2 OUT 3 OUT 4 REMOTE UNLOCK OFF PRESET SHIFT To use this function configure the TCP IP parameters in advance according to the procedure given in section 11 2 1 Press MISC The Misc menu appear...

Page 155: ...mpatibility Canon LIPS4 LPB1710 Canon S500 BJS500 PIXUS860i bjc 8200 BJS500 PIXUS860i escp2 pm950c PM950c pcl 900 DeskJet 5650 Note To use this function configure the TCP IP parameters in advance acco...

Page 156: ...PRINT MISC FILE CLOCK MANUAL TRIG WAVE SEQ TRIG DISP OUT 1 OUT 2 OUT 3 OUT 4 REMOTE UNLOCK OFF PRESET SHIFT To use this function configure the TCP IP parameters in advance according to the procedure g...

Page 157: ...S the data on the machine becomes accessible from a Windows network client You can carry out the operations below on the public folder on the VB8300 internal hard disk However if the USB memory or CF...

Page 158: ...hen a USB memory or CF is detected Download files Upload files Delete files Rename files Create folders Move to different folders Unlike the Samba server function other operations are not possible Not...

Page 159: ...ude Offset If the calibration completes successfully nothing appears on the screen If it fails an error dialog box appears If an error dialog box appears contact your nearest YOKOGAWA dealer Note The...

Page 160: ...RESET SHIFT Saving Preset Settings 1 Press MISC The Misc menu appears 2 Press the Next soft key 3 Press the User Preset soft key The settings that exist when you press the soft key are saved Applying...

Page 161: ...IFT Note Check that it is okay to initialize the settings to their factory default before actually initializing the settings You cannot set the settings back after initialization It is recommended tha...

Page 162: ...PRINT MISC FILE CLOCK MANUAL TRIG WAVE SEQ TRIG DISP OUT 1 OUT 2 OUT 3 OUT 4 REMOTE UNLOCK OFF PRESET SHIFT Turning the Display OFF Press DISPLAY ON OFF when the display is turned ON The backlight tu...

Page 163: ...TRIG DISP OUT 1 OUT 2 OUT 3 OUT 4 REMOTE UNLOCK OFF PRESET SHIFT Turning Key Lock ON Press KEYLOCK The key lock turns ON The green indicator above the KEYLOCK key to the left of the word UNLOCK illumi...

Page 164: ...MISC The Misc menu appears 2 Press the System soft key The System menu is displayed 3 Press the Error Log soft key The error list appears Scrolling the List 4 Press the Log No soft key 5 Enter the log...

Page 165: ...BACK SPACE DISPLAY ON OFF KEY LOCK INITIALIZE HDD OPTION PRINT MISC FILE CLOCK MANUAL TRIG WAVE SEQ TRIG DISP OUT 1 OUT 2 OUT 3 OUT 4 REMOTE UNLOCK OFF PRESET SHIFT 1 Press MISC The Misc menu appears...

Page 166: ...you to turn the power OFF Restart the VB8300 The VB8300 boots up using the updated firmware Updating the Printer Driver 11 Press the Printer Driver Update soft key A dialog appears for you to confirm...

Page 167: ...hile the update operation is in progress When the updating is finished a message Please Shutdown appears Restart the VB8300 The VB8300 boots up using the updated firmware The startup screen shows Setu...

Page 168: ...0 1 Removing the CF card or USB memory without unmounting it first may destroy the data on the CF card or USB memory Procedure To exit the menu during operation press ESC located above the soft keys I...

Page 169: ...pact or usbmem and press the SELECT key twice quickly the data on the CF card or USB memory is displayed File list display area Selection display Displays the selected directory name In the case of th...

Page 170: ...pplication starts and the application menu appears APPLI START STOP ON OFF OUTPUT Note If a software application is not selected no application will start when you press APPLI If you turn OFF the VB83...

Page 171: ...ernal hard disk It does not appear on the file operation screens on the VB8300 Registering Software Applications from a CF Card or USB Memory The CF card or USB memory containing the software applicat...

Page 172: ...amage the VB8300 If the waveform generation start trigger is set to external see section 6 1 apply a start trigger signal Apply a signal with a rising pulse width of 100 ns or greater External Start T...

Page 173: ...ernal a signal indicating that it is ready to receive triggers is output A high TTL level signal indicates the external trigger receive ready state Trigger Ready Output Terminal CLOCK READY OUT Specif...

Page 174: ...s by synchronizing to the internal or external clock signal If the clock signal is set to external see section 5 2 apply a clock signal External Clock Input Terminal CLOCK IN Specifications Item Speci...

Page 175: ...e external clock signal is output For a description of the internal external clock signal selection see section 5 2 External Clock Output Terminal CLOCK OUT Specifications Item Specifications Connecto...

Page 176: ...hronizing to the internal or external clock signal The 10 MHz reference signal is the signal used as a reference to the internal clock signal frequency If the reference signal is set to external see s...

Page 177: ...he external reference signal is output For a description of the internal external reference signal selection see section 5 1 10 MHz Reference Signal Output Terminal 10 MHz REF OUT Specifications Item...

Page 178: ...and Q waveform data are created An event output terminal is available for each output terminal set OUT1 to 4 Event Output Terminal EVENT OUT Specifications Item Specifications Connector type BNC Numbe...

Page 179: ...ct number DX10A 68S by Hirose Number of connectors 2 for Optional Code D2 4 for Optional Code D4 8 for Optional Code D8 Output level LVDS Use at differential 100 termination Output differential voltag...

Page 180: ...QDO N05 27 QDO P06 61 QDO N06 28 QDO P07 62 QDO N07 29 QDO P08 63 QDO N08 30 QDO P09 64 QDO N09 31 QDO P10 65 QDO N10 32 QDO P11 66 QDO N11 33 QDO P12 67 QDO N12 34 QDO P13 68 QDO N13 IDO is the I ou...

Page 181: ...ircuit Input resistance Approx 100 differential Input capacity 10 pF or less Output circuit Approx 100 Timing Chart Approx 0 4 ns DOCK P IDO P00 to IDO P13 QDO P00 to QDO P13 EVNT P0 EVNT P1 Signal na...

Page 182: ...put Connectable monitors are multi sync monitors capable of displaying VGA resolution Video Signal Output Connector VIDEO OUT Specifications Item Specifications Standard VESA Connector type 15 pin D S...

Page 183: ...ON the VB8300 and the monitor The VB8300 screen is displayed on the monitor Note The RGB video signal is constantly output from the pins on VIDEO OUTPUT connector The monitor screen may flicker if th...

Page 184: ...e signal such as excessive voltage may damage the VB8300 The trigger source for sequence trigger see section 7 2 can be input externally Apply a signal with a rising pulse width of 100 ns or greater S...

Page 185: ...er signal for sequence trigger see section 7 2 can be output externally Sequence Trigger External Trigger Source Output Terminal SEQ TRIG TRIG OUT Specifications Item Specifications Connector type BNC...

Page 186: ...equence trigger see section 7 2 can be input externally Apply a signal with a rising pulse width of 100 ns or greater Sequence Trigger External Sampling Clock Input Terminal SEQ TRIG SMPLG IN Specific...

Page 187: ...ing clock for sequence trigger see section 7 2 can be output externally Sequence Trigger External Sampling Clock Output Terminal SEQ TRIG SMPLG OUT Specifications Item Specifications Connector type BN...

Page 188: ...cated above the soft keys In the procedural explanation below the phrase rotary knob SELECT and numeric keys ENTER may be used These phrases indicate procedures for selecting setting items and enterin...

Page 189: ...signal that is output from the ANALOG SUM OUT terminal depends on the amplitude of each signal that is added The gain is 0 dB Selecting the Summed Signals You can select whether to sum the signals ind...

Page 190: ...tput externally Analog Sum ANALOG SUM OUT Terminal Specifications Item Specifications Connector type BNC Output range 1 5 to 2 5 V at 50 load the value of AC peak DC voltage offset Output amplitude 3...

Page 191: ...such as excessive voltage may damage the VB8300 An external signal can be input to be included in the analog sum Analog Sum ANALOG SUM EXT IN Terminal Specifications Item Specifications Connector typ...

Page 192: ...e key lock OFF 12 5 Other causes Perform a key test 14 3 If an error occurs servicing is required Output waveform is odd Insufficient warm up Warm up the VB8300 for 30 minutes 3 4 after turning ON the...

Page 193: ...ntroller 809 FPGA failure Maintenance service is required 811 Fan stopped Power off immediately Maintenance service is required 819 Lack of memory 820 Socket error Servicing required 824 826 Error log...

Page 194: ...900 Not found clock generator board The clock generator board is not installed or cannot 901 be detected Servicing required 902 Not found arbitrary waveform generator board The arbitrary waveform gene...

Page 195: ...the file again after eliminating the invalid parameter 1041 Number of waveform data points is less than 256 Set the waveform data with at least 256 points 7 2 points chapter 8 1042 Number of waveform...

Page 196: ...ch file or directory Chapter 10 1106 The source and the destination are the same file 10 7 10 8 1107 File or directory already exists 10 7 10 8 1108 Cannot find directory Chapter 10 1109 Cannot open h...

Page 197: ...ails on the procedure see section 3 7 or 3 8 BACK SPACE DISPLAY ON OFF KEY LOCK INITIALIZE HDD OPTION PRINT MISC FILE CLOCK MANUAL TRIG WAVE SEQ TRIG DISP OUT 1 OUT 2 OUT 3 OUT 4 REMOTE UNLOCK OFF PRE...

Page 198: ...r 5 When you are done press the ESC key to clear the key arrangement Display Test 3 Press the Display soft key Test screens of the red green and red gradations are displayed sequentially for approxima...

Page 199: ...at a time Check that there are no defects in the pixels on the test screen For the specifications of the display see section 15 3 Peripheral Interface Test The test result of the VB8300 internal hard...

Page 200: ...r selecting setting items and entering values character strings and units For details on the procedure see section 3 7 or 3 8 BACK SPACE DISPLAY ON OFF KEY LOCK INITIALIZE HDD OPTION PRINT MISC FILE C...

Page 201: ...250 V Maximum rated current 5 A Type Time lag Standard VDE SEMKO UL CSA SEV Part Number A1114EF Replacement Procedure Replace the power fuse according to the procedure below 1 Turn OFF the power swit...

Page 202: ...our nearest YOKOGAWA dealer for replacing parts Parts Name Service Life LCD backlight Approx 25000 hours under normal use Parts Name Warranty Period Internal hard disk One year after purchase data is...

Page 203: ...wave DC voltage offset accuracy1 setting 1 3 mV at 50 load Skew between signals between OUTs 1 Within 1 5 ns when low pass filter is through Skew between signals between I and Q 1 Within 1 0 ns when...

Page 204: ...g differential 100 to 100 mV resolution 0 2 mV Noise addition 130 to 80 dBm Hz resolution 1 dBm Hz However the minimum value setting is 130 10 log10 300 fs where fs is the clock frequency in MHz Digit...

Page 205: ...open termination Output impedance Approx 50 IQ digital output Connector type DX10A 68S by Hirose option Output level LVDS level differential 100 termination External trigger source input Connector ty...

Page 206: ...tions Number of drives 1 Slot type Compact Flash TM Type I supports memory cards USB port Item Specifications Connector type Type A connector Number of ports 2 a USB memory can be connected to only on...

Page 207: ...Mbps Communication protocol TCP IP Supported service DHCP Serial RS 232 Item Specifications Connector type D Sub 9 pin Number of ports 1 Electrical specifications Conforms to EIA 574 9 pin EIA 232 RS...

Page 208: ...ambient temperature of 23 C with the power turned OFF Recommended calibration period 1 year Safety standards Complying standard EN61010 1 Overvoltage category II1 Pollution degree 22 Emission Complyi...

Page 209: ...IM 703155 01E Specifications 15 15 10 External Dimensions Rear view 427 30 23 14 4 426 12 65 19 6 177 12 65 Unit mm Unless otherwise specified tolerance is 3 however tolerance is 0 3 mm when below 10...

Page 210: ...Host Name localhost IP Address Blank Net Mask Blank Broadcast Blank Gateway Blank Network DNS DNS ON Domain Name localdomain DNS Server 1 2 Blank Domain Suffix 1 2 Blank Network Samba Server Netbios...

Page 211: ...igger OFF TRIG Start Trigger OFF Trigger Source OFF Sampling Clock Source OFF DISP Format Waveform Configure Interpolate Line Graticule Crosshairs Label ON Scale ON For DISP Waveform Trace Both Scale...

Page 212: ...e Marker Position 0 For DISP Constellation Scale Y Axis Mag 1 5 X Axis Mag 1 5 Begin Point 0 points End Point 256 points Marker Type Marker Position 0 For DISP Eye Trace Both Scale Y Position 0 Y Axis...

Page 213: ...d If you are creating waveform data without using the waveform generator software utilities that come standard or those sold separately follow the format given below For ASCII and binary data data tha...

Page 214: ...ock 1 bit Trigger 1 bit LSB 14 bits 14 bits 32 bits RMS value of I and Q The RMS values are determined as follows RMS k 0 n 1 I 2 k Q2 k n However if RMS 0 set RMS to 1 Event Data For each output term...

Page 215: ...3 1 2 3 RMS data of I and Q IEEE double precision real number 64 bits Data Conversion Example of a program that converts binary data into raw data Example of a function that converts 1 0 real number 1...

Page 216: ...d int d Data before conversion Output None Return value Input data with endian converted In other words BigEndian Endian LittleEndian LittleEndian Endian BigEndian Note The unsigned int type is assume...

Page 217: ...me Char string Alphanumeric and symbols Characters that can be used in directory file names 6 Length Length Integer 0 256 to 65535 When file name is blank the length is 0 7 Repeat Repeat Type Integer...

Page 218: ...3 4 5 6 7 8 9 2 3 4 5 6 7 8 9 2 9 2 3 4 5 6 7 8 9 End of the data Beginning of the data Create data for the total number of The last line is Go To Data Size of Each Field Total Element No Element No...

Page 219: ...P Address 11 4 IP address 11 6 IQ digital output 13 8 13 9 13 10 IQ gain ratio 2 8 5 6 Symbols 10 MHz reference signal 13 5 2 s complement 5 11 A accessories optional iii accessories standard iii Addi...

Page 220: ...printer server name 11 9 Q quadrature offset 2 8 5 6 R raw data App 5 recommended replacement parts 14 11 reference signal 2 7 5 1 repeat count 2 12 7 10 RJ 45 connector 11 1 rotary knob SELECT 3 12 S...

Page 221: ...waveform generation 6 2 waveform generation output principles of 2 5 2 6 waveform output terminals 3 8 waveform output turning ON OFF of 2 11 6 2 weight 15 6 withstanding voltage 15 6 X X Auto Scale 8...

Reviews: