7.1
95-8533
4-9
CONTROLLER REDUNDANCY
Pushbuttons
The pushbuttons are active on the master controller
and inactive on the standby controller.
Controller Status Indicators
The status indicators are active on the master
controller. All LEDs except the power LED are off and
the trouble relay is in the no trouble state.
Controller Relay Operation
The controller relays are fully functional on the master
controller and the standby controller.
Text Display
The text display on the master controller is fully
functional as explained in the previous section. The
text display on the standby controller reads **Standby
Mode**, Ready.
Controller Menu Options
The menu options are active on the master controller
and inactive on the standby controller.
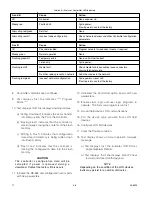
ControlNet Status Indicators
The ControlNet status indicators are active on the
master and standby controller. See Table 4-3 for
details.
Power-up Sequence
The power-up sequence for a redundant controller
pair is as follows:
1. Make sure the LON and HSSL are connected
correctly.
2. Apply power to both controllers.
3. Controllers go through their boot-up routine.
4. The controller that is connected with the primary
end of the HSSL is identified as the primary
controller and is assigned address 1.
5. The controller that is connected with the
secondary end of the HSSL is assigned address
2.
6. If there are no faults present, the primary controller
defaults to the master controller and the
secondary controller defaults to the standby
controller.
7. The master controller executes user logic and
communicates with the connected LON devices.
8. The standby controller indicates that it is in
standby mode and monitors the master controller.
9. The master and standby controller go through a
synchronization process.
10. The power-up sequence is complete.
Synchronization
When a master controller detects a standby controller
on the HSSL, it performs the following synchronization
process:
1. Compare controller firmware versions and SIL
rating. If they are not an exact match, the process
stops and a fault is generated. Consult the
factory for details.
2. Standby controller indicates the synchronization
steps.
3. Compare the user application programs. If there
is a mis-match, the master will configure the
standby controller via the HSSL.
4. Initiate the data synchronization process.
5. Transfer the status of device inhibits and device
removes.
6. Transfer the complete alarm list, including alarm
history.
7. Transfer the real time clock (RTC) value.
8. Copy the local and global memory to the standby
controller.
9. Synchronization is complete and the standby
controller indicates “Ready”.
Summary of Contents for DET-TRONICS 95-8533
Page 128: ...7 1 95 8533 A 4 Figure A 1 System Drawing 007545 001 ...
Page 129: ...95 8533 A 5 7 1 Figure A 2 System Drawing 007545 001 ...
Page 131: ...95 8533 7 1 B 2 Figure B 1 Drawing 007546 001 ...
Page 132: ...95 8533 7 1 B 3 Figure B 2 Drawing 007546 001 ...
Page 134: ...95 8533 7 1 C 2 Figure C 1 Drawing 007547 001 ...
Page 141: ...95 8533 7 1 D 7 Figure D1 System Drawing 007545 001 ...
Page 143: ...APPENDIX E E 1 95 8533 7 1 ...


