7-9
INSTALLATION-TELEPHONE
SECTION 400-096-207
SEPTEMBER 1992
Figure 7-7 (DKT2010-H) or Figure 7-8
(DKT2010-SD, DKT2020-S, DKT2020-SD),
and locate the HHEU strap on the PCB in the
telephone. Cut the strap if a headset will be
connected to the HHEU.
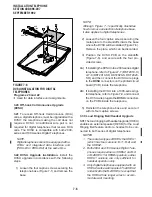
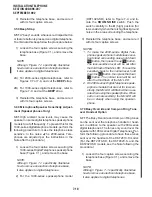
9B) For 1000-series digital telephones, refer to
Figure 7-9, and locate the HHEU strap on the
upper PCB in the telephone. Cut the strap if
an HHEU will be connected to a headset.
10) Reinstall the telephone base, and secure it
with its four captive screws.
11) To adjust the volume of the HESB Loud
Ringing Bell: Call the telephone connected to
the HESB, and adjust the volume control on
the back of the HESB and the ring volume
control on the telephone.
3.40 Carbon Headset/Handset Straps
3.41 If a carbon-type handset or headset is con-
nected to the handset jack on the side of the
telephone, two jumper straps inside the telephone
must be cut. Cut the straps in accordance with the
following steps:
NOTE:
It is not necessary to cut these straps if the
headset is connected to the HHEU.
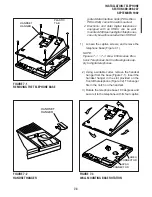
1) Loosen the four captive screws securing the
telephone base (Figure 7-1), and remove the
base.
NOTE:
Although Figure 7-1 specifically illustrates
how to remove an electronic telephone base,
it also applies to digital telephones.
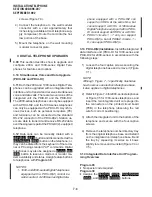
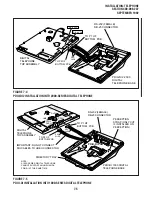
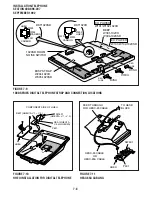
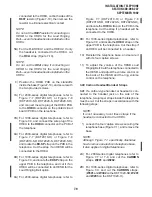
2A) For 2000-series digital telephones refer to
Figure 7-7 or 7-8, and cut the CARBON
straps, W201 and W202.
2B) For 1000-series digital telephones, refer to
Figure 7-9, and cut the CARBON straps,
(W301 and W302 on the DKT1020-SD; W201
and W203 on the DKT1020-H).
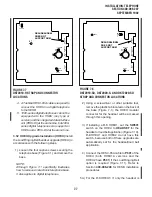
connected to the HHEU, cut both sides of the
R607 resistor (Figure 7-10), then remove the
resistor to eliminate electrical contact.
NOTE:
Do not cut the R607 resistor if connecting an
HESB to the HHEU for the Loud Ringing
Bell—even if a headset is also installed on the
HHEU.
5B) For the V.4 HHEU1 and the HHEU2: If only
the headset is connected to the HHEU, cut
the OCA strap (Figure 7-10).
NOTE:
Do not cut the OCA strap if connecting an
HESB to the HHEU for the Loud Ringing
Bell—even if a headset is also installed on the
HHEU.
6) Position the HHEU PCB on the standoffs
inside the base (Figure 7-10), and secure with
the two provided screws.
7A) For 2000-series digital telephones, refer to
Figure 7-7 (DKT2010-H) or Figure 7-8
(DKT2010-SD, DKT2020-S, DKT2020-SD),
and connect the wire plug of the HHEU PCB
to the HHEU connector on the printed circuit
board (PCB) on the telephone.
7B) For 1000-series digital telephones, refer to
Figure 7-9, and connect the wire plug of the
HHEU to the HHEU connector on the PCB of
the telephone.
8A) For 2000-series digital telephones, refer to
Figure 7-7 (DKT2010-H) or Figure 7-8
(DKT2010-SD, DKT2020-S, DKT2020-SD),
and locate the EX.SP strap on the PCB in the
telephone. Cut the strap if an HESB will be
connected to the HHEU.
8B) For 1000-series digital telephones, refer to
Figure 7-9, and locate the EX.SP strap on the
upper PCB in the telephone, and cut it if an
HHEU will be connected to an HESB for the
Loud Ringing Bell option.
9A) For 2000-series digital telephones, refer to
Summary of Contents for Strata DK 24
Page 2: ......
Page 10: ......
Page 12: ...INSTALLATION SYSTEM DESCRIPTION SECTION 400 096 202 SEPTEMBER 1992 ...
Page 42: ......
Page 72: ......
Page 102: ......
Page 110: ......
Page 144: ...INSTALLATION TELEPHONE SECTION 400 096 207 SEPTEMBER 1992 ...
Page 164: ......
Page 166: ...INSTALLATION PERIPHERALS SECTION 400 096 208 SEPTEMBER 1992 ...
Page 170: ......
Page 238: ...INSTALLATION WIRING DIAGRAMS SECTION 400 096 209 SEPTEMBER 1992 ...
Page 300: ......
Page 302: ...REMOTE ADMINISTRATION MAINTENANCE PROCEDURES SECTION 400 096 600 SEPTEMBER 1992 ...
Page 372: ......


