


1-46
DCR-PC115/PC115E/PC120BT/PC120E
198
(
6
)
Вставьте “Memory Stick” в видеокамеру,
подключите адаптер питания переменного
тока и установите переключатель POWER
в положение MEMORY.
На экране ЖК-дисплея видеокамеры
появится индикация USB MODE.
Компьютер обнаружит наличие
видеокамеры и запустится мастер
установки оборудования Windows.
(
7
)
Для распознания видеокамеры мастером
установки оборудования следуйте
указаниям на экране. Поскольку
устанавливается два различных драйвера
USB, мастер установки оборудования
запустится два раза. Не прерывайте
процесс установки до его завершения.
Примечания
•
Если в видеокамере нет “Memory Stick”,
драйвер USB установить невозможно.
Перед установкой драйвера USB убедитесь
в том, что “Memory Stick” вставлена в
видеокамеру.
•
Если компьютер подключался к
видеокамере до завершения установки
драйвера USB, регистрация драйвера USB
может выполниться некорректно.
Переустановите драйвер USB, следуя
процедуре, описанной на стр. 199.
Viewing images using computer
(
6
)
Insert a “Memory Stick” into your camcorder,
connect the AC power adaptor and set the
POWER switch to MEMORY.
USB MODE appears on the LCD screen of
your camcorder. Your computer recognises
the camcorder, and the Windows Add
Hardware Wizard starts.
(
7
)
Follow the on-screen messages to have the
Add Hardware Wizard recognise the
hardware. The Add Hardware Wizard starts
twice because two different USB drivers are
installed. Be sure to allow the installation to
complete without interrupting it.
Notes
• You cannot install the USB driver if a “Memory
Stick” is not in your camcorder.
Be sure to insert a “Memory Stick” into your
camcorder before installing the USB driver.
• The USB driver has been registered incorrectly
as your computer was connected to your
camcorder before installation of the USB driver
was completed. Re-install the USB driver
following the procedure on page 199.
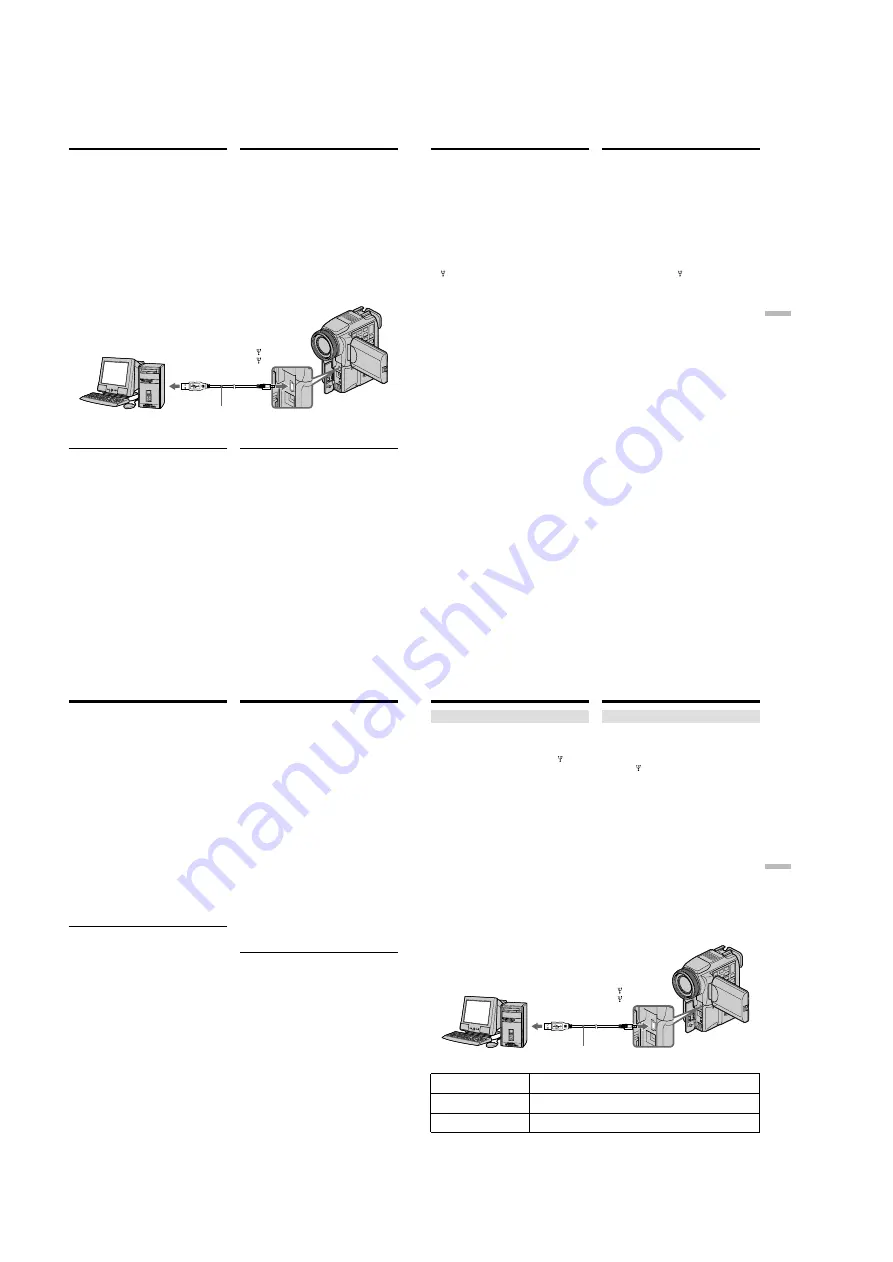
USB connector/
Разъем USB
(USB) jack/
Гнездо USB
USB cable/
Кабель USB
Push into the end/
Вставьте до упора
Просмотр изображений на
компьютере
199
“
Memory Stick
”
operations
Работа с “Memory Stick”
Viewing images using computer
Image data cannot be transferred by
the USB connection
The USB driver has been registered incorrectly as
your computer was connected to your camcorder
before installation of the USB driver was
completed. Perform the following procedure to
correctly install the USB driver.
Step 1 Uninstall the incorrect USB
driver
1
Turn on the power and allow Windows to
load.
2
Connect the USB jack on your computer to the
(USB) jack on your camcorder using the
USB cable supplied with your camcorder.
3
Insert a “Memory Stick” into your camcorder,
connect the AC power adaptor, and set the
POWER switch to MEMORY.
4
Open your computer’s “Device Manager”.
Windows 2000 Professional:
Open “My Computer”
t
“Control Panel”
t
“Hardware” tab, and click the “Device
Manager” button.
Other OS:
Select “My Computer”
t
“Control Panel”
t
“System”, and click “Device Manager”.
5
Select “Other devices”.
Select the device prefixed with the “?” mark
and delete.
Ex: (?)Sony Handycam
6
Set the POWER switch to OFF (CHG), and
then disconnect the USB cable.
7
Restart your computer.
Данные изображения не передаются
через соединение USB
Если компьютер отключался от видеокамеры
до завершения установки драйвера USB,
регистрация драйвера может выполниться
некорректно. Для корректной установки
драйвера USB выполните следующую
процедуру.
Пункт 1 Удаление некорректного
драйвера USB
1
Включите компьютер и дождитесь
загрузки Windows.
2
Соедините разъем (USB) видеокамеры с
гнездом USB на компьютере с помощью
прилагаемого кабеля USB.
3
Вставьте “Memory Stick” в видеокамеру,
подключите адаптер питания переменного
тока и установите переключатель POWER
в положение MEMORY.
4
Запустите на компьютере “Device
Manager”.
Windows 2000 Professional:
Откройте вкладку “My Computer”
t
“Control Panel”
t
“Hardware”, затем
щелкните кнопку “Device Manager”.
Другие ОS (OC):
Выберите “My Computer”
t
“Control Panel”
t
“System”, затем щелкните кнопку
“Device Manager”.
5
Выберите пункт “Other devices”.
Выберите устройство, помеченное знаком
“?”, и удалите его.
Пример: (?)Sony Handycam
6
Установите переключатель POWER в
положение OFF (CHG), затем отсоедините
кабель USB.
7
Перезапустите компьютер.
Просмотр изображений на
компьютере
200
Viewing images using computer
Step 2 Install the USB driver on the
CD-ROM
Perform the entire procedure listed in “Installing
the USB Driver” on the page 197.
Example: For Mac OS 8.5.1/8.6/9.0
users
(
1
)
Turn on the power of your computer and
allow the Mac OS to load.
(
2
)
Insert the supplied CD-ROM in the CD-ROM
drive of your computer.
(
3
)
Double-click the CD-ROM drive icon to open
the window.
(
4
)
Double-click the icon of the hard disk
containing the OS to open the window.
(
5
)
Move the following two files from the
window opened in step 3 to the System Folder
icon in the window opened in step 4 (drag
and drop).
•Sony Camcorder USB Driver
•Sony Camcorder USB Shim
(
6
)
When “Put these items into the Extensions
folder?” appears, click OK.
(
7
)
Restart your computer.
For Mac OS 9.1/Mac OS X
The USB driver need not be installed. Your Mac
is automatically recognised as a driver just by
connecting your Mac using the USB cable.
Просмотр изображений на
компьютере
Пункт 2 Установка драйвера USB с
компакт-диска
Выполните всю процедуру, описанную в
разделе “Установка драйвера USB” на стр.
197.
Пример: Для пользователей Mac OS
8.5.1/8.6/9.0
(
1
)
Включите компьютер и дождитесь
загрузки Mac OS.
(
2
)
Установите прилагаемый CD-ROM в
дисковод CD-ROM компьютера.
(
3
)
Дважды щелкните значок дисковода CD-
ROM для открытия окна с его
содержимым.
(
4
)
Для открытия окна жесткого диска,
содержащего операционную систему,
дважды щелкните его значок.
(
5
)
Перетащите мышью два следующих файла
из окна, открытого в пункте 3, на значок
папки System в окне, открытом в пункте 4.
•
Sony Camcorder USB Driver
•
Sony Camcorder USB Shim
(
6
)
При появлении вопроса “Put these items
into the Extensions folder?” щелкните
кнопку OK.
(
7
)
Перезапустите компьютер.
Для операционных систем Mac OS 9.1/Mac
OS X
Для этих систем не требуется установка
драйвера USB. Нужный драйвер
автоматически распознается в компьютере
сразу после его подключения с помощью
кабеля USB.
201
“
Memory Stick
”
operations
Работа с “Memory Stick”
Viewing images
For Windows users
(
1
)
Turn on the power of your computer and
allow Windows to load.
(
2
)
Connect one end of USB cable to the (USB)
jack on the camcorder and the other end to the
USB connector on your computer.
(
3
)
Insert a “Memory Stick” into your camcorder,
and connect the AC power adaptor to your
camcorder and then to a wall socket.
(
4
)
Set the POWER switch to MEMORY.
USB MODE appears on the screen of the
camcorder.
(
5
)
Open “My Computer” on Windows and
double click the newly recognised drive
(Example: “Removable Disk (E:)”).
The folders inside the “Memory Stick” are
displayed.
(
6
)
Select and double-click the desired image file
from the folder.
For the detailed folder and file name, see
”Image file storage destinations and image
files” (p. 203).
* Copying a file to the hard disk of your
computer before viewing it is recommended. If
you play back the file directly from the
“Memory Stick,” the image and sound may
break off.
Desired file type/
Double-click in this order/
Нужный тип файла
Порядок двойных щелчков
Still image/
“Dcim” folder
t
“100msdcf” folder
t
Image file/
Неподвижное изображение
Папка “Dcim”
t
Папка “100msdcf”
t
Файл изображения
Moving picture*/
“Mssony” folder
t
“Moml0001” folder
t
Image file*/
Движущееся изображение*
Папка “Mssony”
t
Папка “Moml0001”
t
Файл изображения*
Viewing images using computer
USB connector/
Разъем USB
USB cable/
Кабель USB
Push into the end/
Вставьте до упора
(USB) jack/
Гнездо USB
Просмотр изображений на
компьютере
Просмотр изображений
Для пользователей Windows
(
1
)
Включите компьютер и дождитесь
загрузки Windows.
(
2
)
Подсоедините один конец кабеля USB к
гнезду (USB) на видеокамере, а другой
конец - к разъему USB на компьютере.
(
3
)
Вставьте “Memory Stick” в видеокамеру и
подключите к ней адаптер питания
переменного тока, а затем к
электрической сети.
(
4
)
Установите переключатель POWER в
положение MEMORY.
На экране видеокамеры появится
индикация USB MODE.
(
5
)
Откройте в Windows окно “My Computer” и
дважды щелкните вновь распознанный
диск (например: “Removable Disk (E:)”).
Отобразятся папки “Memory Stick”.
(
6
)
Выберите из папки и дважды щелкните
файл нужного изображения.
Подробное описание имен папок и файлов
содержится в разделе “Файлы
изображений и места их хранения” (стр.
203).
*
Рекомендуется перед просмотром
скопировать файл на жесткий диск
компьютера. При воспроизведении файла
непосредственно с “Memory Stick”
изображение и звук могут прерываться.