background image

Section 07

REAR SUSPENSION

Subsection 02

(TORQUE REACTION SUSPENSION)

07-02-5

RH SIDE

LH SIDE

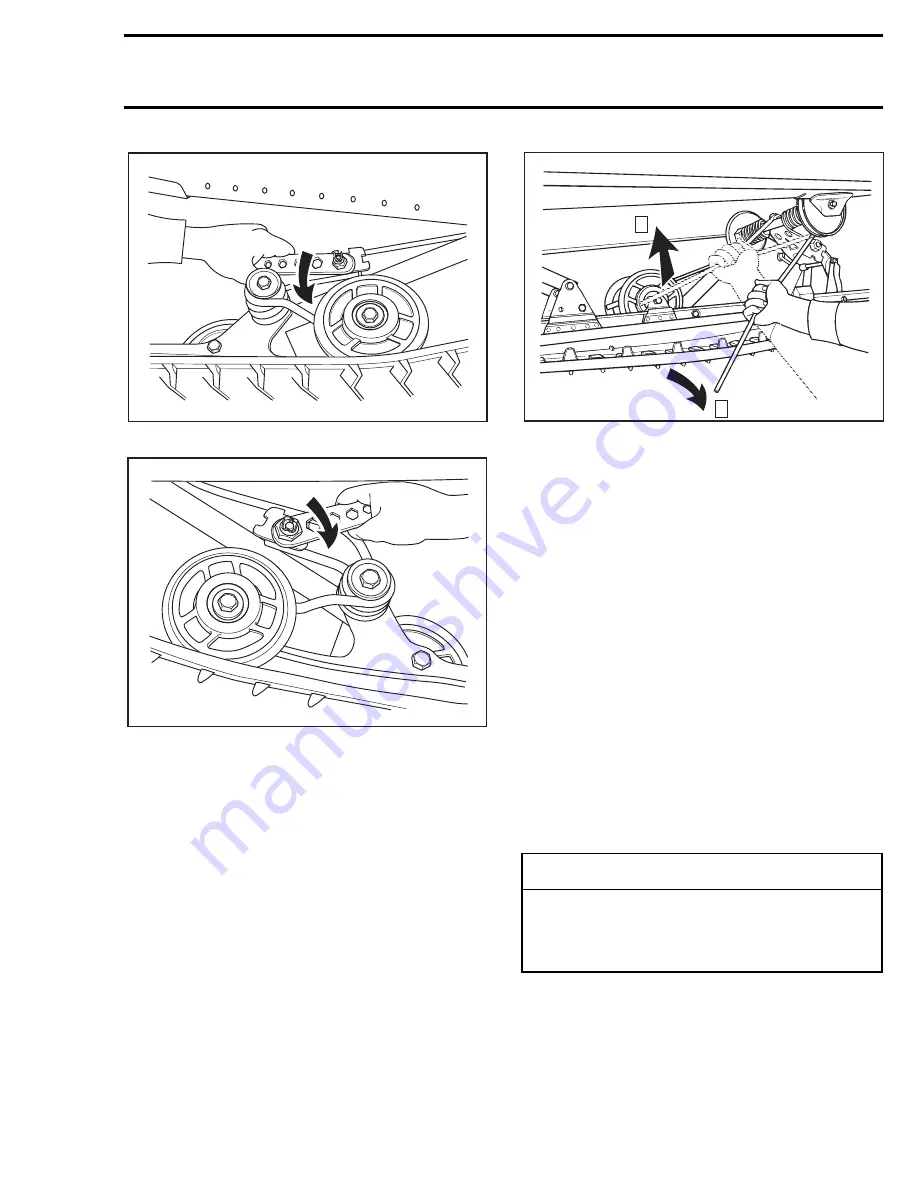
NOTE:

To quickly change rear cam position with-

out using any tool:

– Lay vehicle on its side.

– Unhook rear spring by hand from lower idler

wheel.

– Turn adjustment cam by hand to the desired po-

sition.

– Reinstall spring on its support making sure that

it sits in the groove of support.

Stopper Strap

The function of the stopper strap is to control the
transfer of vehicle weight during acceleration and
to control track lead angle.

The longer the belt, the more the weight will be
transferred to the track to provide a better trac-
tion. The shorter the belt, the lesser the weight
transferred to the track, thus maintaining a more
positive steering.

The longer the belt, the greater will be the track
lead angle. A shorter belt will reduce track lead
angle which may help when negotiating a particu-
lar snow condition.

Adjusting holes on the stopper strap allow to ad-
just it according to driver’s requirements, field
and/or snow conditions.

A05F0OA

A05F0PA

-

CAUTION

Whenever stopper strap length is changed,
track tension must be readjusted to prevent
any possibility of operating vehicle with a
too loose or too tight track tension.

A05F0FA

1

2

Summary of Contents for Formula S 1998

Page 1: ......

Page 2: ...1998 Shop Manual VOLUME 1 TUNDRA II LT TOURING E LE FORMULA S S ELECTRIC SL SKANDIC 380 500...

Page 3: ...n Canada Registered trademarks of Bombardier Inc This document contains the trademarks of the following companies Kimtowels is a trademark of Kimberly Clark Loctite is a trademark of Loctite Corporati...

Page 4: ...ection system 04 06 1 07 Axial fan cooling system 04 07 1 08 Rewind starter 04 08 1 09 Carburetor and fuel pump 04 09 1 10 Fuel tank and throttle cable 04 10 1 05 TRANSMISSION 01 Table of contents 05...

Page 5: ...ion and ski system 08 03 1 09 BODY FRAME 01 Table of contents 09 01 1 02 Body 09 02 1 03 Frame 09 03 1 10 TECHNICAL DATA 01 SI metric information guide 10 01 1 02 Engines 10 02 1 03 Vehicles 10 03 1 0...

Page 6: ...The engines and the corresponding components identified in this document should not be utilized on product s other than those mentioned in this document Torque wrench tightening specifications must be...

Page 7: ...ber Meaning MODELS MODEL NUMBER TUNDRA II LT 3270 SKANDIC 380 Canada 1240 SKANDIC 380 U S 1241 SKANDIC 380 Europe 1242 SKANDIC 500 Canada 1237 SKANDIC 500 U S 1238 SKANDIC 500 Europe 1239 TOURING E Ca...

Page 8: ...11 major sections 01 SERVICE TOOLS AND SERVICE PRODUCTS 02 LUBRICATION AND MAINTENANCE 03 TROUBLESHOOTING 04 ENGINE 05 TRANSMISSION 06 ELECTRICAL 07 REAR SUSPENSION 08 STEERING FRONT SUSPENSION 09 BOD...

Page 9: ...kilogram km h kilometer per hour kPa Kilopascal L liter lb pound lbf pound force lbf in pound per square inch LH left hand m meter MAG magneto Max maximum Min minimum mL milliliter mm millimeter MPH m...

Page 10: ...ase nut must be torqued to 4 N m or 35 lbf in This Shop Manual uses technical terms wich may be slightly different from the ones in the parts catalog Exploded view assists you in identifying parts and...

Page 11: ...oval procedure A03D1YA 529 0313 00 529 0312 00 A03D1ZA 529 0313 00 529 0312 00 Cam Coat cam no 18 interior with anti seize lubricant ASSEMBLY Came Slider Shoe Section 05 TRANSMISSION Subsection 03 DRI...

Page 12: ...duce the full detail or exact shape of the parts shown however they repre sent parts which have the same or a similar func tion As many of the procedures in this manual are in terrelated we suggest th...

Page 13: ...8 Lbf ft 20 15 21 M8 15 22 M8 16 23 M8 17 24 M8 18 25 M8 18 26 19 27 20 28 21 29 21 30 22 31 23 32 24 33 24 34 25 35 26 36 27 37 27 38 28 39 29 40 30 41 30 42 31 43 M10 32 44 M10 32 45 M10 33 46 M10 3...

Page 14: ...15 85 116 86 117 86 118 87 119 88 120 89 121 M14 89 122 M14 90 123 M14 91 124 M14 91 125 M14 92 126 M14 93 127 M14 94 128 M14 94 N m FASTENER SIZE 8 8 Lbf ft 129 M14 95 130 M14 96 131 M14 97 132 M14 9...

Page 15: ...______________________________________________________ ____________________________________________________________ ____________________________________________________________ _______________________...

Page 16: ...E Bombardier Inc Technical Publications After Sales Service Valcourt Quebec Canada J0E 2L0 Bombardier Inc Technical Publications After Sales Service Valcourt Quebec Canada J0E 2L0 Bombardier Inc Techn...

Page 17: ...tely The list of Service Products both mandatory and optional are not part of any kit and must all be ordered separately If you need to replace or add to your tool inventory these items can be ordered...

Page 18: ...00 A00C1A4 APPLICATION All engines 2 3 4 5 Engine leak tester kit P N 861 7491 00 A01B2D4 APPLICATION All engines Choke plunger tool P N 529 0321 00 A01C5D4 APPLICATION All models equipped with choke...

Page 19: ...x 1 5 x 150 P N 420 9407 55 For either or pullers 3 Screw M8 x 40 4 P N 420 8406 81 puller MAG side puller MAG and PTO side 4 Screw M8 x 70 4 P N 420 8412 01 puller only PTO side 5 Crankshaft protecto...

Page 20: ...377 and 443 engines B 503 engine 202 Piston circlip 203 204 206 Magneto coil centering ring P N 420 8769 22 A01B1V4 APPLICATION All engines with Nippondenso CDI 160 W Crankshaft feeler gauge P N 420 8...

Page 21: ...sting gauge 223 225 227 Dial indicator TDC gauge P N 414 1047 00 A00B4E4 APPLICATION All engines Injection pump gear holder P N 420 8766 95 A00B314 APPLICATION 377 443 and 503 engines Digital inductio...

Page 22: ...TRA drive pulley 51 79 53 55 Forks 3 P N 529 0055 00 A16B014 APPLICATION All vehicles equipped with a TRA drive pulley Drive belt installer P N 529 0172 00 A00A1A4 APPLICATION All models except Tundra...

Page 23: ...kit 1 Spring compressor P N 529 0151 00 A01B334 APPLICATION 1 All models Tension tester P N 414 3482 00 A00C074 APPLICATION All models 64 74 Countershaft bearing installer P N 529 0302 00 A00A194 APP...

Page 24: ...rocket adjuster P N 861 7257 00 A01B2O4 APPLICATION All vehicles Parts included in the kit 1 Block with threads P N 529 0107 00 2 Block without threads P N 529 0108 00 3 Plate P N 529 0106 00 4 Bolt M...

Page 25: ...ND SERVICE PRODUCTS Subsection 01 SERVICE TOOLS 01 01 9 SUSPENSION MANDATORY SERVICE TOOLS Shock spring removal kit P N 529 0271 00 Replacement clevis pin P N 414 5284 00 A01B4O4 APPLICATION All suspe...

Page 26: ...remover P N 529 0287 00 A01F224 APPLICATION A Tundra II LT B S Series 345 346 254 Camber angle tool P N 529 0216 00 NOTE Angle finder with a mag netic base must be used Suggestion K D tool no 2968 A06...

Page 27: ...TS Subsection 01 SERVICE TOOLS 01 01 11 SUSPENSION continued RECOMMENDED SERVICE TOOLS Spring installer bar P N 529 0050 00 A00C1I4 APPLICATION Tundra II LT and S Series Drive axle holder P N 529 0072...

Page 28: ...on 01 SERVICE TOOLS 01 01 12 VEHICLES RECOMMENDED SERVICE TOOLS Protective mat P N 529 0306 00 A01B45W APPLICATION All models 503 Dolly P N 529 0299 00 A00B4CJ APPLICATION All models 348 Snowmobile ja...

Page 29: ...ICATION Crankcase halves chaincase and gearbox mating surfaces 151 LOCTITE LOCTITE LOCTITE RC 609 152 Medium strength threadlocker P N 413 7030 00 Loctite 242 Threadlocker 10 mL blue medium strength A...

Page 30: ...continued Loctite primer P N 413 7081 00 Loctite 764 56 Primer N 170 g 6 oz A00B3N4 APPLICATION To prepare mating surfaces before applying paste gasket retaining compound or threadlockers Silicone com...

Page 31: ...00 A00B2R4 APPLICATION Chaincase lubricant on Tundra II LT 350 351 GRAISSE LMZ No 1 353 Synthetic chaincase oil 12 x 355 mL P N 413 8033 00 A01B4Q4 APPLICATION Chaincase lubricant on all models except...

Page 32: ...ke Oil 1 liter 1 05 U S qt Synthetic BOMBARDIER FORMULA XP S 358 362 Bearing grease 400 g P N 413 7061 00 A01B574 APPLICATION For idler bearings ski legs seal interior lips drive axle bearings suspens...

Page 33: ...ray can A00B3H4 APPLICATION All models with a black frame General purpose instant adhesive Loctite 495 3 g P N 413 7032 00 A00B2V4 APPLICATION Rubber to metal bonding and most hard plastic Fuel stabil...

Page 34: ...bsection 04 07 Coolant Replacement Except Fan Cooled Not applicable Condition of Seals Subsections 04 02 and 04 03 Injection Oil Filter Condition Subsection 04 06 Injection Oil Filter Replacement Subs...

Page 35: ...priate Subsection and Operator s Guide Suspension Lubrication Section 07 See appropriate Subsection Suspension Condition Section 07 See appropriate Subsection Suspension Stopper Strap Condition Sectio...

Page 36: ...can With the engine stopped remove the spark plug and spray storage oil P N 496 0141 00 into each cylinder Crank slowly 2 or 3 revolutions to lubricate cylin ders Reinstall the spark plugs and the out...

Page 37: ...nd dry then prop erly reinstall the filter Tundra II LT Air filter is located on lower side portion of air in take silencer Lift hood and remove belt guard Gently pull air filter sideward Ensure it is...

Page 38: ...allic parts with a thin coat of grease use Simple Green from Sunshine Makers Inc available at hardware stores or at automotive parts retailer For vinyl and plastic parts use Vinyl Plastic Cleaner P N...

Page 39: ...1 ENGINE LEAK VERIFICATION FLOW CHART 03 02 10 FUEL AND OIL SYSTEMS 03 03 1 TRANSMISSION AND BRAKE SYSTEMS 03 04 1 TRANSMISSION 03 04 1 BRAKE SYSTEM 03 04 7 MECHANICAL BRAKE 03 04 7 HYDRAULIC BRAKE 03...

Page 40: ...E Test Inspection 1 Check spark plug s a Carbon accumulation caused by defective spark plug s Clean carbon accumulation and replace spark plug s 2 Check cooling system a Loose fan belt Adjust or repla...

Page 41: ...d fuel lines Replace defective lines c Fuel does not flow through carburetor s plastic particles in needle area and or varnish formation in carburetor s Clean carburetor s d Spark plug heat range is t...

Page 42: ...ine Replace piston s and check if intake system leaks 7 Piston color is dark due to seizure on intake and exhaust sides a Broken or loose fan belt Replace fan belt or adjust its tension refer to TECHN...

Page 43: ...and or improper alignment Align track and adjust its tension to specifications refer to TECHNICAL DATA 10 7 Check drive pulley a Improper calibration screw adjustments TRA pulley and or worn bushing s...

Page 44: ...PTOM ENGINE TURNS OVER BUT FAILS TO START CONDITION NORMAL USE Test Inspection 1 Check switches a Ignition switch emergency cut out switch or tether switch is in the OFF position Place all switches in...

Page 45: ...to specifications refer to TECHNICAL DATA 10 7 Perform engine leak test a Leaking gaskets allow air to enter in engine Replace defective parts SYMPTOM HIGH ENGINE OPERATING TEMPERATURE CONDITION NORMA...

Page 46: ...cations refer to TECHNICAL DATA 10 11 Check if there are leaks at air intake silencer and or engine crankcase a Leak s Repair or replace 12 Check condition and heat range of spark plug s a Melted spar...

Page 47: ...ully tighten 3 Check RAVE valve movement RAVE movement indicator P N 861 7258 00 a Valve s is are stuck in open position Clean SYMPTOM REWIND STARTER ROPE DOES NOT REWIND CONDITION NORMAL USE Test Ins...

Page 48: ...ratio a Compression ratio is too high Replace inadequate part s to obtain manufacturer s recommended compression ratio or use a higher grade fuel SYMPTOM ENGINE GENERATES A LOT OF VIBRATIONS CONDITION...

Page 49: ...RESERVOIR IN CRANKCASE ARE SEALS LEAKING CHECK CRANKSHAFT OUTER SEAL OF PTO AND MAG SIDES PRESSURIZE ROTARY VALVE GEAR RESERVOIR IN CRANKCASE IS RESERVOIR LEAKING UNSEAL PTO CYLINDER AND MAG CYLINDER...

Page 50: ...uel flows through primer while engine runs Replace primer 4 Check float height in carburetor s a Fuel level is too high in float bowl s Adjust according to specifications refer to TECHNICAL DATA 10 5...

Page 51: ...cate or replace 4 Check fuel pump flow a Dried diaphragm Replace 5 Check if carburetor s is are clean a Varnish Clean SYMPTOM HIGH INJECTION OIL CONSUMPTION CONDITION NORMAL USE Test Inspection 1 Chec...

Page 52: ...ir fittings or are improperly rooted Replace or properly relocate lines 3 Check fuel pump outlet flow a Dirt clogging fuel pump lines or torn membrane Clean or replace fuel pump 4 Check carburetor nee...

Page 53: ...flection according to specifications refer to TECHNICAL DATA 10 3 Check driven pulley sliding half play a Jammed sliding half Replace 4 Check spring tension of driven pulley sliding half a Sliding hal...

Page 54: ...mber 2 Check tightening torque of drive pulley screw a Moving governor cup Retighten screw 3 Spring cover screws a Spring cover moves and restrains sliding half movement Retighten screws 4 Check sprin...

Page 55: ...on is too weak Replace SYMPTOM IT IS DIFFICULT TO ENGAGE TRANSMISSION IN FORWARD OR REVERSE GEAR CONDITION NORMAL USE Test Inspection 1 Check position of gear shift lever adjustment screw a Improper a...

Page 56: ...n a Oil on pulley surfaces Clean pulley halves 4 Check pulley calibration a Improper pulley calibration Calibrate according to specification SYMPTOM BELT WORN EXCESSIVELY IN TOP WIDTH CONDITION NORMAL...

Page 57: ...en pulleys a Incorrect pulley distance Readjust according to specification A00D0CY 7 Check belt deflection a Deflection is too small Adjust according to specification SYMPTOM BELT SIDES WORN CONCAVE C...

Page 58: ...TORN CONDITION NORMAL USE Test Inspection A00D0HY 1 Check drive belt rotational direction a Improper belt installation Replace 2 Check if drive belt rubs against components a Belt rubbing on stationa...

Page 59: ...return spring Replace 2 Check if brake cable moves freely in its housing a Brake cable movement is limited due to oxidation or dirt accumulation Replace 3 Check distance between brake lever and calip...

Page 60: ...NG Subsection 04 TRANSMISSION AND BRAKE SYSTEMS 03 04 8 MECHANICAL AND HYDRAULIC BRAKES SYMPTOM BRAKE SYSTEM IS NOISY CONDITION NORMAL USE Test Inspection 1 Check brake pad thickness a Pads are worn u...

Page 61: ...switch and solenoid switch Repair SYMPTOM STARTER TURNS BUT DOES NOT CRANK THE ENGINE CONDITION NORMAL USE Test Inspection 1 Check battery capacity a Shorted battery cell s Replace 2 Check battery ch...

Page 62: ...ak magnets Replace yoke assembly 14 Check if bushings are worn a Worn bushings Replace bushings SYMPTOM STARTER TURNS BUT OVERRUNNING CLUTCH PINION DOES NOT MESH WITH RING GEAR CONDITION NORMAL USE Te...

Page 63: ...cts a Melted solenoid switch contacts Replace solenoid switch 6 Check starter switch a Starter switch returns poorly Replace ignition switch SYMPTOM NOISE OCCURENCE WHEN STARTING ENGINE CONDITION NORM...

Page 64: ...n lighting circuit Replace voltage regulator and ensure proper grounding Retest SYMPTOM HEADLAMP DIMING CONDITION NORMAL USE Test Inspection 1 Check voltage at headlamp at different speeds It must not...

Page 65: ...ating grips installation overloads the magneto generator capacity a Excessive electrical load to magneto generator Reduce the electrical load by removing accessories SYMPTOM FALSE FUEL AND OR TEMPERAT...

Page 66: ...cone dielectric grease 4 Verify trigger coil resistance with an ohmmeter and connector condition a Defective coil Corroded connector terminals Replace defective coil Clean terminals and apply silicone...

Page 67: ...c timing light unplug connectors between magneto generator and vehicle wiring harness to isolate problem Check condition of connectors a Defective spark plug and or cables caps Defective electrical sy...

Page 68: ...N NORMAL USE Test Inspection 1 Refer to Engine slows down or stops at high RPM and check items listed 2 Check spark plug heat range a Spark plug heat range is too high Replace by Bombardier s recommen...

Page 69: ...nd or broken wires Replace terminal s or crimp defective wires SYMPTOM TACHOMETER DOES NOT WORK CONDITION NORMAL USE Test Inspection 1 Check fuse a Burnt fuse Replace 2 Check continuity of wires a Cor...

Page 70: ...E CONDITION NORMAL USE Test Inspection 1 Check track tension a Pressure is too great on cleats Adjust according to specifications refer to TECHNICAL DATA 10 2 Check slider shoes and or suspension reta...

Page 71: ...lubrication and or contaminated grease sticky oil sludge Clean and or lubricate 3 Check rear spring preload a Insufficient preload Increase preload using shock adjustment cams SYMPTOM WHEN HANDLEBAR I...

Page 72: ...n is weak more weight is transferred to the skis Increase spring preload 4 Check condition of ball joints a Corrosion restrains movement Lubricate or replace 5 Check swing arm camber liquid cooled mod...

Page 73: ...TOM END 04 02 7 CLEANING 04 02 8 DISASSEMBLY 04 02 8 INSPECTION 04 02 8 ASSEMBLY 04 02 8 377 443 AND 503 ENGINE TYPES 04 03 1 ENGINE REMOVAL AND INSTALLATION 04 03 1 ENGINE REMOVAL AND INSTALLATION 04...

Page 74: ...04 04 10 CHECKING SURFACE FLATNESS 04 04 11 RECTIFYING SURFACES 04 04 12 CHECKING CRANKSHAFT ALIGNMENT 04 04 12 CDI SYSTEM 04 05 1 NIPPONDENSO IGNITION SYSTEM WITH SINGLE GENERATING COIL 04 05 1 CLEAN...

Page 75: ...N 04 09 2 IDENTIFICATION 04 09 2 DISASSEMBLY AND ASSEMBLY 04 09 2 CARBURETOR FLOAT LEVEL ADJUSTMENT 04 09 3 INSTALLATION 04 09 4 CARBURETOR ADJUSTMENTS 04 09 5 PRELIMINARY IDLE SPEED ADJUSTMENT 04 09...

Page 76: ...NE Subsection 02 277 ENGINE TYPE 04 02 1 277 ENGINE TYPE 0 ENGINE REMOVAL AND INSTALLATION A05C0KS 4 10 48 N m 35 lbf ft 48 N m 35 lbf ft 16 25 N m 18 lbf ft 21 N m 15 lbf ft 48 N m 35 lbf ft 736 RTV...

Page 77: ...nifold screws no 16 to 25 N m 18 lbf ft Torque the engine support screws nos 4 and 10 to 48 N m 35 lbf ft Torque the engine mount screws to 21 N m 15 lbf ft INSTALLATION ON VEHICLE To install engine o...

Page 78: ...Section 04 ENGINE Subsection 02 277 ENGINE TYPE 04 02 3 TOP END A05C0SS 22 N m 16 lbf ft Grease 1 2 3 4 5 6 8 7 26 N m 19 lbf ft FLAT RATE PARTS...

Page 79: ...cylinder head and piston dome using a wooden spatula NOTE The letters AUS over an arrow on the piston dome must be visible after cleaning Clean the piston ring grooves with a groove clean er tool or w...

Page 80: ...D ENGINE DIMENSIONS MEASUREMENT 04 04 ASSEMBLY When reinstalling original needle bearings make sure that 31 needles are inserted between expan sion sleeve and locating sleeve 1 Expansion sleeve 2 31 n...

Page 81: ...nimize the effect of acceleration forces on circlip install each circlip so the circlip break is at 6 o clock as illustrated Use piston circlip installer P N 529 0169 00 1 Place circlip in 2 Restrain...

Page 82: ...Section 04 ENGINE Subsection 02 277 ENGINE TYPE 04 02 7 BOTTOM END A05C0TT 1 3 5 6 4 2 7 22 N m 16 lbf ft Lithium grease Anti seize compound Lithium grease 8 FLAT RATE PARTS...

Page 83: ...rankcase half no 1 1 Plate 2 Flat washer Heat to 110 120 C 230 248 F all around bearing seat on MAG side Install puller with plate long bolts M8 x 110 mm and flat washers Extract MAG side crankcase ha...

Page 84: ...SUREMENT 04 04 To install new seal nos 3 and 4 into crankcase use oil seal pusher P N 420 9779 20 1 Crankcase half Prior to crankcase adjoining install a protector sleeve on each crankshaft extension...

Page 85: ...Section 04 ENGINE Subsection 02 277 ENGINE TYPE 04 02 10 Torque the screws no 7 to 22 N m 16 lbf ft fol lowing illustrated sequence A02C04A 5 2 1 3 4...

Page 86: ...D 503 ENGINE TYPES 04 03 1 377 443 AND 503 ENGINE TYPES 0 ENGINE REMOVAL AND INSTALLATION 377 and 443 Engine Types A03C12S Skandic 380 Touring E LE Formula S 37 N m 27 lbf ft 35 N m 26 lbf ft 17 N m 1...

Page 87: ...Section 04 ENGINE Subsection 03 377 443 AND 503 ENGINE TYPES 04 03 2 503 Engine Type A03C13S 37 N m 27 lbf ft 35 N m 26 lbf ft 17 N m 150 lbf in 28 N m 21 lbf ft FLAT RATE PARTS...

Page 88: ...nd carburetors impulse line from engine crankcase 4 connector housing exhaust pipe and exhaust cooling hose on so equipped models oil pump inlet tube and plug it oil pump cable TUNED PIPE IDENTIFICATI...

Page 89: ...INE Subsection 03 377 443 AND 503 ENGINE TYPES 04 03 4 TOP END 22 N m 16 lbf ft 22 N m 16 lbf ft Grease 503 S Series only 22 N m 16 lbf ft 22 N m 16 lbf ft A23C05S 1 2 1 2 1 2 3 4 5 5 8 9 10 7 7 6 6 F...

Page 90: ...clip from piston no 8 To remove piston pin no 9 use piston pin puller P N 529 0290 00 as follows Fully screw puller handle Insert puller end into piston pin Screw LH threads extracting nut Hold puller...

Page 91: ...ENGINE DIMENSIONS MEASUREMENT 04 04 ASSEMBLY 503 Engine When reinstalling original needle bearings make sure that 31 needles are inserted between expan sion sleeve and locating sleeve 1 Expansion slee...

Page 92: ...At assembly place the pistons over the connect ing rods with the letters AUS over an arrow on the piston dome facing in the direction of the ex haust port 1 Exhaust All Engines Except 503 To center th...

Page 93: ...latness of intake sockets no 6 Refer to ENGINE DIMENSION MEASUREMENT 04 04 and look for checking surface flatness At cylinder no 4 and or cylinder head no 3 instal lation use aligning tool or exhaust...

Page 94: ...trated 1 Exhaust 2 Distance nuts Cross torque cylinder head nuts nos 1 and 2 to 22 N m 16 lbf ft torque each cylinder head indi vidually Install armature plate fan housing and then air de flector Inst...

Page 95: ...443 AND 503 ENGINE TYPES 04 03 10 BOTTOM END A03C1IS Anti seize lubricant 22 N m 16 lbf ft 503 22 N m 16 lbf ft 377 10 N m 89 lbf in 11 9 8 7 6 5 2 4 10 3 2 1 3 Anti seize lubricant Anti seize lubrica...

Page 96: ...ASUREMENT 04 04 ASSEMBLY Smear anti seize lubricant P N 413 7010 00 on part of crankshaft where bearing fits To check proper clearance between bearing no 3 and counterweight use feeler gauge P N 420 8...

Page 97: ...faces Let it dry for 10 to 20 minutes Apply paste gasket P N 413 7027 00 no 5 on the other mating surface NOTE Primer N allows Loctite 515 to fully cure on aluminum surfaces It increases filling capac...

Page 98: ...tary valve gear lubrication system 7 Install air pump on any valve of exhaust plug NOTE If necessary lubricate air pump piston with mild soap 8 Rotate crankshaft so that piston goes to BDC Bottom Dead...

Page 99: ...d surfaces and screw stud threads of engine spark plug base insulator cylinder head cylinder base crankcase halves joint rotary valve cover oil injection pump mounting flange O ring seal coolant pump...

Page 100: ...y Valve Gear Reservoir Block one hose of rotary valve gear lubrication system with a hose pincher and install an adapter in remaining hose Install air pump on adapter and pressurize as be fore 1 Block...

Page 101: ...gs Pay attention to tapped holes which may go through engine sealed area and thus leading to leakage FINALIZING REASSEMBLY After reassembling engine always recheck for leakage COOLING SYSTEM LEAK TEST...

Page 102: ...RY VALVE GEAR RESERVOIR IN CRANKCASE ARE SEALS LEAKING CHECK CRANKSHAFT OUTER SEAL OF PTO AND MAG SIDES PRESSURIZE ROTARY VALVE GEAR RESERVOIR IN CRANKCASE IS RESERVOIR LEAKING UNSEAL PTO CYLINDER AND...

Page 103: ...UND Measuring 16 mm 5 8 in from top of cylinder with a cylinder gauge check if the cylinder out of round is more than the specified dimension If larger cylinder should be rebored and honed or should b...

Page 104: ...ter to the specified val ue on the piston dome 1 Micrometer set to the piston dimension With the micrometer set to the piston dimension adjust a cylinder bore gauge to the micrometer di mension and se...

Page 105: ...r to correctly position the ring in the cylinder use piston as a pusher Using a feeler gauge check ring end gap Replace ring If gap exceeds specified tolerance refer to TECHNICAL DATA 10 1 Transfer po...

Page 106: ...e measure distance between thrust washer and crankshaft counterweight If the distance exceeds specified tolerance repair or replace the crankshaft TYPICAL CONNECTING ROD PISTON PIN CLEARANCE Measure p...

Page 107: ...shim thickness needed for the end play ad justment is determined with the following proce dure a Measure crankcase halves as illustrated M1 and M2 A standard compressed crankcase gasket will have a 0...

Page 108: ...e result is under specification remove adjust ment shim s to reach this specification To Summarize A M1 M2 M3 B M4 M5 M6 M7 M8 A B Actual end play that must be within spec ification M8 is the dimensio...

Page 109: ...nstall a degree wheel P N 414 3529 00 on crank shaft end Remove both spark plugs Install a TDC gauge P N 414 1047 00 in spark plug hole on MAG side Bring MAG piston at top dead center Rotate degree wh...

Page 110: ...M 0 NIPPONDENSO IGNITION SYSTEM WITH SINGLE GENERATING COIL 277 Engine A25C0OS Dielectric grease 5 Loctite 242 6 7 Loctite 242 8 2 3 4 9 Loctite 242 1 7 N m 62 lbf in Loctite 242 11 10 90 N m 66 lbf f...

Page 111: ...m 5 8 in long NOTE To correctly remove a threadlocked fas tener it is first necessary to tap on the fastener to break threadlocker bond This will eliminate the possibility of thread breakage TYPICAL 1...

Page 112: ...efore tightening screws To replace lighting generator coil no 7 Heat the armature plate to 93 C 200 F around the screw holes to break the threadlocker bond 1 Protect harness from flame 2 Heat Remove s...

Page 113: ...per Position Woodruff key magneto flywheel no 9 and lock washer no 12 on crankshaft Clean nut threads and apply Loctite 242 blue be fore tightening nut no 13 Torque nut to 90 N m 66 lbf ft At reassemb...

Page 114: ...on 04 ENGINE Subsection 05 CDI SYSTEM 04 05 5 DUCATI IGNITION SYSTEM 377 443 and 503 Engines A07C03S 1 2 3 5 4 Loctite 242 Dielectric grease 105 N m 77 lbf ft 22 N m 195 lbf in Loctite 242 FLAT RATE P...

Page 115: ...agneto flywheel from its taper REPAIR To replace generator coil no 1 Heat the armature plate to 93 C 200 F around the screw holes to break the threadlocker bond To replace trigger coil no 4 Disconnect...

Page 116: ...ature and carefully pull wires Install new parts and other parts removed ASSEMBLY Clean crankshaft extension taper Apply Loctite 242 blue on taper Position Woodruff key flywheel and lock washer on cra...

Page 117: ...04 ENGINE Subsection 06 OIL INJECTION SYSTEM 04 06 1 OIL INJECTION SYSTEM 0 OIL INJECTION PUMP 277 Engine A05C07T 1 7 3 4 5 Grease Grease Loctite 242 Oil pump gasket set X X X X X 2 X X 6 8 7 FLAT RAT...

Page 118: ...Section 04 ENGINE Subsection 06 OIL INJECTION SYSTEM 04 06 2 377 443 and 503 Engines A03C17T 5 5 5 6 5 N m 44 lbf in 3 5 N m 44 lbf in Loctite 242 2 1 Loctite 242 4 Grease 8 8 7 FLAT RATE PARTS...

Page 119: ...e needle roller no 4 must be engaged as deep as possible in the pump mounting flange Always check for spring clips no 5 and clamps no 6 tightness Torque screws no 3 to 5 N m 44 lbf in Make sure cable...

Page 120: ...E AT IDLE 1 Fully open position CHECKING OPERATION Oil Pump On Vehicle NOTE Main oil line must be full of oil See bleed ing procedure above Lift rear of vehicle and support with a mechanical stand Unb...

Page 121: ...y Test Bench Connect a hose filled with injection oil to main line fitting Insert other hose end in an injection oil container Using a counterclockwise rotating drill rotate pump shaft Oil must drip f...

Page 122: ...04 07 1 AXIAL FAN COOLING SYSTEM 0 NOTE For 277 engine radial fan cooling system refer to CDI SYSTEM 04 05 377 443 and 503 Engines 1 3 5 18 13 12 14 15 16 443 and 503 engines only 17 47 N m 35 lbf ft...

Page 123: ...y torque nut to 65 N m 48 lbf ft TYPICAL Fan belt deflection must be as specified when ap plying the proper force midway between pulleys 1 Deflection To adjust tension add or remove shim s no 15 betwe...

Page 124: ...g bearing To install press one bearing in place then install circlip and shims Press the other bearing from op posite side until it is flush with housing Press fan shaft from engine side of fan housin...

Page 125: ...ection 08 REWIND STARTER 04 08 1 REWIND STARTER 0 277 377 and 443 A03C1GS Molykote G n Paste or Equivalent Silicone Compound Grease 1 2 3 4 5 6 7 8 9 10 11 12 Silicone Compound Grease 14 15 10 N m 89...

Page 126: ...n 08 REWIND STARTER 04 08 2 503 Skandic 500 and Formula SL A21C08S 10 N m 89 lbf in Molykote G n paste or equivalent Silicone compound grease Silicone compound grease 8 N m 71 lbf in 15 6 7 5 4 1 3 8...

Page 127: ...At assembly position spring no 4 outer end into spring guide notch then wind the spring counter clockwise into guide 1 Outer end into guide notch NOTE Due to dust accumulation rewind starter must be...

Page 128: ...ccessible through starter housing orifice Pull the rope out of the starter housing and tem porarily make a knot to hold it One turn preload will give 7 turns of tension when fully extended Position pa...

Page 129: ...ly on engine Thread starter rope no 6 through rope guide when applicable Prior to installing starter grip no 15 on new rope it is first necessary to fuse the rope end with a lit match pass rope throug...

Page 130: ...ETOR AND FUEL PUMP 04 09 1 CARBURETOR AND FUEL PUMP 0 A03C1WS 6 13 10 8 11 12 9 7 1 2 3 4 5 14 To other carburetor All carburetors except VM 30 193 Carburetors VM 30 193 VM 34 508 VM 34 511 VM 34 512...

Page 131: ...owmobile carbu retor only It is designed to operate with a fuel pump system Check throttle slide for wear Replace as neces sary Check idle speed screw straightness Replace as necessary IDENTIFICATION...

Page 132: ...n Jet The main jet installed in the carburetor has been selected for a temperature of 20 C 0 F at sea level Different jetting can be installed to suit tem perature and or altitude changes Always check...

Page 133: ...bration according to altitude and temperature INSTALLATION To install carburetor on engine inverse removal procedure However pay attention to the following Inspect throttle cable and housing prior to...

Page 134: ...A 10 for the specifica tions Carburetor Synchronization Twin Carburetor Models Only Both carburetor slides must start to open at the same time Completely unscrew idle speed screw on both carburetors U...

Page 135: ...ulet bore en gine side THROTTLE LEVER AGAINST HANDLE GRIP 1 Throttle cable adjuster 2 Throttle slide flush or 1 0 mm 040 in lower than carburetor oulet bore engine side Once carburetor adjustment is p...

Page 136: ...se engine speed or counterclockwise to decrease it NOTE On twin carburetor models Turn adjust ment screw the same amount to keep carbure tors synchronized Refer to TECHNICAL DATA 10 for the specifica...

Page 137: ...in of recess wall AIR SILENCER SIDE SHOWN 1 Tool stopper within 1 mm 040 in of recess wall CUTAWAY ENGINE SIDE SHOWN 1 Choke plunger 2 Tool properly seated under choke plunger If tool tip does not sea...

Page 138: ...ut and reinstall protec tor cap Set choke lever to close and open positions and ensure that tool properly seats under plunger only when lever is set to fully open position Set choke lever to close pos...

Page 139: ...Section 04 ENGINE Subsection 09 CARBURETOR AND FUEL PUMP 04 09 10 FUEL PUMP A00C48S S Series Tundra LT 1 2 2 1 FLAT RATE PARTS...

Page 140: ...and alternately apply pressure and vacuum with pump of leak test kit The inlet valve should re lease with pressure and hold under vacuum Repeat the same procedure at the outlet nipple This time the ou...

Page 141: ...ver Replace filter if neces sary ASSEMBLY To install a new valve proceed as follows Place new valve flat on its seat Slightly oil taper tip of grommet Push grommet with a rotational movement un til it...

Page 142: ...CAL 1 Circlip Other Models 1 Throttle cable housing 2 Throttle handle housing 3 Throttle handle 4 Circlip WARNING When draining a fuel tank or when ever a fuel line is disconnected obstruct line with...

Page 143: ...dle tab until it sits properly 1 Throttle handle 2 Retainer 3 Cable barrel 4 Silicone grease Adjust throttle cable as specified in CARBURE TOR AND FUEL PUMP 04 09 Throttle Cable Routing CAUTION Check...

Page 144: ...SASSEMBLY 05 03 3 CLEANING 05 03 4 INSPECTION 05 03 4 ASSEMBLY 05 03 4 INSTALLATION 05 03 5 TRA 05 03 6 GENERAL 05 03 7 REMOVAL 05 03 7 DISASSEMBLY 05 03 7 CLEANING 05 03 9 INSPECTION 05 03 9 ASSEMBLY...

Page 145: ...INSTALLATION 05 06 7 ADJUSTMENT 05 06 8 CHAINCASE 05 07 1 REMOVAL 05 07 2 DISASSEMBLY 05 07 2 INSPECTION 05 07 2 GEAR RATIO MODIFICATION 05 07 2 ASSEMBLY 05 07 3 INSTALLATION 05 07 3 ADJUSTMENT 05 07...

Page 146: ...that correct direction of rotation is respect ed CORRECT INCORRECT NOTE For used drive belt mark and reinstall in the same position MODEL PART NUMBER WIDTH NEW 0 25 mm 010 in MINIMUM WIDTH WEAR LIMIT...

Page 147: ...erence only To Check Tension Position a reference rule on drive belt Wooden Stick and Spring Scale Method 1 Mark specified deflection Using spring scale and stick apply specified force on drive belt h...

Page 148: ...PULLEY DISTANCE AND ALIGNMENT 05 05 and measure drive belt deflection Readjust pulley distance if required then tighten the 4 nuts Adjust driven pulley support and lock it to engine S Series Adjust pu...

Page 149: ...llen screws should be restrained while tighten ing jam nut to prevent throwing adjustment out Use drive belt tension adjuster P N 529 0087 00 Restrain Allen screws with the wrench and tight en nut wit...

Page 150: ...ON Subsection 03 DRIVE PULLEY 05 03 1 DRIVE PULLEY 0 BOMBARDIER LITE NOTE This is a lubrication free drive pulley Tundra II LT A05D0TS 1 2 3 5 6 7 8 9 4 Loctite 271 10 11 95 N m 70 lbf ft 128 N m 95 l...

Page 151: ...Section 05 TRANSMISSION Subsection 03 DRIVE PULLEY 05 03 2 377 Engine S Series 1 2 3 5 6 7 8 9 11 128 N m 95 lbf ft 95 N m 70 lbf ft A03D2GT FLAT RATE PARTS...

Page 152: ...puller P N 529 0314 00 then remove drive pulley TYPICAL DISASSEMBLY Unscrew nut Remove tab washer Check for alignment marks for proper indexing at reassembly 1 Alignment marks Identify blocks no 1 an...

Page 153: ...ring cover Slowly unscrew clutch puller to release spring pressure Remove spring cover no 5 spring and washer no 11 CLEANING All Models Clean pulley faces and shaft with fine steel wool and clean dry...

Page 154: ...th a mechanical stand Accelerate the vehicle at low speed maximum 30 km h 20 MPH and apply the brake repeat 5 times Recheck the torque of 90 to 100 N m 66 to 74 lbf ft WARNING Ensure that the track is...

Page 155: ...cation free drive pulley A19D07T Repair kit 5 2 1 3 Loctite 271 6 Loctite 648 Loctite 648 Loctite 648 9 18 12 11 12 13 14 15 16 17 16 19 23 25 24 22 20 21 26 27 25 29 32 30 31 28 95 N m 70 lbf ft 10 N...

Page 156: ...Fixed and Sliding Half Screw puller into fixed half shaft about 13 mm 1 2 in Raise drive pulley and hold it by the sliding half while knocking on puller head to disengage fixed half CAUTION Such modi...

Page 157: ...1 at a time 32 Cushion Drive 1 Hold slider shoes 2 Lift one housing at a time NOTE To ease disassembly forks P N 529 0055 00 should be used to hold slider shoes prior to removing governor cup 19 Sprin...

Page 158: ...thickness wear Replace as required 9 12 Fitting Bolt Ass y and Flanged Bushing Check for wear replace as required When install ing old style flanged bushing made of black plas tic use a size O letter...

Page 159: ...on free Do not lubricate any component 1 2 3 Screw Ring Gear and Loctite 271 Apply Loctite 271 P N 413 7029 00 on threads and under head then torque to 15 N m 133 lbf in 26 27 28 Calibration Screw Was...

Page 160: ...blies so that cotter pins are at the shown side Besides install cotter pin head on top when lever is sat at bottom of sliding half Bend cotter pin ends to sit perfectly against lever 1 Head on top 2 A...

Page 161: ...ork P N 529 0055 00 into slider shoe grooves to maintain them for governor cup instal lation Proceed on 3 set of slider shoes Make sure to align governor cup arrow with slid ing half and fixed half ma...

Page 162: ...drive pulley allows setting maxi mum engine RPM in the vehicle to maintain max imum power Calibration screws should be adjusted so that ac tual maximum engine RPM in vehicle matches with the maximum h...

Page 163: ...it in steps of 200 RPM Example Calibration screw is set at position 4 and is changed to position 6 So maximum engine RPM is increased of 400 RPM To Adjust Just loosen locking nut enough to pull calibr...

Page 164: ...ection 05 TRANSMISSION Subsection 04 DRIVEN PULLEY 05 04 1 DRIVEN PULLEY 0 Tundra II LT A09D0QS 13 N m 115 lbf in 1 2 3 4 5 6 11 12 13 14 15 8 9 10 Anti seize lubricant P N 413 7010 00 FLAT RATE PARTS...

Page 165: ...er Disconnect impulse hose from engine Disconnect oil injection supply line at injection pump and plug line to prevent draining Remove screws retaining rear engine support to chassis Tip engine forwar...

Page 166: ...Half Bushing Clean mounting surfaces with Loctite Safety Sol vent Using a press and a suitable pusher install bushing as illustrated 1 Install bushing from this side of sliding half 2 Bushing After bu...

Page 167: ...incase Install a new upper chaincase oil seal and a new chaincase cover seal Reinstall the driven pulley on vehicle by reversing the removal procedure NOTE If chaincase screws have been slackened chai...

Page 168: ...ring pre load relocate spring end in sliding pulley moving it clockwise to decrease the pre load and counterclockwise to increase it 1 Decrease 2 Adjusting holes 3 Increase NOTE Always recheck torsion...

Page 169: ...Section 05 TRANSMISSION Subsection 04 DRIVEN PULLEY 05 04 6 S Series A15D1DS 14 2 19 18 8 6 5 15 4 7 9 10 16 11 17 12 13 Anti seize lubricant P N 413 7010 00 Loctite 609 Loctite 609 FLAT RATE PARTS...

Page 170: ...and Small Bushing During break in period about 10 hours of use te flon from bushing moves to cam or shaft surface A teflon over teflon running condition occurs leading to low friction So it is normal...

Page 171: ...11 02 below bushing Mount puller screw head in a vise Turn pulley half by hand to extract old bushing Before bushing installation file sliding half bore to remove burrs from crimping areas Coat bushin...

Page 172: ...Countershaft and Anti seize Lubricant Should installation procedure be required refer to BRAKE 05 06 then look for Brake Disc and Coun tershaft Bearing Adjustment Reinstall the pulley on the countersh...

Page 173: ...Take 1st measurement when sliding half begins to turn Rotate sliding half to 10 mm 3 8 in of rota tion Hold fish scale at this position Slowly re lease tension from fish scale and take 2nd measurement...

Page 174: ...o install proper cam Refer to TECHNI CAL DATA 10 Cam angle is identified on cam NOTE For high altitude regions the High Altitude Technical Data Booklet P N 484 0686 00 and 484 0545 00 for binder gives...

Page 175: ...ixed half edge measured at the end of straight bar Z Distance between outside diameter of pul leys GENERAL PROCEDURE Remove belt guard and drive belt By turning and pushing the sliding half open the d...

Page 176: ...nor fixed half shoulder and shim s TYPICAL 1 Shaft 2 Alignment template 3 Fixed half shoulder and shim s Drive Belt Deflection NOTE When pulley distance and alignment are adjusted to specifications r...

Page 177: ...Adjustment Method Slacken the 4 chaincase retaining bolts unlock and raise pulley support Move chaincase to obtain specific adjustment and adjust driven pulley support length accordingly light contac...

Page 178: ...ain specified pulley align ment torque engine support bolts to 55 N m 41 lbf ft and remove engine support positioner Driven Pulley Movement Shims can be mounted between chaincase and frame Use shim P...

Page 179: ...ovement When engine slotted mounting holes do not allow to set proper pulley offset X adjust with shims P N 504 1082 00 between pulley and counter shaft bearing support pulley pushed toward brake disc...

Page 180: ...Section 05 TRANSMISSION Subsection 06 BRAKE 05 06 1 BRAKE 0 MECHANICAL BRAKE Tundra II LT 4 N m 35 lbf in 24 N m 18 lbf ft A05D0SS 21 23 22 15 14 12 1 11 7 6 8 3 9 4 16 10 12 5 17 FLAT RATE PARTS...

Page 181: ...MISSION Subsection 06 BRAKE 05 06 2 Formula S S Elec Touring E and Skandic 380 500 A03D27S 7 11 1 12 25 17 Loctite 242 19 20 9 5 14 15 16 Anti seize lubricant 2 Dielectric grease Anti seize lubricant...

Page 182: ...Section 05 TRANSMISSION Subsection 06 BRAKE 05 06 3 HYDRAULIC BRAKE Touring LE and Formula SL A03D26S 7 Loctite 242 Anti seize lubricant 17 18 19 20 24 Black Max FLAT RATE PARTS...

Page 183: ...Remove air silencer Unbolt bearing support from chassis Open chaincase and remove upper sprocket Pull countershaft toward driven pulley side to gain access to clip no 25 Remove clip no 25 on counters...

Page 184: ...p no 25 Remove clip no 25 on countershaft Pull countershaft toward driven pulley side to free from chaincase Withdraw countershaft to ward chaincase Remove connecting pipe between tuned pipe and after...

Page 185: ...can only be removed upward Lock it in the caliper casting notch 7 Fixed Brake Pad Tundra II LT Torque screw no 3 to 4 N m 35 lbf in Bend locking tab no 4 over a flat of screw head 1 6 11 12 Locking T...

Page 186: ...r exceeding portion toward driven pulley Push O rings inside disc hub 7 Brake Pad After brake pads installation brake disc must be centered in caliper Apply brake then check for proper brake disc posi...

Page 187: ...l caliper retaining bolts Assemble outer caliper Install locking tab then nuts Torque nuts to 24 N m 18 lbf ft Bend lock ing tab over a flat of each nut 5 10 Brake Cable and Nut Insert brake cable int...

Page 188: ...ibed above NOTE If brake light adjustment is unattainable while respecting brake adjustment ratchet wheel may be too far out If so tighten ratchet wheel Tundra II LT Brake light should light up before...

Page 189: ...Section 05 TRANSMISSION Subsection 07 CHAINCASE 05 07 1 CHAINCASE 0 Tundra II LT A03D0QS 1 7 10 9 10 9 11 12 13 28 14 15 4 5 2 3 6 27 30 22 23 19 20 16 17 18 24 25 26 8 Lithium grease FLAT RATE PARTS...

Page 190: ...9 0072 00 1 Drive axle 2 Suspension cross shaft Chaincase and Driven Pulley Assembly Using 2 large screwdrivers inserted between chaincase and frame pry complete assembly from vehicle DISASSEMBLY Disa...

Page 191: ...of a vehicle equipped with an 11 teeth sprocket check the wear of protectors no 8 Re place if required Grease new gasket no 20 with petroleum jelly or other suitable product and install gasket making...

Page 192: ...Section 05 TRANSMISSION Subsection 07 CHAINCASE 05 07 4 ADJUSTMENT Pulley Alignment Refer to PULLEY DISTANCE AND ALIGNMENT 05 05 Track Tension and Alignment Refer to TRACK 07 05 FLAT RATE PARTS...

Page 193: ...Reverse Gear SYNTHETIC CHAINCASE OIL HUILE SYNTH TIQUE POUR CARTER A03D2OS Chaincase oil 2 1 45 to 75 N m 33 to 55 lbf ft 3 27 4 5 6 23 7 Loctite 242 12 46 N m 34 lbf ft 15 Loctite 271 14 13 16 17 14...

Page 194: ...Check for worn or defective bear ings sprockets and chain tensioner components GEAR RATIO MODIFICATION For particular applications the number of teeth of the sprockets can be increased or decreased on...

Page 195: ...This initial adjustment should provide 3 5 mm 1 8 13 64 in free play when measured at the out er circumference of the brake disc 22 Chaincase Oil Pour 250 mL 8 5 fl oz of chaincase oil P N 413 8019 0...

Page 196: ...PICAL 1 Dipstick 2 Oil level 3 Level between marks NOTE Chaincase must be in its proper position when checking oil level ADJUSTMENT Pulley Alignment Refer to PULLEY DISTANCE AND ALIGNMENT 05 04 Track...

Page 197: ...andic 380 500 A03D17S 15 N m 133 lbf in 7 8 5 28 31 40 48 N m 35 lbf ft Loctite 271 6 16 17 32 33 34 37 38 5 N m 44 lbf in 35 36 29 N m 21 lbf ft Loctite 242 Loctite 242 27 Grease 25 14 Loctite 271 26...

Page 198: ...and then remove reverse axle no 20 1 Sliding gear screw 2 Reverse axle Remove coupling shaft no 33 44 tooth sprocket no 34 spacer no 38 and chain no 28 First unscrew castellated nut no 10 then remove...

Page 199: ...h sprocket Tighten nut no 37 to 5 N m 44 lbf in in a criss cross sequence Insert spring pin no 21 in reverse axle up to in side diameter Press needle bearing in 19 tooth sprocket Install ring no 24 an...

Page 200: ...is still impossi ble check if the fork engages in the sliding gear or disassemble the cover to inspect components 3 Completely slacken ball joint lock nut on the gear shift linkage 4 Using tool P N 5...

Page 201: ...procket Clean cover interior NOTE It is normal to find metallic particles stuck to dipstick magnet If bigger pieces of metal are found disassemble and check all parts Reinstall cover as previously des...

Page 202: ...lip must be on opposite side of chain rotation The circlip should also be facing the outer side of chaincase TYPICAL 1 Rotation CHAIN SEPARATION When separating an endless chain always use a chain bea...

Page 203: ...ink pin C Cranked link D Cotter pin E Outer link F Circlip LENGTHENING 1 LINK A Connecting link B Inner link C Outer link D Circlip LENGTHENING 1 1 2 LINKS A Connecting link B Outer link C Cranked lin...

Page 204: ...5 SPARK PLUGS 06 04 1 NGK SPARK PLUG 06 04 1 NGK SPARK PLUG NUMBERING SYSTEM 06 04 1 REFERENCE CHART 06 04 1 DESIGN SYMBOLS USED IN NGK SPARK PLUGS 06 04 2 DISASSEMBLY 06 04 3 HEAT RANGE 06 04 3 FOUL...

Page 205: ...TING 06 07 5 5 IGNITION MODULE VOLTAGE TESTING 06 07 5 6 HIGH VOLTAGE COIL VOLTAGE TESTING 06 07 6 CONCLUSION 06 07 6 LIGHTING GENERATOR COIL VOLTAGE TESTING 06 07 6 CONCLUSION 06 07 6 DUCATI CDI SYST...

Page 206: ...with a BLACK stripe MODEL WIRING DIAGRAM PAGE HEADLIGHT watt TAILLIGHT watt ELECTRICAL SYSTEM OUTPUT watt Tundra II LT Annex 1 60 55 hal 8 27 160 Skandic 380 500 Annex 2 60 55 hal 8 27 240 Formula S A...

Page 207: ...beam Current returns by YELLOW BLACK wire connected to headlamp VIOLET GREY 12 volts AC Low beam WHITE 12 volts AC Brake light Current returns by YELLOW BLACK wire connected to taillight WHITE RED 12...

Page 208: ...CLE CONNECTORS REMOVAL Tab Connector It is locked in its housing by a spring tab on its side Removal is done by squeezing this tab TAB CONNECTOR 1 Locking tab To remove Insert a screwdriver or Snap on...

Page 209: ...all hook pull out the lock 1 Lock 1 Lock Pry tab to free connector then pull wire out of housing MALE CONNECTOR HOUSING CUTAWAY TAB AND RECEPTACLE CONNECTORS INSTALLATION Prior to installing make sure...

Page 210: ...ries on any snowmobile connect their wires di rectly to the YELLOW and YELLOW BLACK lighting coil wires Even if manual start models have an AC ground to the chassis on voltage regulator all accesso ri...

Page 211: ...ark posi tion before checking ignition timing Verifying Magneto Flywheel Timing Mark Position 1 Disconnect spark plug wire and remove spark plug 2 Install and adjust TDC gauge on engine as fol lows Ro...

Page 212: ...wer supply If a different timing light requiring auxiliary power supply is used on manu al start models use a separate battery to power timing light TIMING LIGHT P N 529 0319 00 The ignition component...

Page 213: ...rewind starter and starter pulley have to be removed For remov al procedure refer to CDI SYSTEM 04 05 IGNITION TIMING ADJUSTMENT Timing is performed by moving armature plate clockwise to retard spark...

Page 214: ...rded timing In this case turn armature plate counterclock wise 1 Turn counterclockwise to advance After adjustment tighten armature plate retaining screws Reinstall removed parts Recheck ignition timi...

Page 215: ...er from the engine 3 Install the TDC gauge in the spark plug hole magneto generator side and adjust as follows a Position the magneto flywheel at approxi mately TDC INSTALLATION OF TDC GAUGE 1 Gauge o...

Page 216: ...efer to illustration c If the marks do not align check magneto fly wheel and trigger coil part numbers and check Woodruff key condition If all parts are the appropriate ones and if Woodruff key is in...

Page 217: ...mark scribed previously and the crank case arrow should be perfectly aligned If the marks do not align a faulty trigger coil check proper grounding of coil or a faulty CDI module could be the cause s...

Page 218: ...odels NGK SPARK PLUG NUMBERING SYSTEM Bombardier is using the NGK spark plug type on all its snowmobile models The heat range identification system is Low number hot plug High number cold plug REFEREN...

Page 219: ...9 10 Cold 18 mm 14 mm 10 mm 12 mm 8 mm 12 mm x 19 mm Reach A B C D E J Special Design Single Ground Special Alloy Dual Ground Special Alloy Racing Type Racing Version of V Type Half Heat Range Standar...

Page 220: ...tion etc A too cold plug will result in fouling shorting the spark plug or may create carbon build up which can heat up red hot and cause pre ignition or detonation FOULING Fouling of the spark plug i...

Page 221: ...wire feeler gauge set electrode gap ac cording to TECHNICAL DATA 10 2 Apply anti seize lubricant P N 413 7010 00 over the spark plug threads to prevent possible seizure 3 Hand screw spark plug into c...

Page 222: ...ve boot Step Remove vent tube All Models Withdraw battery from vehicle being careful not lean it so that electrolyte flows out of vent tube CLEANING Clean the battery battery casing vent tube caps cab...

Page 223: ...t readings adjust the ini tial reading by adding 004 points to the hydrom eter readings for each 5 5 C 10 F above 27 C 80 F and by subtracting 004 point for every 5 5 C 10 F below 27 C 80 F This chart...

Page 224: ...charge as possible trickle charge ACTIVATION OF NEW BATTERY A new battery is factory fresh dry charged For storage purposes it is fitted with a temporary sealing tube Do not remove the sealing tube or...

Page 225: ...1 Battery electrolyte 6 Connect a 2 A battery charger for 10 to 20 hours A17E0FA 1 A17E0GA 1 A17E0HA CAUTION If charging rate raises higher than 2 4 A re duce it immediately If cell temperature rises...

Page 226: ...fic gravity 1 260 9 Let battery settle for 1 hour 1 60 minutes 10 Allow gas bubbles to escape by lightly shake battery 11 Readjust electrolyte level 1 Battery electrolyte 12 Reinstallcapsandcleananyel...

Page 227: ...ey can supply Therefore time required for the battery to begin accepting measurable current will also vary Charging a Very Flat or Completely Discharged Battery Unless this procedure is properly follo...

Page 228: ...suitable for use with most chargers if the peak current is to be held below 2 amps If you need an accurate ammeter we recommend the use of SHURITE 5202 0 to 3 amps or 5203 0 to 5 amps available from...

Page 229: ...tube on fitting Ensure that vent tube is not kinked or blocked then install protective boot over battery Close and fasten retaining strips Reinstall air silencer Fasten spark plug cables to fan housin...

Page 230: ...Section 06 ELECTRICAL Subsection 06 ELECTRIC STARTER 06 06 1 ELECTRIC STARTER 0 S Series with Electric Starting A03E13S 1 2 3 8 9 10 11 12 13 15 16 17 18 19 4 5 6 7 12 FLAT RATE PARTS...

Page 231: ...o 8 Insert blade of a small screwdriver between stop collars Twist screwdriver to separate stop collars no 12 thus giving access to circlip no 13 Remove outer collar circlip then inner collar Remove o...

Page 232: ...to rotate tap until the bushing comes free 1 Turn until bushing goes out 2 12 mm tap To install new bushing use the same bushing pusher as for drive housing bushing installation 6 Brush To replace br...

Page 233: ...ce drive lever onto overrunning clutch then in sert into drive housing 1 Install on overrunning clutch 2 Install thrust washer Slide yoke over armature Install brush holder then brushes in their hous...

Page 234: ...In stall hardened washers P N 503 0079 00 be tween engine and starter supports accordingly 1 Screwdriver pulling starter pinion 2 Ring gear 3 No excessive backlash A 0 5 to 1 5 mm 020 to 060 in Connec...

Page 235: ...ce If necessary turn the commutator on a lathe enough to remove grime only Check the commutator for mica depth If the depth is less than 0 20 mm 0 008 in undercut the mica Be sure that no burrs are le...

Page 236: ...ndication of an open circuit armature coil Field Windings and Brushes Test the Field Winding for Open Circuit Use growler test probes Place one test probe on the negative brush and the other test prob...

Page 237: ...tion If defec tive replace Check the pinion teeth for wear and damage If defective replace SOLENOID SWITCH Inspect connections and clean as necessary Sole noid switch condition can be checked with an...

Page 238: ...wire connector BLACK and BLACK RED wires 277 Engine Ignition module stamped P N 070000 1960 Ignition coil stamped P N 129700 2480 Flywheel stamped P N 032700 4380 NIPPONDENSO CDI SINGLE COIL SYSTEM 1...

Page 239: ...Section 06 ELECTRICAL Subsection 07 TESTING PROCEDURE 06 07 2 DUCATI CDI SYSTEM 1 Combined ignition module ignition coil mounted on air silencer below carburetors 2 4 wire connector A17E0TA 1 2...

Page 240: ...reading is too low the part is considered to be de fective and must be replaced Resistance Readings Place multimeter selector switch to in order to measure resistance Readings must be within the indic...

Page 241: ...he above men tioned indications replace switch If readings are acceptable check other switches Emergency Switch Unplug switch block connected to main wiring harness Check using a multimeter Connect pr...

Page 242: ...or replace if necessary General When manually starting the engine while the spark plug is installed the engine will tend to ac celerate beyond the compression point This will result in higher magneto...

Page 243: ...Set the multimeter as indicated LIGHTING GENERATOR COIL VOLTAGE TESTING NOTE The lighting generator coil is not part of the ignition system It is a self contained system used to supply current to the...

Page 244: ...0 At least one stop switch must be operational Ignition generator coil Output BK and BK RE 4 20 1 M and 4 20 2 M 40 0 76 0 00 0 18 0 30 0 00 0VAC No stop switch must be operational Stop wire continui...

Page 245: ...low cranking force Perform testing in the prescribed order and replace any parts not performing according to specifications It is important to resume all tests when replacing a component If not specif...

Page 246: ...s too low the part is considered to be de fective and it must be replaced Resistance Readings Place multimeter selector switch to in order to measure resistance Readings must be within the indicated r...

Page 247: ...respond to the above men tioned indications replace switch If readings are acceptable check other switches Emergency Switch Unplug switch block connected to main wiring harness Check using a multimete...

Page 248: ...gneto output power 4 IGNITION GENERATOR COIL VOLTAGE TESTING 1 Disconnect the 4 wire housing between the ig nition module and the magneto wiring harness 4 20 2 Connect multimeter probes to GREEN and W...

Page 249: ...ly current to the lighting system and to other devices working on alternating current However this system can be tested using a mul timeter 1 Disconnect housing from engine 2 01 2 Connect multimeter w...

Page 250: ...01 D M and 2 01 C M 00 0 00 5 00 0 At least one stop switch must be operational Ignition generator coil Output BL and GR 4 20 B F and 4 20 A FA 230 0 330 0 00 0 30 0 60 0 00 0VAC No stop switch must b...

Page 251: ...ng in the prescribed order and replace any parts not performing according to specifications It is important to resume all tests when replacing a component If not specified the probe connecting sequenc...

Page 252: ...ter to YELLOW BLACK wire Connect the other wire of the voltmeter to YEL LOW wire Lift the rear of vehicle and support with a mechan ical stand Start the engine at an idle without opening the throttle...

Page 253: ...en INSPECTION Disconnect regulator rectifier Connect one digital ohmmeter probe needle ohmmeter will not offer enough precision to frame and other probe to YELLOW or YEL LOW BLACK magneto wires Measur...

Page 254: ...nt Measurement Handlebar Grip Heating Element HIGH INTENSITY YELLOW BLACK wire BROWN wire 1 96 to 3 64 ohms LOW INTENSITY YELLOW BLACK wire BROWN YELLOW wire 8 05 to 14 95 ohms HIGH INTENSITY BROWN wi...

Page 255: ...SUSPENSION 07 03 1 COMPONENT REMOVAL AND INSTALLATION 07 03 2 REMOVAL 07 03 2 DISASSEMBLY AND ASSEMBLY 07 03 3 INSPECTION 07 03 4 INSTALLATION 07 03 4 RIDE ADJUSTMENT 07 03 5 LUBRICATION 07 03 7 DRIV...

Page 256: ...2 1 TORQUE REACTION SUSPENSION 0 Tundra II LT A05F0HT 24 N m 18 lbf ft 19 N m 168 lbf in 1 2 3 4 5 48 N m 35 lbf ft 24 N m 18 lbf ft 6 48 N m 35 lbf ft 11 N m 97 lbf in 9 10 7 8 7 8 Loctite 271 24 N m...

Page 257: ...pper Strap Inspect strap for wear or cracks bolt and nut for tightness If loose inspect hole for deformation Replace as required Make sure it is attached through the 3rd hole from the end Torque nut t...

Page 258: ...from the bottom to the 0 5 mm 020 in radius as shown on the next pho to Minimum thickness must be 2 mm 080 in TYPICAL 1 Slider shoe 2 Molding line this line is not the wear limit A Wear measurement m...

Page 259: ...ttoming occurring under the worst riding conditions indicates a good choice of spring preload To adjust rear suspension adjustment cams use special key supplied in vehicle tool box Turning adjustment...

Page 260: ...ngle The longer the belt the more the weight will be transferred to the track to provide a better trac tion The shorter the belt the lesser the weight transferred to the track thus maintaining a more...

Page 261: ...eep Snow Operation When operating the vehicle in deep snow it may be necessary to change position of adjustment cams stopper strap and or driver s riding position to change the angle at which the trac...

Page 262: ...S Series A03F24S Short track models only Long track models only SLE only Loctite 271 Loctite 271 Loctite 271 Loctite 271 Loctite 271 Loctite 271 Loctite 271 Loctite 271 Low temp grease 6 5 6 7 4 3 2 1...

Page 263: ...HT SIDE SHOWN 1 Right position upward 2 Wrong position REMOVAL 19 Cam Decrease spring preload by turning LH cam clock wise and RH cam counterclockwise LH SIDE SHOWN RH SIDE SHOWN Lift rear of vehicle...

Page 264: ...ly before reinstalling sus pension Refer to 07 05 TRACK 1 Rear Arm At installation rear arm stroke limiter must be on rear side 1 Stroke limiter on rear side 8 9 Pivot Arm and Flat Washer At installat...

Page 265: ...7 lbf in INSPECTION Shock Absorber Refer to SUSPENSION AND SKI SYSTEM 08 03 then look for Shock Inspection 17 Slider Shoe Measure slider shoes from the bottom to the 0 5 mm 020 in radius as shown on t...

Page 266: ...The rear portion of rear suspension is adjustable for driver s weight 1 Stopper strap for weight transfer 2 Driver s weight Choice of suspension adjustments depends on carrying load driver s weight pe...

Page 267: ...when the sup porting edge of cam is the farthest to hexagonal portion of cam STIFFEST ADJUSTMENT 1 Supporting edge farthest to hexagonal LH SIDE SHOWN RH SIDE SHOWN Stopper Strap The function of the s...

Page 268: ...stment will improve steering ability Deep Snow Operation When operating the vehicle in deep snow it may be necessary to change position of adjustment cams stopper strap and or driver s riding position...

Page 269: ...Section 07 REAR SUSPENSION Subsection 04 DRIVE AXLE 07 04 1 DRIVE AXLE 0 Tundra II LT S Series A05D03S 2 9 3 11 5 8 6 9 5 A03F1CS 9 11 5 3 2 10 4 8 6 12 FLAT RATE PARTS...

Page 270: ...nd remove with its spacer if applicable 8 9 Drive Axle and Sprocket Release drive axle sprocket from track and at the same time pulling the drive axle towards the end bearing housing side Remove drive...

Page 271: ...dexing marks of each sprocket when assembling TYPICAL 1 Indexing marks aligned The maximum desynchronization for the sprock ets is 1 5 mm 1 16 in To check this tolerance place axle assembly on a plane...

Page 272: ...housing bearing must be flush with end of drive axle Each bearing must have its shield facing the sprocket 1 Bearing shield on this side 2 Flush with drive axle 3 Seated on shaft shoulder AXIAL PLAY S...

Page 273: ...asy bearing installa tion This chart can be use as a starting point to cor rect the chaincase perpendicularity TYPICAL 1 Upper shim location 2 Lower shim location 3 50 mm long screws when installing o...

Page 274: ...ifference between these 2 measurements Repeat this procedure 2 or 3 times to obtain an accurate measurement The allowable drive axle axial play is 0 to 1 5 mm 0 to 060 in The drive axle axial play as...

Page 275: ...guide cleat and slider shoe 2 Suspension front axle If the difference between each side exceeds 3 mm 1 8 in redistribute drive axle shims as fol lows INSTALLATION 4 Speedometer Drive Insert If the dri...

Page 276: ...all the suspension Refer to TRACK 07 05 and adjust track tension and carry out track alignment procedure LUBRICATION 15 Grease Fitting Lubricate end housing bearing with synthetic grease P N 413 7115...

Page 277: ...wing items speedometer cable muffler chaincase cover suspension drive axle seal end bearing housing sprockets and chain drive axle toward end bearing housing track INSTALLATION All Models Reverse the...

Page 278: ...ge of gauge reaches line TYPICAL 1 Line NOTE Lightly oil track tension gauge center pin to avoid sticking Tundra II LT 35 to 40 mm 1 3 8 to 1 9 16 in when exerting a downward pull of 7 3 kg 16 lb A 35...

Page 279: ...oosen the lock nuts and tighten the adjuster bolt on side where guides are farthest to slide Tighten lock nuts and re check alignment 1 Guides 2 Slider shoes 3 Tighten on this side Tighten lock nuts a...

Page 280: ...expose a cleat to be replaced Using track cleat remover P N 529 0082 00 for Tundra II LT Use P N 529 0087 00 for all other models Installation NOTE Keep the same pitch between guide cleats Place new c...

Page 281: ...8 02 3 DISASSEMBLY AND ASSEMBLY 08 02 3 INSPECTION 08 02 4 ADJUSTABLE HANDLEBAR 08 02 5 STEERING ADJUSTMENT SKIS 08 02 6 LUBRICATION 08 02 10 SUSPENSION AND SKI SYSTEM 08 03 1 ON VEHICLE COMPONENT REM...

Page 282: ...SYSTEM 0 Tundra II LT A05G0AS 8 5 4 2 3 2 6 24 N m 18 lbf ft 24 N m 18 lbf ft 1 8 21 9 9 21 10 13 15 53 N m 39 lbf ft 18 N m 159 lbf in 13 15 18 N m 159 lbf in 10 16 34 21 13 9 21 21 14 18 N m 159 lbf...

Page 283: ...5 4 6 9 40 N m 30 lbf ft 25 N m 18 lbf ft 2 21 21 16 13 14 25 N m 18 lbf ft 15 10 21 22 21 9 40 N m 30 lbf ft 26 52 N m 38 lbf ft 18 N m 159 lbf in 9 21 21 16 13 20 15 18 N m 159 lbf in 18 N m 159 lbf...

Page 284: ...ering column work ing under engine On S Series remove air intake silencer and carburetor s to gain access 17 Steering Arm To maintain correct steering geometry when reas sembling punch mark the steeri...

Page 285: ...od end must run par allel with the horizontal line of the steering arm when assembled on vehicle The ball joint should be restrained when tightening tie rod end lock nut For torque specifications see...

Page 286: ...4 screws and nuts to the column as illustrat ed See applicable exploded view for each model Adjust the steering handle to the desired position Lock the handle in place by tightening the 4 nuts to 26 N...

Page 287: ...tilt angle of ski leg compared to a vertical line when viewing vehicle from front This angle is not adjustable on these models Adjustments Tundra II LT Adjustments should be performed following this...

Page 288: ...and check ski toe out TOE OUT Loosen lock nuts of long tie rods and turn each tie rod so that skis are in a straight ahead position To adjust toe out slightly turn both tie rods exactly the same amou...

Page 289: ...eries Adjustments should be performed following this sequence Pivot arm centering Check for horizontal handlebar Set toe out PIVOT ARM CENTERING 13 14 22 Jam Nut Tie Rod and Pivot Arm With handlebar i...

Page 290: ...ose front of skis manually to take all slack from steering mechanism NOTE A rubber cord must be hooked in front of skis to keep them closed Toe out is 0 mm 0 in when skis are in a straight ahead posit...

Page 291: ...ndra II LT Lubricate front suspension posts and pivot arm at grease fittings Pump five strokes of grease gun on each post NOTE There are 3 grease fittings Oil ball joints and steering column bushings...

Page 292: ...Section 08 STEERING FRONT SUSPENSION Subsection 02 STEERING SYSTEM 08 02 11 S Series A06G08T If so equipped If so equipped FLAT RATE PARTS...

Page 293: ...SUSPENSION Subsection 03 SUSPENSION AND SKI SYSTEM 08 03 1 SUSPENSION AND SKI SYSTEM 0 Tundra II LT A05G0JS 1 13 N m 115 lbf in 2 4 3 5 6 7 Grease 13 4 14 Grease 15 16 17 12 9 8 9 10 11 29 N m 21 lbf...

Page 294: ...cover 2 Spring Pull out spring then check shock as described be low in inspection Suspension Free Operation Remove cover and check for free movement of ski leg by lifting end of ski DISASSEMBLY Lift...

Page 295: ...ion Replace as required 13 Ski Leg Check that splines on ski leg and steering arm in terlock properly with no excessive free play Re new as necessary 8 Shock Absorber Secure the shock body end in a vi...

Page 296: ...proce dure However pay attention to the following Apply synthetic grease P N 413 7115 00 as illus trated in exploded view above Tighten nuts and screws to proper torque as men tioned in exploded view...

Page 297: ...Section 08 STEERING FRONT SUSPENSION Subsection 03 SUSPENSION AND SKI SYSTEM 08 03 5 S Series A03G0CS 5 Loctite 242 11 8 8 7 7 6 1 4 3 2 FLAT RATE PARTS...

Page 298: ...hanging position of clevis pin Push down on handle until il locks Remove spring stopper and cap then release handle At installation cap opening must be 180 from spring stopper opening 1 Spring stopper...

Page 299: ...as nec essary Check condition of ski stopper Replace it when deteriorated To check condition of shock on all S Series mod els refer to Tundra shock inspection INSTALLATION For assembly reverse the di...

Page 300: ...MING 09 02 1 BULB REPLACEMENT 09 02 1 DECAL 09 02 2 WINDSHIELD INSTALLATION 09 02 2 BELT GUARD 09 02 2 WIRING HARNESS 09 02 3 CABLES 09 02 3 PIPING 09 02 3 PLASTIC REPAIR 09 02 4 REPAIR 09 02 4 MATERI...

Page 301: ...perpendicular to test surface wall or screen and 381 cm 12 ft 6 in away from it Rider or equivalent weight must be on the vehicle Select high beam Adjustment Remove headlamp molding Turn screws accor...

Page 302: ...od slots Lock the windshield tabs in position using latches as shown S SERIES 1 Latch 2 Temporary remove headlamp molding for windshield installation BELT GUARD Disassembly and Assembly NOTE For addit...

Page 303: ...devices as required WARNING Before installation ensure that all cables are in perfect condition Properly install the ca ble ends and secure them in place Pay at tention to route them properly away fr...

Page 304: ...following chart CAUTION Consult chart and repair kit instructions carefully some repair products are not com patible with certain plastics WARNING Polycarbonate windshields must never be repaired by...

Page 305: ...n both sides of hood using a knife or a rough round file Enlarge the crack to 2 4 mm 3 32 in 3 2 mm 1 8 in using a sharp knife Clean outside and inside surface with isopropyl alcohol or Crest Hi Solv...

Page 306: ...6 Fax 404 288 4658 Mailing Address P O Box 254 Decatur Georgia 30031 CREST INDUSTRIES INC CREST MID WEST 231 Larkin Williams Ind Court St Louis Missouri 63026 Phone 314 349 4800 Toll Free 1 800 733 27...

Page 307: ...ng FRAME COMPONENT REPLACEMENT S Series Drilling Procedure When drilling self piercing rivets use Supertanium drill bit P N 529 0318 00 available in a 5 mm 3 16 in size and shipped in packs of 2 For p...

Page 308: ...e Bombardier syn thetic chaincase oil P N 413 8033 00 as a cutting oil Grinding Procedure Rear Cap Grind rivet heads from top of rear cap and under neath for side retaining rivets 1 Rivets heads groun...

Page 309: ...e speed meter kilogram newton liter Celsius kilopascal newton meter kilometer per hour m kg N L C kPa N m km h PREFIXES PREFIX SYMBOL MEANING VALUE kilo centi milli micro k c m one thousand one hundre...

Page 310: ...n 0 45 018 0 45 018 0 45 018 0 45 018 Ignition Timing BTDC mm in 2 52 099 1 68 066 1 38 054 1 66 065 Trigger Coil N A 140 180 140 180 140 180 Generating Coil Low Speed 40 76 N A N A N A High Speed N A...

Page 311: ...39 345 136 307 121 Profile Height mm in 18 4 724 18 4 724 Adjustment Deflection mm in 35 40 1 3 8 1 9 16 35 40 1 3 8 1 9 16 35 40 1 3 8 1 9 16 Force kg lbf 7 3 16 7 3 16 7 3 16 Suspension Type Track T...

Page 312: ...gth cm in 345 136 345 136 345 136 307 121 Profile Height mm in 18 4 724 23 2 913 23 2 913 18 4 724 Adjustment Deflection mm in 35 40 1 3 8 1 9 16 35 40 1 3 8 1 9 16 35 40 1 3 8 1 9 16 35 40 1 3 8 1 9...

Page 313: ...ay between pulleys to ob tain specified deflection Drive pulley retaining screw torque to 90 to 100 N m 66 to 74 lbf ft install drive belt ac celerate the vehicle at low speed maximum 30 km h 20 MPH a...

Page 314: ...TUNDRA II LT ANNEX 1...

Page 315: ......

Page 316: ......

Page 317: ......

Page 318: ...SKANDIC 380 500 ANNEX 2...

Page 319: ......

Page 320: ......

Page 321: ......

Page 322: ......

Page 323: ...FORMULA S ANNEX 3...

Page 324: ......

Page 325: ......

Page 326: ......

Page 327: ......

Page 328: ...FORMULA SL ANNEX 4...

Page 329: ......

Page 330: ......

Page 331: ......

Page 332: ......

Page 333: ...TOURING E LE FORMULA S ELECTRIC ANNEX 5...

Page 334: ......

Page 335: ......

Page 336: ......

Page 337: ......

Page 338: ......

Reviews: