


6-35
DOCUMENT FILING
Contents
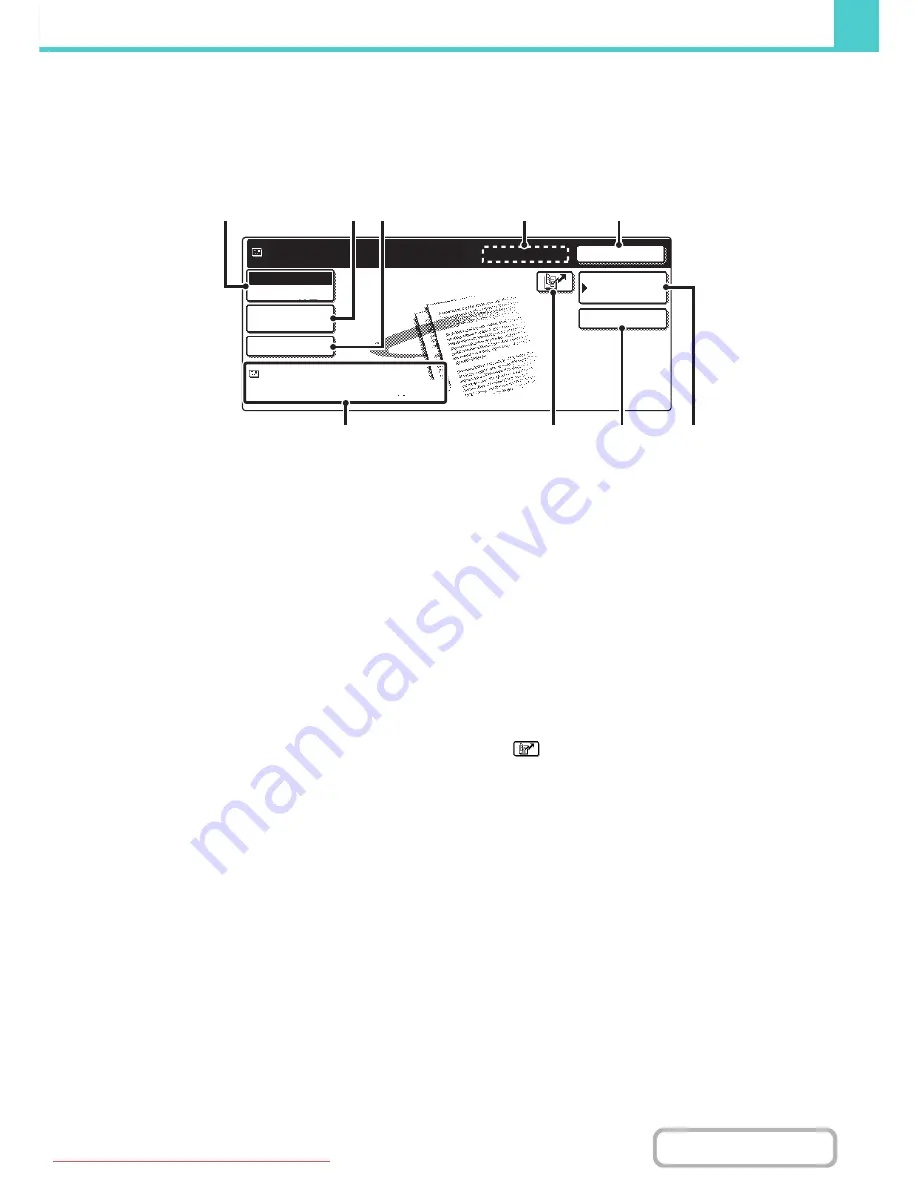
SEND SETTINGS SCREEN
The keys that appear in the send settings are explained below. For more information on each of the settings, see "
BASE
SCREEN OF FAX MODE
" (page 4-7) in "4. FACSIMILE" and "
BASE SCREEN
" (page 5-9) in "5. SCANNER / INTERNET FAX".
Example of scan mode
(1)
[Mode Switch] key
Use this key to select fax mode, scan mode, Internet fax
mode, or other method.
(2)
[Job Detail Settings] key
Touch this key to select send settings. The settings that
can be selected vary by mode.
•
Scan mode
[Resolution] key
Use this to select the resolution. A resolution setting
higher than the resolution at which the file was stored
cannot be selected.
[File Format] key
This lets you select the file type, compression ratio,
and colour mode.
[Special Modes] key
This displays the [Timer] key.
•
Internet fax mode
[Resolution] key
Use this to select the resolution. A resolution setting
higher than the resolution at which the file was stored
cannot be selected.
[File Format] key
Use this to select the file type and compression ratio.
[Special Modes] key
This displays the [Timer] and [Transaction Report] keys.
•
Fax mode
[Resolution] key
Use this to select the resolution. A resolution setting
higher than the resolution at which the file was stored
cannot be selected.
[Special Modes] key
This displays the [Timer], [Own Name Select], and
[Transaction Report] keys.
In addition to the above send modes, image settings in
other send modes may also be possible depending on
the options that are installed.
(3)
[Send Settings] key
This key appears in scan mode and Internet fax mode.
Touch the key to enter a subject and a file name when
performing a transmission. In scan mode, a sender can
also be specified.
(4)
[Next Address] key
This key appears when at least one address has been
entered. Use this key when you are sending a file to
multiple destinations.
(5)
[Cancel] key
This returns you to the job settings screen.
(6)
File name / User name display
This shows the icon of the file to be sent, the file name, the
user name, and the colour mode (colour/black & white).
(7)
key
The 3-digit search number that was assigned to a
one-touch key or group key when the key was stored can
be entered to specify a destination.
(8)
[Address Entry] key or [Sub Address] key
Use this key to directly enter an address when sending a
file in scan mode or Internet Fax mode.
In fax mode this appears as the "Sub Address" key. Use
this key to enter a sub-address and password for F-code
communication.
(9)
[Address Book] key
Touch this key to display the destinations stored in the
address book.
Ready to send.
Cancel
Address Book
Address Entry
file-01
Name 1
F. Colour
Scan
Mode Switch
Job Detail
Settings
Send Settings
(1)
(2) (3)
(4)
(5)
(9)
(8)
(7)
(6)
Downloaded From ManualsPrinter.com Manuals