


4-8
FACSIMILE
Contents
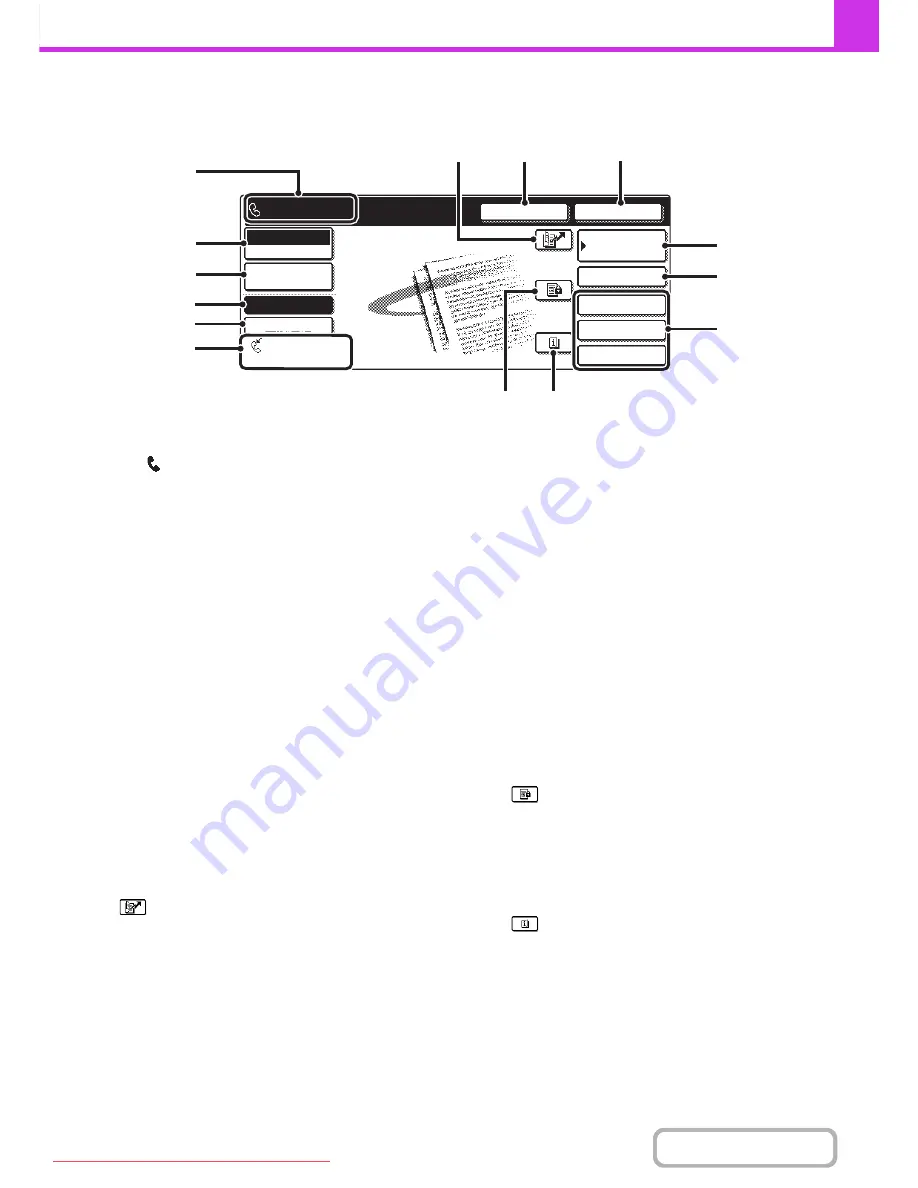
BASE SCREEN OF FAX MODE
This screen is used to select settings and operations in fax mode.
(1)
This shows various messages and the destinations
that have been entered.
The
icon on the left indicates fax mode.
(2)
[Mode Switch] key
Use these keys to change the mode of the image send
function.
☞
BASE SCREEN OF FAX MODE
(page 4-7)
(3)
[Job Detail Settings] key
Touch this key to select image settings (exposure,
resolution, original size, and two-sided original) and
special mode settings.
☞
JOB DETAIL SETTINGS
(page 4-44)
(4)
[Memory TX] key
This key is highlighted when a normal transmission
(memory transmission mode) is performed.
☞
To fax a large number of sheet originals, use the
automatic document feeder.
(page 4-25)
(5)
[Direct TX] key
Touch this key to send a fax by direct transmission.
☞
If you wish to send a fax ahead of other previously
reserved fax transmissions, use direct transmission
mode.
(page 4-26)
(6)
This shows the currently selected fax reception
mode and the amount of free memory remaining.
☞
RECEIVING FAXES
(page 4-52)
(7)
key
Touch this key to dial a fax destination using a search
number.
☞
USING A SEARCH NUMBER TO RETRIEVE A
DESTINATION
(page 4-20)
(8)
[Speaker] key / [Pause] key / [Space] key
Touch this key to dial using the speaker.
When entering a fax number to be dialled, the key
changes to the [Pause] key. When entering a
sub-address, the key changes to the [Space] key.
☞
TRANSMISSION USING THE SPEAKER
(page 4-37)
(9)
[Resend] key / [Next Address] key
Touch this key to redial a fax number. When entering a
fax number to be dialled, this key changes to the [Next
Address] key.
☞
USING THE RESEND FUNCTION
(page 4-23)
(10) [Address Book] key
Touch this key to dial using a one-touch key or group
key. When the key is touched, the address book screen
appears.
☞
RETRIEVING A FAX NUMBER FROM THE
ADDRESS BOOK
(page 4-17)
(11) [Sub Address] key
Touch this key to enter a sub-address and passcode for
F-code transmission.
☞
F-CODE DIALLING
(page 4-97)
(12) Customized keys
The keys that appear here can be changed to show
settings or functions that you prefer.
☞
Customizing displayed keys
(page 4-9)
(13)
key
When "Hold Setting for Received Data Print" is enabled,
this appears when a fax has been received. Touch this
key to open a password entry screen. Enter the set
password to print the received fax.
☞
PRINTING A PASSWORD-PROTECTED FAX (Hold
Setting For Received Data Print)
(page 4-55)
(14)
key
This key appears when a special mode or 2-sided
scanning is selected. Touch the key to display the
selected special modes.
☞
Checking what special modes are selected
(page
4-9)
Quick File
File
Special Modes
Sub Address
Speaker
Resend
Address Book
Fax
Mode Switch
Job Detail
Settings
Direct TX
Memory TX
Auto Reception
Fax Memory:100%
Ready to send.
(9)
(8)
(7)
(2)
(1)
(3)
(4)
(5)
(6)
(12)
(11)
(10)
(14)
(13)
Downloaded From ManualsPrinter.com Manuals