Wireless network setup (Optional)
64
3. Using a Network-Connected Machine
9
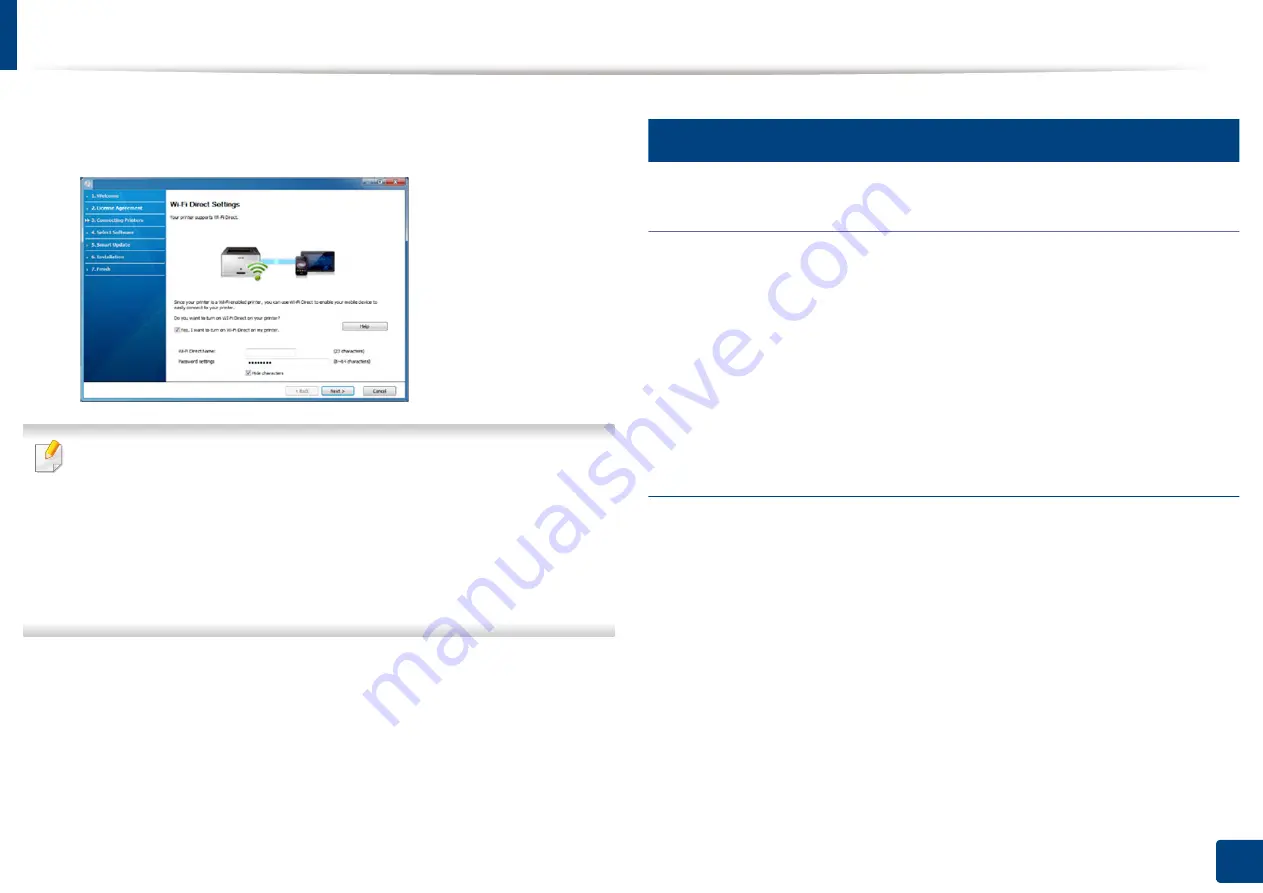
If your printer supports Wi-Fi Direct, the following screen appears.
Click
Next
.
•
Wi-Fi Direct option appears on the screen only if your printer supports
this feature.
•
Can start to build Wi-Fi Direct by using
Samsung Easy Printer Manager
"Setting up Wi-Fi Direct" on page 68).
•
Wi-Fi Direct Name
: The default Wi-Fi Direct Name is the model name
and the maximum length is 22 characters.
•
Password setting
is the numeric string, and the size is 8 ~ 64 characters.
10
When the wireless network set up is completed, disconnect the USB
cable between the computer and machine. Click
Next
.
11
Select the components to be installed.
12
Follow the instructions in the installation window.
13
Setup using Mac
Items to prepare
•
Access point
•
Network-connected computer
•
Software CD that was provided with your machine
•
A machine installed with a wireless network interface
•
USB cable
Setting up via USB cable
1
Make sure that the machine is connected to your computer and
powered on.
2
Insert the supplied software CD into your CD-ROM drive.
3
Select the CD-ROM volume that appears on
Finder
.
4
Double-click
Install Software
icon.
5
Read the license agreement and check installation agreement button.
6
Click
Next
.
Summary of Contents for Multifunction MultiXpress K325 Series
Page 295: ...Redistributing toner 295 14 Maintenance 4 X322x X328x series ...
Page 296: ...Redistributing toner 296 14 Maintenance 5 K325x K330x series ...
Page 298: ...Replacing the toner cartridge 298 14 Maintenance 6 X322x X328x series ...
Page 299: ...Replacing the toner cartridge 299 14 Maintenance 7 K325x K330x series ...
Page 301: ...Replacing the imaging unit 301 14 Maintenance 8 X322x X328x series ...
Page 302: ...Replacing the imaging unit 302 14 Maintenance 9 K325x K330x series ...
Page 303: ...Replacing the imaging unit 303 14 Maintenance ...
Page 305: ...Replacing the waste toner container 305 14 Maintenance 10 X322x X328x series ...
Page 306: ...Replacing the waste toner container 306 14 Maintenance 11 K325x K330x series ...
Page 312: ...Cleaning the machine 312 14 Maintenance X322x X328x series ...
Page 313: ...Cleaning the machine 313 14 Maintenance K325x K330x series ...
Page 315: ...Cleaning the machine 315 14 Maintenance X322x X328x series ...
Page 316: ...Cleaning the machine 316 14 Maintenance ...
Page 317: ...Cleaning the machine 317 14 Maintenance K325x K330x series ...
Page 318: ...Cleaning the machine 318 14 Maintenance ...
Page 320: ...Cleaning the machine 320 14 Maintenance K325x K330x series ...
Page 324: ...Cleaning the machine 324 14 Maintenance X322x X328x series ...
Page 325: ...Cleaning the machine 325 14 Maintenance ...
Page 326: ...Cleaning the machine 326 14 Maintenance K325x K330x series ...
Page 327: ...Cleaning the machine 327 14 Maintenance ...
Page 339: ...Clearing paper jams 339 15 Troubleshooting 3 In the multi purpose tray ...
Page 341: ...Clearing paper jams 341 15 Troubleshooting Jam feed 1 Jam feed 2 ...
Page 342: ...Clearing paper jams 342 15 Troubleshooting Jam feed 3 Jam feed 4 Optional device only ...
Page 357: ...Clearing paper jams 357 15 Troubleshooting 8 In the optional finisher area ...


