Chapter 3 Functions for Master Making
89
3
Managing the Saved Original Data
[Storage], [USB Job List]
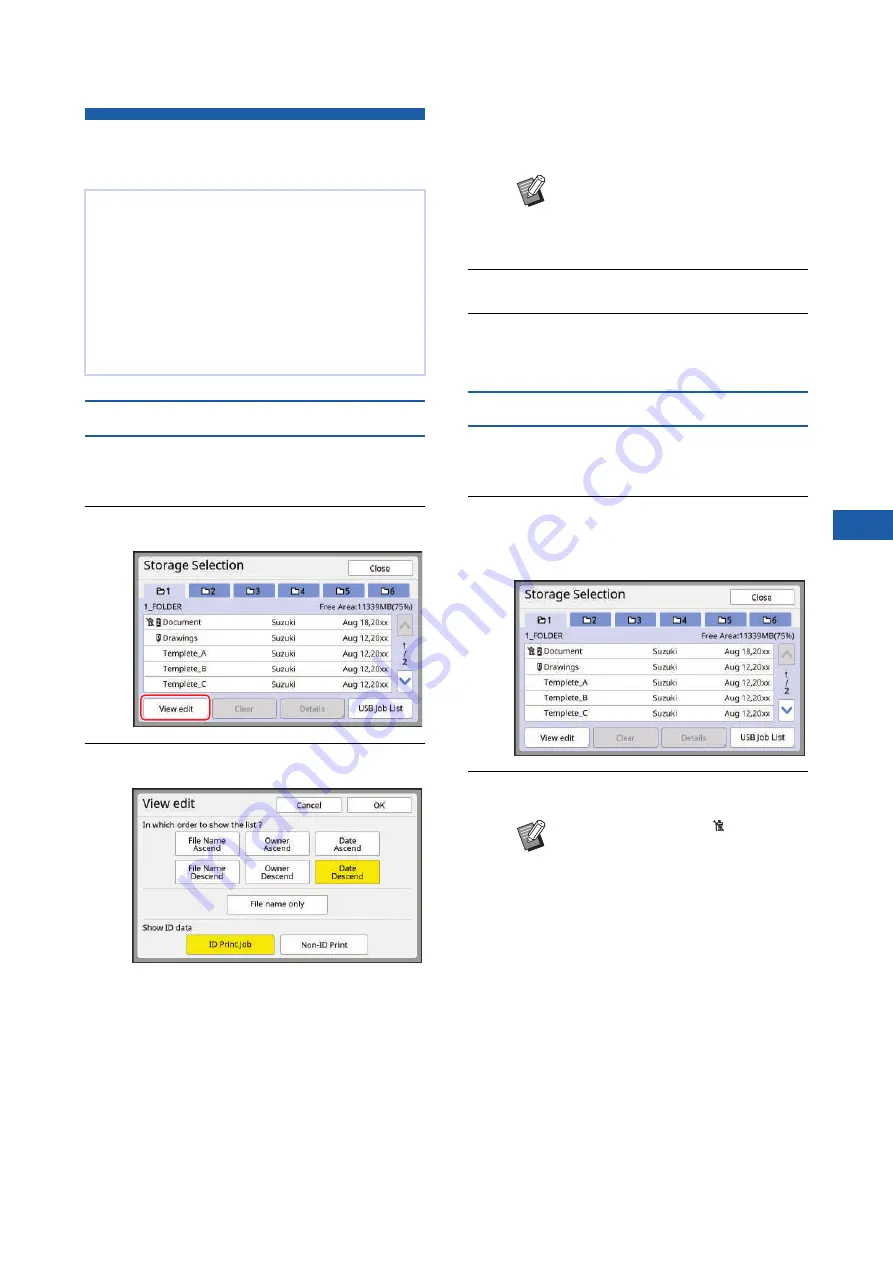
Changing the display style of the list
1
Touch [Storage] in the [Functions]
tab screen.
2
Touch [View edit].
3
Change the settings.
■
Order in which items are listed
You can select in which order the list is sorted.
■
[File name only]
You can change the items to be listed.
OFF: Data name + owner name + saved date
ON: Data name
■
[Show ID data]
[ID Print Job]: Lists only ID data.
[Non-ID Print]: Lists items other than ID data.
4
Touch [OK].
5
The [Storage Selection] screen is
displayed.
Deleting original data
1
Touch [Storage] in the [Functions]
tab screen.
2
Touch an original data item that
you want to delete.
You can also select multiple original data items.
3
Touch [Clear].
This section describes how to use the screen to
retrieve the saved original data.
Operation in the [Storage Selection] screen is
explained as an example.
The operation procedure is the same in the [USB
Job List] screen.
• For the saving method, see the page below.
43 “Saving Paper Original as Data”)
• For the printing method, see the page below.
45 “Printing the Saved Original Data”)
B
[Show ID data] is displayed when
[High/Full Management] is set in
[User Management] (
[Admin.].
B
Original data with the [ ] icon dis-
played at the beginning is set to
[Display a message before deleting
data] in the printer driver.
When you select such original data
and touch [Clear], a confirmation
screen is displayed. Touch [OK] in
the confirmation screen to remove
protection and delete the data.
Summary of Contents for MH 9350
Page 21: ...Chapter 1 19 1 About This Machine ...
Page 31: ...29 2 Chapter 2 Basic Operations ...
Page 53: ...51 3 Chapter 3 Functions for Master Making ...
Page 97: ...95 4 Chapter 4 Functions for Printing ...
Page 109: ...107 5 Chapter 5 Useful Functions ...
Page 130: ...Chapter 5 Useful Functions 128 ...
Page 131: ...129 6 Chapter 6 Functions for Scanning ...
Page 137: ...135 7 Chapter 7 Setting the Operation Conditions ...
Page 159: ...157 8 Chapter 8 RISO Console ...
Page 165: ...163 9 Chapter 9 Replacing Consumables ...
Page 177: ...175 10 Chapter 10 Maintenance ...
Page 181: ...179 11 Chapter 11 Troubleshooting ...
Page 205: ...203 12 Chapter 12 Appendix ...
Page 215: ...Chapter 12 Appendix 213 12 V View edit 48 W WAKE UP key 23 Z Zoom 71 ...


