4. Electronics & Lid
60
Original Prusa SL1 kit assembly
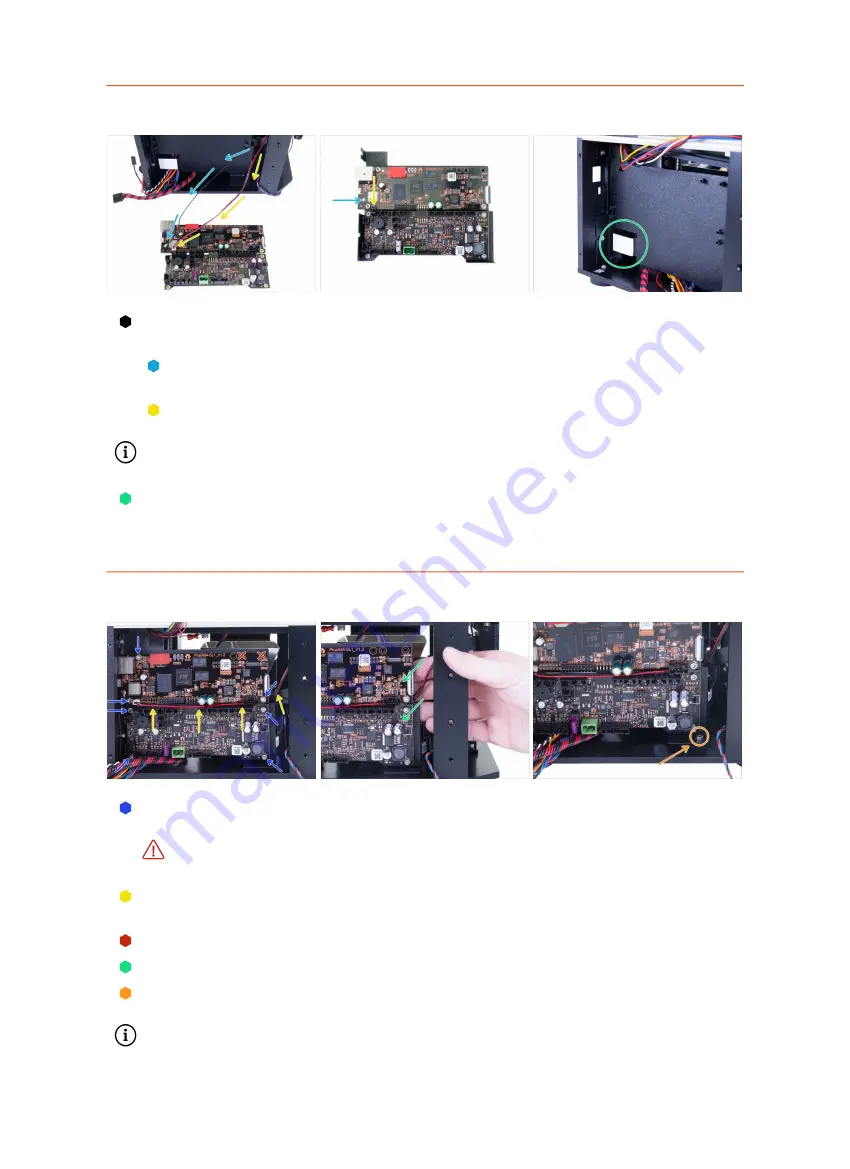
STEP 16
Connecting Wi-Fi & Speaker
Place the electronics closer to the left side of the printer so that the Wi-Fi and
speaker cables can reach the connectors.
Avoid stretching the cables!
Guide the Wi-Fi cable inside the printer between the electronics holder and the
support, then connect it to the board.
Guide the speaker cable inside the printer between the electronics holder and
the support, then connect it to the board.
Black wire must be on the left!
Make sure the Wi-Fi connector is properly connected. Lightly press the connector
into the board with your finger. You will feel a slight "click".
Before you move to the next step, please ensure you have removed the blue
protective film from the thermal pad, otherwise, the cooling system won't work
properly.
STEP 17
Mounting the electronics
Insert the board inside the printer and secure it with the M3x5 screws. Tighten
them carefully!
WARNING:
Insert the board carefully. Avoid damaging or pinching both Wi-Fi
and speaker cables!
Guide Wi-Fi and speaker cables in the gap between both boards as shown in the
picture.
Avoid using holes in the top right corner. We will use them later on.
While tightening screws on the right side, hold the steel sheet.
After both boards are secured, insert and tighten the M3x5 screw in the lower right
corner.
Be careful, you might damage the electronics if your tool slips.
Tip: For more convenient installation, you can also lay the printer on its right side,
but make sure no wire is pinched or any part deformed.
Summary of Contents for Original Prusa SL1
Page 5: ...Original Prusa SL1 kit assembly 5 1 Introduction ...
Page 13: ...Original Prusa SL1 kit assembly 13 2 Base Tower ...
Page 32: ...32 Original Prusa SL1 kit assembly 3 Covers Platform ...
Page 51: ...Original Prusa SL1 kit assembly 51 4 Electronics Lid ...
Page 75: ...Original Prusa SL1 kit assembly 75 5 Preflight check ...
Page 84: ...84 Original Prusa SL1 kit assembly Manual changelog SL1 ...
Page 87: ...87 Notes ...
Page 88: ...88 ...
Page 89: ...89 Notes ...
Page 90: ...90 ...
Page 91: ...91 Notes ...
Page 92: ...92 ...


