


158
How-To Topics
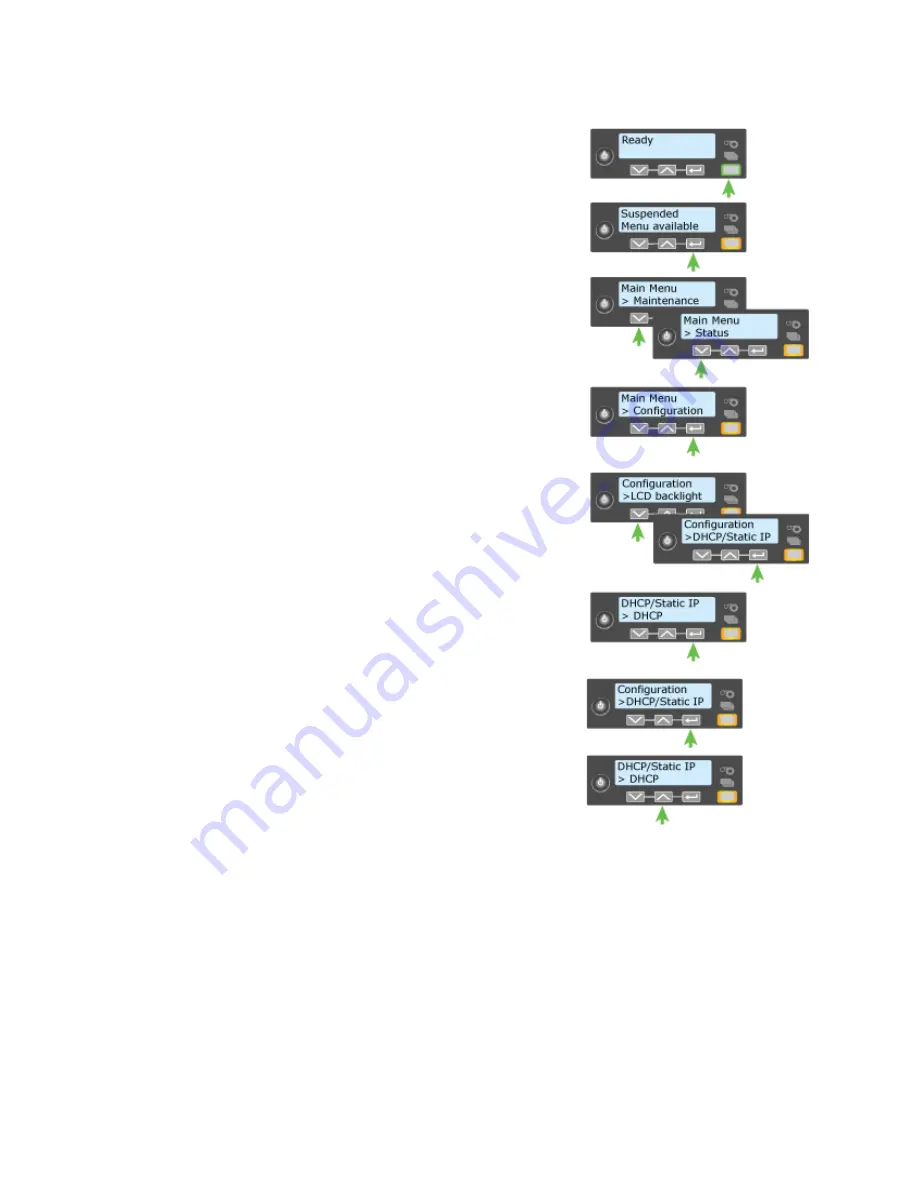
1.
Obtain the IP Address, Subnet Mask, and
Gateway Address for each printer before you
begin this procedure.
2.
Begin with the printer “Ready”. The U
SER
button glows steady green.
3.
Press the U
SER
button to display
“Suspended” on Line 1 and Menu available
on Line 2.
4.
Press the E
NTER
key to enter the menu
system.
“Main Menu” appears on Line 1 and
“Maintenance” is shown on Line 2
5.
Press the down arrow key to scroll to the
Configuration menu.
6.
Press the E
NTER
key when “Configuration”
appears on Line 2.
7.
Press the down arrow key until “DHCP/
Static IP” is displayed on Line 2.
8.
Press the E
NTER
key to enter the DHCP/
Static IP menu.
9.
Press an arrow key to scroll to display “Static
IP” on Line 2.
10.
Press the E
NTER
key to apply the setting.
“Configuration” will be displayed on Line 1
and “DCHP/Static IP” is displayed on Line 2.
11.
Press the down arrow key to display
“Network” on Line 2.
12.
Press the E
NTER
key and “Network” is displayed on Line 1 and “IP Address”
on Line 2.
13.
Press E
NTER
and the IP address appears on Line 2.
Summary of Contents for 539957-020 Rev. A
Page 1: ...Polaroid XPS Card Printer Installation and User Guide June 2011 Part No 539957 020 Rev A ...
Page 10: ...8 ...
Page 13: ...3 Inside a printer Printer with Duplex Option ...
Page 15: ...5 ...
Page 18: ...8 Welcome to Card Printer Information ...
Page 51: ...41 ...
Page 52: ...42 Printing Cards ...
Page 92: ...82 Printer Driver ...
Page 95: ...85 ...
Page 96: ...86 Updates Upgrades and More ...
Page 100: ...90 Removing a Printer from a Windows PC ...
Page 118: ...108 Troubleshooting ...
Page 183: ...173 ...
Page 184: ...174 Legal Notices ...


