


187
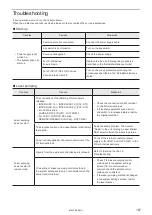
Troubleshooting
If any operation errors occur, check items below.
When the problems cannot be resolved, please contact our sales office or representatives.
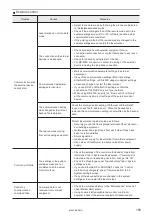
Start-up
Troubles
Causes
Measures
• Power supply is not
turned on.
• The system does not
start up.
Power cable is not connected.
Connect the power supply cable.
Key switch is not turned on.
Turn on the key switch.
Power is not supplied.
Check the power supply.
For LP-GS series:
Fuse is blown.
Replace the fuse by following the procedures
described in the “Setup/Maintenance Guide”.
For LP-RC/LP-RF/LP-RV series:
Circuit protector is OFF.
Turn on the circuit protector by following the
procedures described in the “Setup/Maintenance
Guide”.
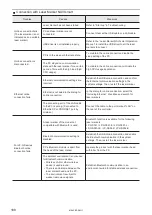
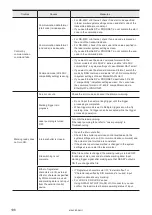
Laser pumping
Troubles
Causes
Measures
Laser pumping
does not start.
The connection of the following I/O terminals is
released.
• INTERLOCK 1(+) - INTERLOCK 1(-) (X16 - X17)
• INTERLOCK 2(+) - INTERLOCK 2(-) (X18 - X19)
• For LP-GS series:
LASER STOP 2 IN (X11) - OUT COM. 1
• For LP-RC/LP-RF/LP-RV series:
REMOTE INTERLOCK IN (X20) - OUT COM. 1
• Check the connection of each terminal
on the I/O terminal block.
• If the safety equipment such as door
and switch is in released status, restore
the original condition.
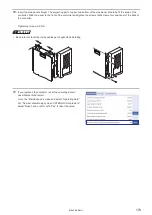
The stop laser button of the Laser Marker NAVI smart
is pressed.
Solve the safety problem. Then select
“Reset” in the error dialog in Laser Marker
NAVI smart to finish the laser stop status.
Power is not supplied to the common terminal of the
I/O terminal block.
Connect the internal or external power
supply to IN COM.1 and OUT COM.1 in the
I/O terminal respectively.
Laser pumping
does not start in
remote mode.
Signals from the external control device are refused.
Refer to “External Control” in
Troubleshooting.
The setting of a laser pumping control method in
the system settings screen is not consistent with the
actual control method.
• Check if the laser pumping control
method set in the system settings
screen (I/O or communication
command) and the actual control
method are consistent.
• If the laser pumping method is changed
in the system settings screen, restart
the laser marker.
ME-LPRF-SM-11
Summary of Contents for LP-RF Series
Page 17: ...1 Product Overview ME LPRF SM 11...
Page 34: ...2 Laser Marker Installation ME LPRF SM 11...
Page 57: ...3 Operation Method ME LPRF SM 11...
Page 81: ...4 External Control Using I O ME LPRF SM 11...
Page 126: ...5 External Control by Communication Commands ME LPRF SM 11...
Page 135: ...6 Link Control with External Devices ME LPRF SM 11...
Page 160: ...7 Maintenance ME LPRF SM 11...
Page 186: ...Troubleshooting ME LPRF SM 11...
Page 214: ...Index ME LPRF SM 11...
Page 216: ...216 USB 32 55 W Warning 205 ME LPRF SM 11...
Page 217: ......


