


172
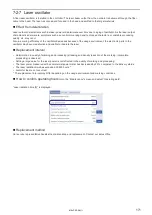
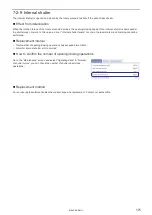
Confirm laser output (Daily inspection)
Confirm the laser output regularly in order to maintain consistent marking quality.
The laser output should be measured with a commercially available meter using the following steps:
1.
Prepare a commercially available power meter.
ワㄐㄕㄊㄆ
• Be sure to use the calibrated power meter.
• The power meter with the detector having the damage threshold (maximum average power density) of more than 10kW/cm
2
should be used.
• Also the size of the detector should be more than
φ
10 mm.
• A difference may arise under the high/low temperature. Measuring power with normal temperature (20 to 30 Celsius
degree) is recommended.
• Before measuring the laser power, make sure there is no contamination in the laser emission port. If the laser emission
port is contaminated or damaged, an error may result in the measurement of the laser power.
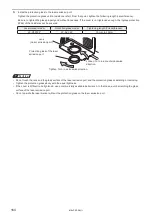
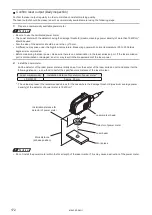
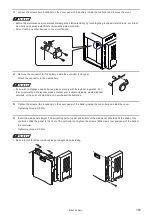
2.
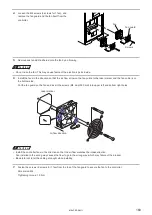
Install the power meter.
Put the detector of the laser power meter vertically down from the center of the laser emission port and place it at the
following distance, i.e. one-third to half of the specified work distance of the laser marker.
Laser marker model
Installation distance for detector of power meter *
LP-RF200P
Approx. 90 mm
* The values represent the recommended values for the case where the damage threshold (maximum average power
density) of the detector of power meter is 10kW/cm
2
.
Laser marker head
Detector of power meter
Laser beam
Work piece
Installation distance for
detector of power meter
Work distance
(at base position)
ワㄐㄕㄊㄆ
• Do not install the power meter within the focal length of the laser marker. This may cause destruction of the power meter.
ME-LPRF-SM-11
Summary of Contents for LP-RF Series
Page 17: ...1 Product Overview ME LPRF SM 11...
Page 34: ...2 Laser Marker Installation ME LPRF SM 11...
Page 57: ...3 Operation Method ME LPRF SM 11...
Page 81: ...4 External Control Using I O ME LPRF SM 11...
Page 126: ...5 External Control by Communication Commands ME LPRF SM 11...
Page 135: ...6 Link Control with External Devices ME LPRF SM 11...
Page 160: ...7 Maintenance ME LPRF SM 11...
Page 186: ...Troubleshooting ME LPRF SM 11...
Page 214: ...Index ME LPRF SM 11...
Page 216: ...216 USB 32 55 W Warning 205 ME LPRF SM 11...
Page 217: ......


