The GTWIN User Interface
GTWIN Reference Manual
94
3.1 What You See on Your Monitor
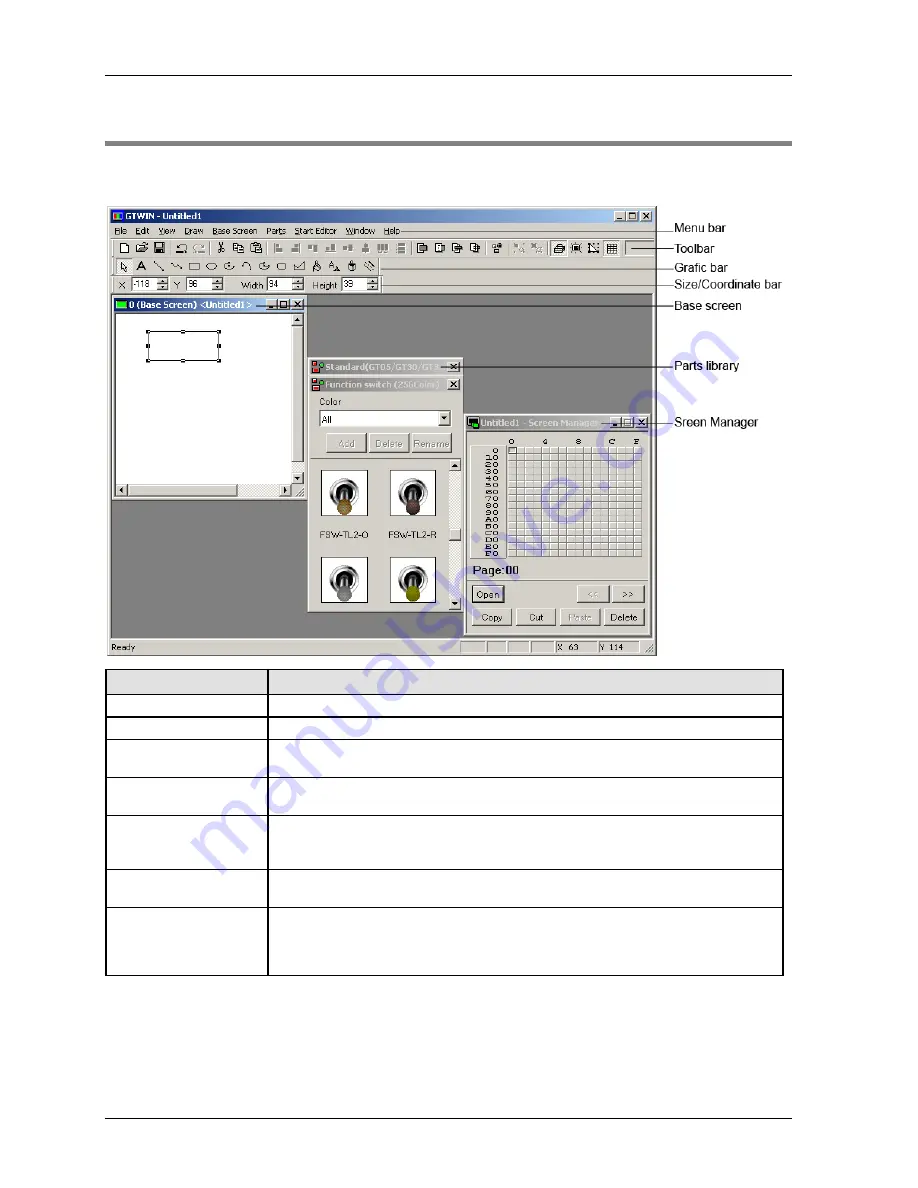
If you have created a new file, in the Screen Manager (see p. 106), double-click any screen
number and GTWIN will appear as follows on your monitor.
Item
Description
Menu bar (see p. 95)
All GTWIN operations and functions can be accessed via menus.
Toolbar (see p. 96)
Frequently used functions can be easily accessed via the toolbar.
Graphic bar (see p. 98)
Text can be created, graphics can be drawn and colors can be specified using the
icons on the graphic bar.
Size/Coordinate bar (see
p. 101)
The size/coordinate bar displays the coordinates of the top left corner of the selected
part as well as the part's width and height.
Base screen (see p. 102)
On the base screen, you create the screen that will be displayed on the GT panel. Via
View
Zoom
, you can change the magnification. Please note, for the smaller GT
units, the initial screen size is set to 200% in GTWIN.
Parts library (see p. 103)
The parts library contain switches, lamps, clocks, keyboards, etc., which you can drag
and drop to the base screen and configure as required.
Screen Manager (see p.
106)
The Screen Manager manages multiple base screens in a map (grid) or list format as
a single screen file. Double-click on any screen number in the map or list to display it.
Screens that already exist can be easily identified by a red rectangle in the map. You
can also use the Screen Manager to copy, move and delete base screens.
Summary of Contents for GTWIN
Page 1: ...TOUCH TERMINALS GTWIN Reference Manual ...
Page 11: ...Chapter 1 Introducing GTWIN ...
Page 59: ...Chapter 2 GT Panel System Menu ...
Page 94: ...Chapter 3 The GTWIN User Interface ...
Page 108: ...Chapter 4 Menus ...
Page 182: ...Chapter 5 Parts and Their Functions ...
Page 234: ...Chapter 6 Troubleshooting ...
Page 248: ...Chapter 7 Connecting the GT to a PLC ...
Page 288: ...Chapter 8 SD Card Data Upload from GT to PC ...
Page 293: ......


