Section 7 COPIER MANAGEMENT FUNCTIONS
7-53
●
Day & time
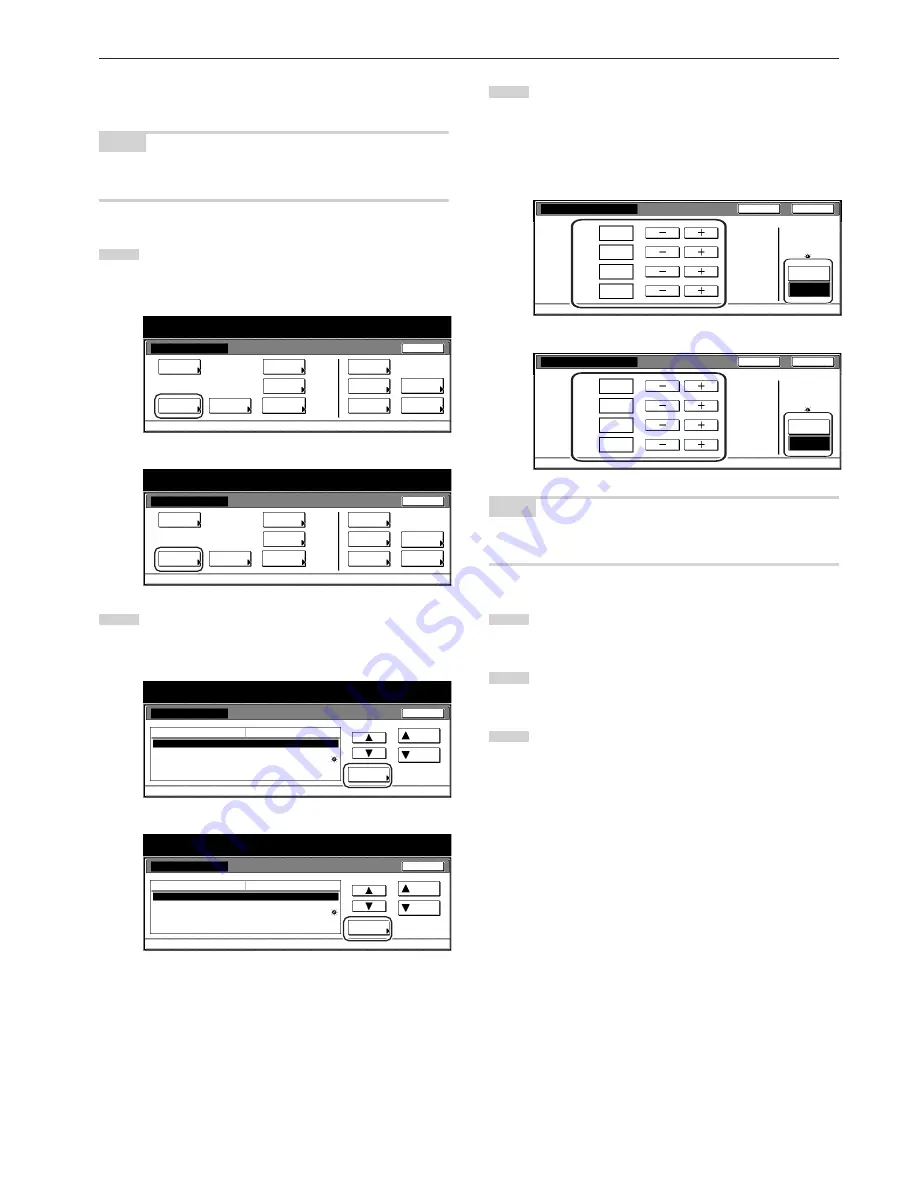
Perform the following procedure to set the current date and time.
NOTE
BE SURE to perform the “Time difference” setting prior to setting the
day and time.
1
Display the “Machine default” screen.
(See “(2) Accessing the machine default settings” on
page 7-41.)
Inch specifications
Default setting
Copy
default
Machine
default
Language
Management
End
BOX
Management
Bypass
setting
Document
Management
Register
orig. size
Print
report
Counter
check
User
Adjustment
Default setting / Counter
Metric specifications
Default setting
Copy
default
Machine
default
Language
Management
End
Hard Disk
Management
Bypass
setting
Document
Management
Register
orig. size
Print
report
Counter
check
User
Adjustment
Default setting / Counter
2
Select “Date/Time” in the settings list on the left side of the
touch panel and then touch the “Change #” key.
The “Date/Time” screen will be displayed.
Inch specifications
Key sound ON/OFF
Silent mode
Date/Time
Time difference
Management code change
Default setting / Counter
On
On
2001/10/30 14:02
GMT+08:00
5000
Default menu
Down
Change #
Setting mode
Up
Machine default
Close
Metric specifications
Machine default
Key sound ON/OFF
Silent mode
Date/Time
Time difference
Change MGMT code with #
On
Off
30/10/'01 14:02
GMT+08:00
5000
Up
Down
Change #
Close
Default setting
Default menu
Setting mode
Default setting / Counter
3
Touch the “+” key or the “–” key to change the displayed
information for each field (“Year”, “Month”, “Day” and “Time”)
to the current time and date.
If you want the time to be automatically calculated for
daylight savings time, touch the “On” key under
“Summertime”.
Inch specifications
Date/Time
2001
10
16
18:27
Summertime
Off
On
Default setting - Machine default
Back
Close
Year
Month
Day
Time
Metric specifications
Date/Time
Back
Close
Year
Month
Day
Time
2001
10
16
18:27
Summertime
Off
On
Default setting - Machine default
NOTE
If you want to quit the displayed setting without changing it, touch the
“Back” key. The touch panel will return to the screen in step 2.
4
Touch the “Close” key. The touch panel will return to the
screen in step 2.
5
Touch the “Close” key once again. The touch panel will return
to the “Default setting”screen.
6
Touch the “End” key. The touch panel will return to the
contents of the “Basic” tab.
Summary of Contents for d-Copia 300
Page 4: ......
Page 11: ...vii Printer Kit Page 8 12 Printer scanner Kit Page 8 12 Fax Kit Page 8 12...
Page 14: ......
Page 22: ...1 8...
Page 30: ...Section 2 NAMES OF PARTS 2 8...
Page 46: ...Section 4 BASIC OPERATION 4 12...
Page 116: ...Section 5 OTHER CONVENIENT FUNCTIONS 5 70...
Page 244: ...Section 7 COPIER MANAGEMENT FUNCTIONS 7 106...
Page 284: ...10 14...
Page 287: ...W Warm up 4 1 Waste Toner Box 10 3 When paper misfeeds 9 4 X XY zoom mode 4 8 Z Zoom mode 4 6...
Page 288: ...506617D ENG...


