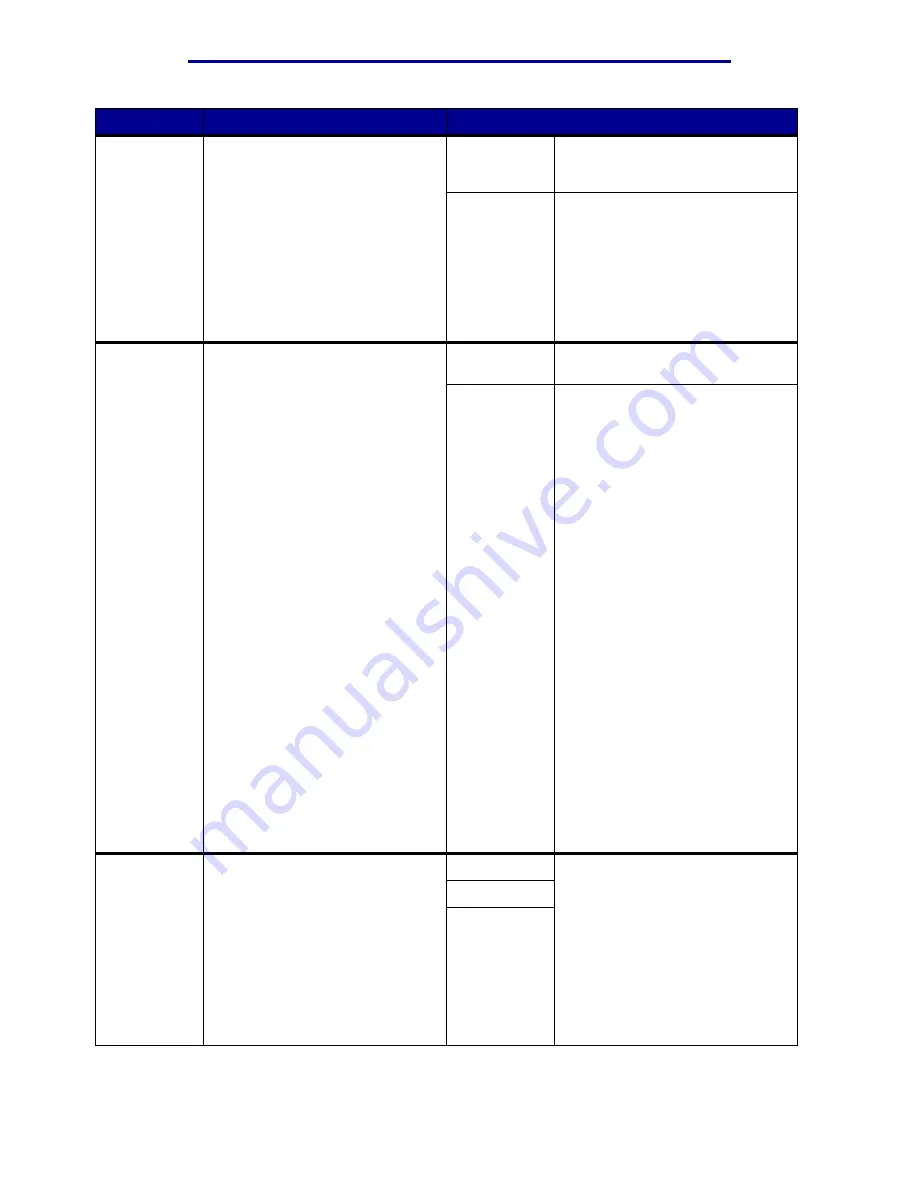
Using printer menus
Menu Item
Purpose
Values
Page Protect
To successfully print a page that
may otherwise generate
Complex
Page
errors.
If, after selecting On, you still
cannot print the page, you may
also have to reduce the size and
number of fonts on the page, or
increase the installed printer
memory.
For most print jobs, you do not
need to select On. When On is
selected, printing may be slower.
Off*
Prints a partial page of data if
memory is insufficient to process
the entire page.
On
Ensures that an entire page is
processed before it prints.
Power Saver
To specify the amount of time (in
minutes) the printer waits after a
job is printed before it goes into a
reduced power state.
Disabled
This value does not appear unless
Energy Conserve is set to Off.
1...240
Specifies the amount of time after
a print job before the printer goes
into Power Saver mode. (Your
printer may not support the entire
range of values.)
The factory default Power Saver
setting depends on your printer
model. Print the menu settings
page to determine the current
Power Saver setting. When the
printer is in Power Saver mode, it
is still ready to receive print jobs.
Select 1 to put the printer in Power
Saver mode one minute after it
finishes a print job. This uses
much less energy, but requires
more warm-up time for the printer.
Select 1 if your printer shares an
electrical circuit with room lighting
and you notice lights flickering.
Select a high value if your printer is
in constant use. Under most
circumstances, this keeps the
printer ready to print with minimum
warm-up time. Select a value
between 1 and 240 minutes if you
want a balance between energy
consumption and a shorter warm-
up period.
Print Area
To modify the logical and physical
printable area.
Normal*
Note: The Whole Page setting
only affects pages printed using
PCL 5 interpreter. This setting has
no effect on pages printed using
the PCL XL or PostScript
interpreters. If you try to print any
data in the non-printable area
defined by Normal Print Area, the
printer clips the image at the
boundary defined by the Normal
defined printable area.
Fit to Page
Whole Page
Setup Menu
85
Summary of Contents for 12N1515 - C 912fn Color LED Printer
Page 1: ...C912 User s Reference March 2002 www lexmark com ...
Page 29: ...Printing 4 Close the multipurpose feeder Loading the multipurpose feeder 24 ...
Page 52: ...Media guidelines Card stock 47 ...
Page 138: ...Clearing paper jams 3 Close the top cover 4 Press Go 24 x Paper Jam Check Tray x 133 ...
Page 154: ...Maintenance 3 Lower the fuser until it snaps into place Replacing the fuser 149 ...
Page 181: ...Maintenance 4 Close the front door Closing the top cover 176 ...
Page 193: ...Maintenance 5 Lift the optional drawer Removing an optional drawer 188 ...


