2. HORIZONTAL MODE
2-19
2.9.3
Changing Tx interval
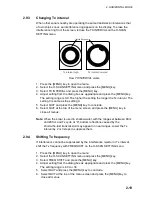
When other sonars nearby are operating the same transmission interval as that
of own ship’s sonar, an interference ring appears on the display. To erase the
interference ring from the screen, reduce the TX INTERVAL on the H-SCAN
SETTING menu.
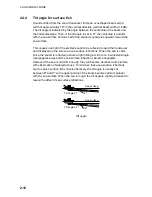
Interference
Tx interval high Tx interval lowered
How TX INTERVAL works
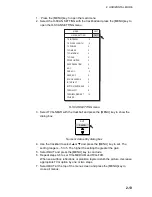
1. Press the [MENU] key to open the menu.
2. Select the H-SCAN SETTING menu and press the [MENU] key.
3. Select TX INTERVAL and press the [MENU] key.
4. Adjust setting from the dialog box as appropriate and press the [MENU] key.
The setting range is 0-9. The higher the setting the longer the Tx interval. The
setting 0 is same as the setting 9.
5. Select QUIT and press the [MENU] key to conclude.
6. Select QUIT at the top of the menu screen and press the [MENU] key to
close all menus.
Note:
When the sonar is used in shallow water with the range set between 60 m
and 200 m and Tx cycle at “9”, bottom reflections caused by the
2nd-to-the-last transmission may appear on near ranges. Lower the Tx
interval by 2 or 3 steps to suppress them.
2.9.4
Shifting Tx frequency
If interference cannot be suppressed by the interference rejector or Tx interval,
shift the Tx frequency with FREQ SHIFT on the H-SCAN SETTING menu.
1. Press the [MENU] key to open the menu.
2. Select the H-SCAN SETTING menu and press the [MENU] key.
3. Select FREQ SHIFT and press the [MENU] key.
4. Adjust setting from the dialog box as appropriate and press the [MENU] key.
The setting range is -30 to +30.
5. Select QUIT and press the [MENU] key to conclude.
6. Select QUIT at the top of the menu screen and press the [MENU] key to
close all menus.
Summary of Contents for FSV-30
Page 1: ...COLOR SCANNING SONAR FSV 30 ...
Page 14: ...This page is intentionally left blank ...
Page 30: ...1 OPERATIONAL OVERVIEW 1 16 This page is intentionally left blank ...
Page 80: ...2 HORIZONTAL MODE 2 50 The page is intentionally left blank ...
Page 100: ...3 VERTICAL MODE 3 20 The page is intentionally left blank ...
Page 122: ...5 6 This page is intentionally left blank ...
Page 136: ...7 10 This page is intentionally left blank ...
Page 152: ...8 OTHERS MENU 8 16 This page is intentionally left blank ...
Page 170: ...10 MAINTENANCE TROUBLESHOOTING 10 14 This page is intentionally left blank ...
Page 174: ...SP 4 This page is intentionally left blank ...
Page 182: ...ORIGINAL SETTING AP 8 New Original setting ...
Page 183: ...ORIGINAL SETTING AP 9 ...
Page 184: ...ORIGINAL SETTING AP 10 ...
Page 185: ...ORIGINAL SETTING AP 11 Color setting ...
Page 186: ...ORIGINAL SETTING AP 12 Color Response Curve setting ...

