195
5
Vie
w
er
Ref
erence
Arrange Video Windows
If you have camera control, you can only drag the window by
clicking and holding the title bar.
If you did not make any control for 30 seconds, the message of
ÅgControl will be lost in 10 secondsÅh appears, and a 10-
second countdown will start.
You can still manipulate a camera that is currently recording.
If the recording position has been set, the Camera Server will
return to that position after the Viewer release camera control.
Tip
When using the VB-C60/VB-C300, you cannot use Night Mode in
the following cases:
When Day/Night is set to Auto on the Camera and Video Settings page
When the Night Mode is set to Auto with a recording schedule
Panorama picture needs to be set on the Camera Server in
advance. VB-C50FSi/VB-C50Fi cannot display panorama picture.
Note
●
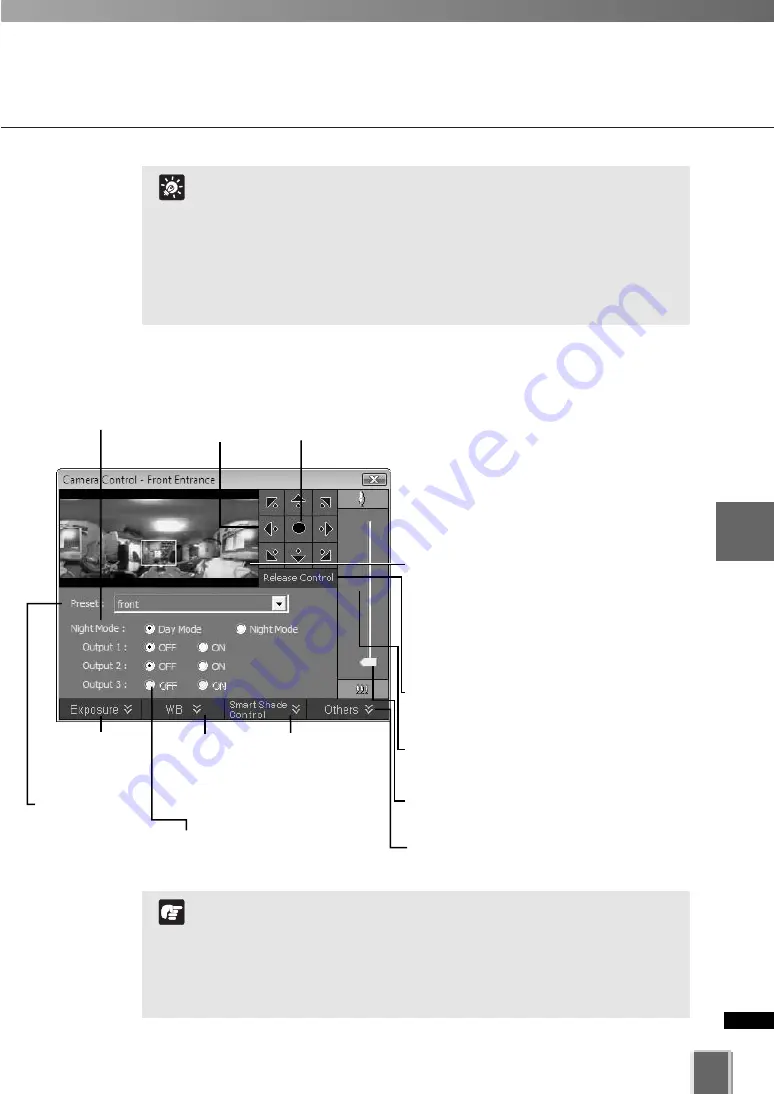
Using the Camera Control Panel
To display, select
View
>
Camera Control
from the menu bar, or click the Video
window menu icon (or right-click in the
Video Window) to bring up a context menu
and select
Camera Control.
If a Video Window is not selected, the
preview window will be blank. Click on a
Video Window to control the camera.
Pan/Tilt controls. Click
to nudge or click and
hold for continuous
movement.
Click this button to
display exposure
control (
➝
P. 196).
Click this button
to display white
balance control
(
➝
P. 197).
If preset camera
angles have been
set up by your
Administrator, they
will be available from
a drop-down menu.
Set Night
Mode.
Switch On and Off of
external device
output of the camera.
Click and drag the Zoom slider to perform the
zoom operation.
You can control the pan, tilt, and zoom
operation using a panorama image. Click
inside the Panorama window to adjust the pan
and tile angles so that the clicked position
becomes the center of the image.
Alternatively, you can move or zoom in/out the
yellow scope to perform the pan, tilt, and zoom
operation.
When the Video Window is selected, click
Get
Control
. Click
Release Control
when
finished.
If the digital zoom is enabled by the Camera
Server, a boundary between the optical and
digital zoom is displayed.
Click this button to
display the smart
shade correction
controls at the
bottom of the panel.
Click this button to display extended camera
control panel (
➝
P. 198).
Clicking this button
returns the camera
to face the front.
Summary of Contents for VK-16 v2.0
Page 13: ...Chapter 1 System Overview ...
Page 15: ...15 1 System Overview ...
Page 42: ...42 ...
Page 43: ...Chapter 2 Installation ...
Page 49: ...Chapter 3 Storage Server Configuration Reference ...
Page 75: ...Chapter 4 Register Camera Server and Set Recording Schedule ...
Page 152: ...152 ...
Page 153: ...Chapter 5 Viewer Reference ...
Page 155: ...155 5 Viewer Reference ...
Page 218: ...218 ...
Page 219: ...Chapter 6 Operation and Management ...
Page 227: ...Chapter 7 Backup Scheme ...
Page 243: ...Chapter 8 System Maintenance ...
Page 250: ...250 ...
Page 251: ...Chapter 9 Troubleshooting ...
Page 290: ...290 ...
Page 291: ...Appendix ...
Page 301: ...301 ...


