Start the Viewer
163
5
Vie
w
er
Ref
erence
Viewer Start-up Option
You can set the start-up option of the Viewer to omit the display of Start-up screen (
➝
P.
77) and login screen to enter a user name and password (
➝
P. 79, P. 160).
You can place a shortcut icon on the Desktop for your convenience by following the
method described below.
For this setting, you cannot use the shortcut icon that was automatically created on the
Desktop after installing this software, which is used for starting the Viewer.
Right-click on the icon for
NVR_Viewer.exe
located in the installation directory and
select
Create Shortcut
from the menu. The shortcut icon will be created. Move it to
the Desktop.
The default destination directory is shown below.
<System Drive>:\Program Files\Canon\WebView\NVR
1
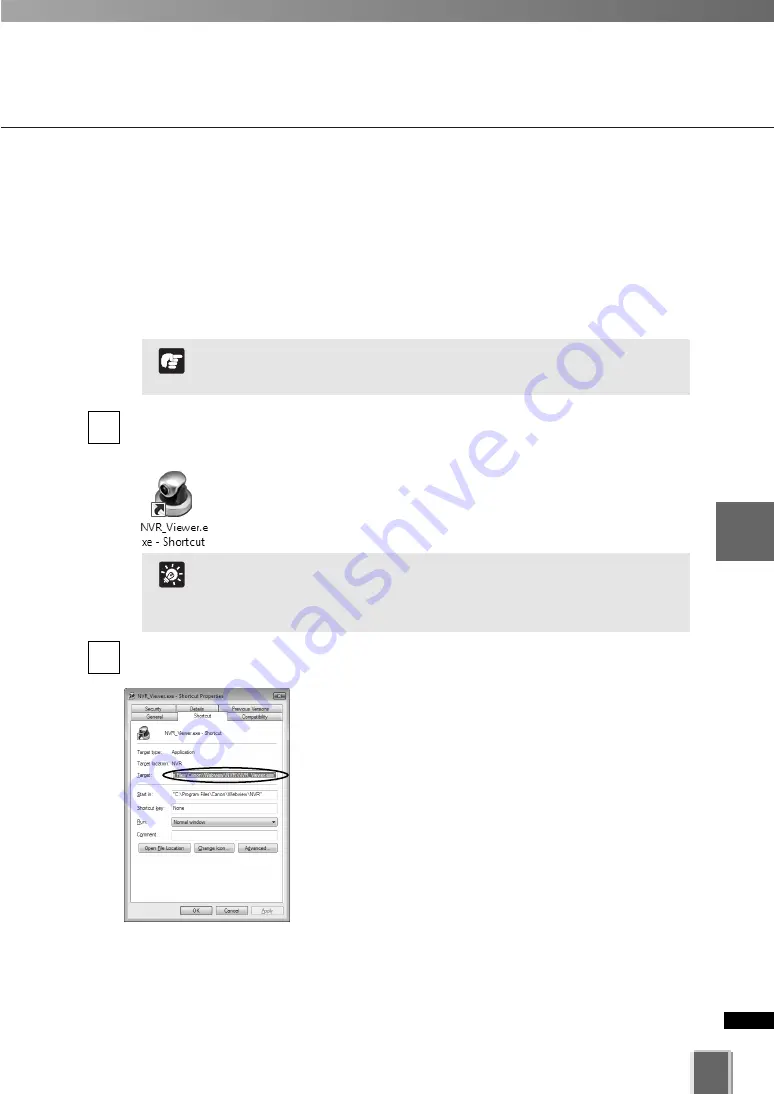
Right-click on the shortcut icon that was moved onto the Desktop and select
Properties
from the menu.
Example
“C:\Program Files\Canon\WebView\NVR\NVR_Viewer.exe” -h=192.168.100.1 -p=80 -
u=admin -pw=NVR
Make sure to enter a space after
“C:\Program Files\Canon\WebView\NVR\NVR_Viewer.exe”.
2
Specify
Target
as follows (using alphanumeric characters)
-h=<IP address of the Storage Server>
This specification is mandatory
(
➝
P. 79, P. 160).
-p=<port number>
It can be omitted. When omitted, 80 is
specified (
➝
P. 79).
-u=<user name>
Specify the user name (
➝
P. 78).
-pw=<password>
Specify the password (
➝
P. 78).
-u and -pw can be omitted. When omitted, the start-up
screen will not be displayed (
➝
P. 77, P. 158). Instead, the
login screen for entering a username and password is
displayed. When you use the Viewer alone, you also need to
specify “nohost” for -h.
System Drive is a drive that contains a directory (folder) in which
the Operating System files are stored. For example, if the
Operating System is installed on Drive C, your system drive is
Drive C.
Tip
Password can be referred through the Properties of the shortcut
icon. You need to make sure that the Password is secure.
Note
Summary of Contents for VK-16 v2.0
Page 13: ...Chapter 1 System Overview ...
Page 15: ...15 1 System Overview ...
Page 42: ...42 ...
Page 43: ...Chapter 2 Installation ...
Page 49: ...Chapter 3 Storage Server Configuration Reference ...
Page 75: ...Chapter 4 Register Camera Server and Set Recording Schedule ...
Page 152: ...152 ...
Page 153: ...Chapter 5 Viewer Reference ...
Page 155: ...155 5 Viewer Reference ...
Page 218: ...218 ...
Page 219: ...Chapter 6 Operation and Management ...
Page 227: ...Chapter 7 Backup Scheme ...
Page 243: ...Chapter 8 System Maintenance ...
Page 250: ...250 ...
Page 251: ...Chapter 9 Troubleshooting ...
Page 290: ...290 ...
Page 291: ...Appendix ...
Page 301: ...301 ...


