Advanced Guide
>
Appendix
>
Sharing the Printer on a Network
> Settings on Client PC
Settings on Client PC
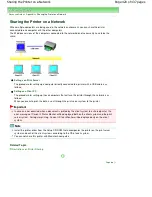
After setting up the print server system, set up the client system.
The procedure for setting up the client systems is as follows:
In Windows Vista
1.
Install the printer driver on the client systems
To install the driver, load the Setup CD-ROM that comes with the printer, and select Custom Install.
For details on connection instructions, refer to the "Install the Software" in the manual: Getting
Started.
Note
During the installation, a screen prompting you to turn the printer on appears. Click Manual
Selection and then select an appropriate port to complete your installation.
2.
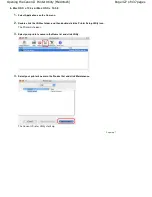
Start the wizard
Select the Start menu -> Network -> Add Printer.
The Add Printer window appears.
3.
Add a printer
Select Add a network, wireless or Bluetooth printer, and click the icon for the printer that you have
configured on the print server system to be shared, and then click Next.
Note
If the icon for the printer is not displayed, check that the printer is actually connected to the print
server.
It may take some time for the icon for the printer to appear.
4.
Complete the setup
Take the appropriate action as described on the screen and then click Finish.
The icon for the shared printer will be created in the Printers window.
The setup on the client systems is complete. You can now share the printer in the network.
In Windows XP/Windows 2000
1.
Install the printer driver on the client systems
To install the driver, load the Setup CD-ROM that comes with the printer, and select Custom Install.
For details on connection instructions, refer to the "Install the Software" in the manual: Getting
Started.
Note
During the installation, a screen prompting you to turn the printer on appears. Click Manual
Selection and then select an appropriate port to complete your installation.
2.
Start the wizard
In Windows XP, select the start menu -> Control Panel -> Printers and Other Hardware ->
Printers and Faxes -> Add a printer.
Page 430 of 437 pages
Settings on Client PC
Summary of Contents for iP4700 - PIXMA Color Inkjet Printer
Page 29: ...Page top Page 29 of 437 pages Loading Paper ...
Page 33: ...Page top Page 33 of 437 pages Loading Paper in the Cassette ...
Page 47: ...Page top Page 47 of 437 pages Replacing an Ink Tank ...
Page 50: ...Page top Page 50 of 437 pages Checking the Ink Status ...
Page 52: ...Page top Page 52 of 437 pages When Printing Becomes Faint or Colors Are Incorrect ...
Page 105: ...Page top Page 105 of 437 pages What Is Easy PhotoPrint EX ...
Page 107: ...How Do I Print with Even Margins Page top Page 107 of 437 pages Printing Photos ...
Page 133: ...See Help for details on the Edit screen Page top Page 133 of 437 pages Editing ...
Page 142: ...Page top Page 142 of 437 pages Printing ...
Page 151: ...Adjusting Images Page top Page 151 of 437 pages Correcting and Enhancing Photos ...
Page 190: ...Page top Page 190 of 437 pages Printing an Index ...
Page 192: ...Page top Page 192 of 437 pages Printing ID Photos ID Photo Print ...
Page 211: ...Page top Page 211 of 437 pages Printing Dates on Photos ...
Page 232: ...Page top Page 232 of 437 pages Borderless Printing ...
Page 291: ...Page top Page 291 of 437 pages Smoothing Jagged Outlines ...
Page 324: ...Page top Page 324 of 437 pages About PictBridge Print Settings ...
Page 356: ...Page top Page 356 of 437 pages If an Error Occurs ...
Page 421: ...Page top Page 421 of 437 pages Installing the Printer Driver ...
Page 435: ...Page top Page 435 of 437 pages Using Easy PhotoPrint EX ...


