background image

Advanced Guide

 > 

Changing the Printer Settings

 > 

Changing Printer Settings from Your Computer

 > Changing the Print

Options 

Changing the Print Options 

You change the detailed print driver settings for print data that is sent from an application software. 

Check this check box if part of the image data is cut off, the paper source during printing differs from the
driver settings, or printing fails. 

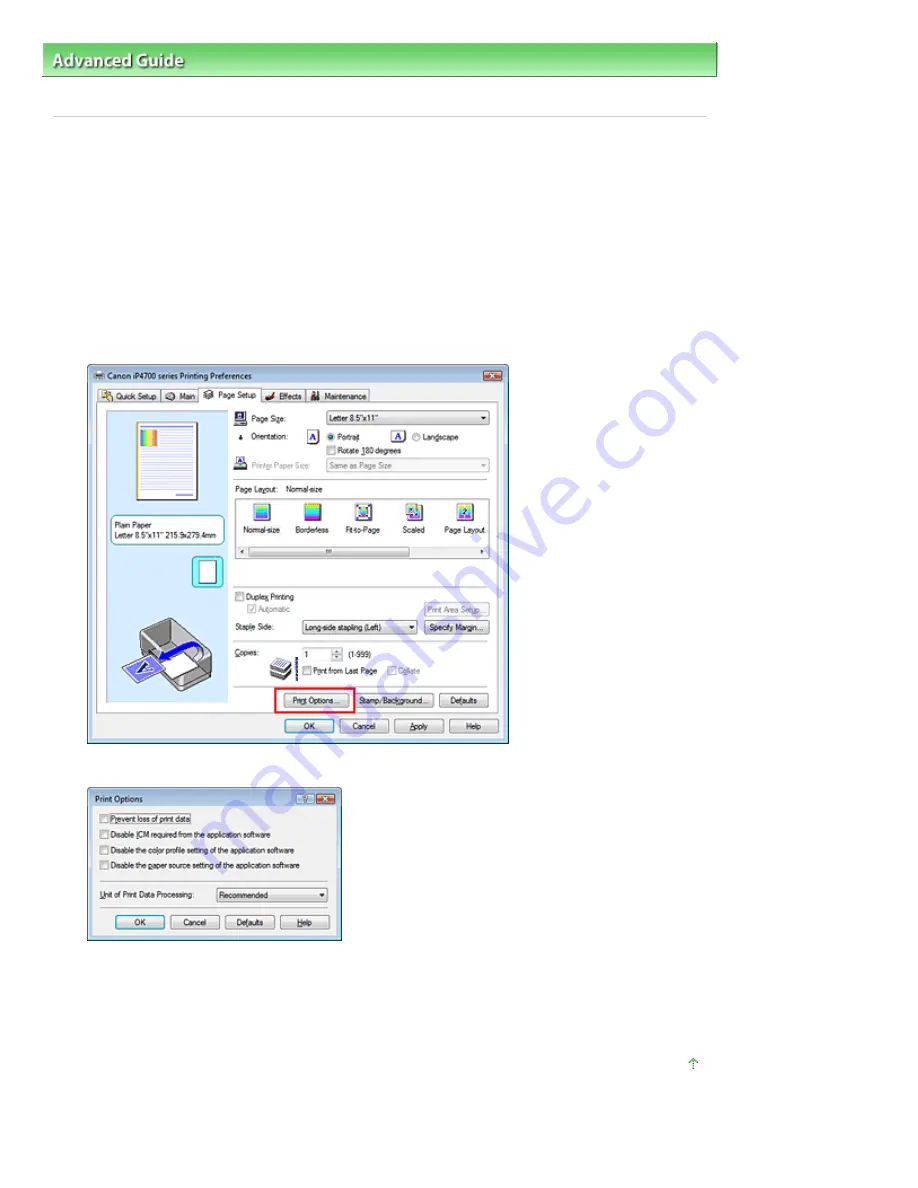
The procedure for changing the print options is as follows: 

1.

Open the 

printer driver setup window

2.

Click Print Options... on the Page Setup tab 

The Print Options dialog box opens. 

3.

Change the individual settings 

If necessary, change the setting of each item, and then click OK. 

The Page Setup tab is displayed again. 

Page top

Page 346 of 437 pages

Changing the Print Options

Summary of Contents for iP4700 - PIXMA Color Inkjet Printer

Page 1: ...l Printing This Manual MC 4052 V1 00 Basic Guide Describes the summary of this product Advanced Guide Describes the detailed function of this product Troubleshooting Page 1 of 437 pages Canon iP4700 series On screen Manual ...

Page 2: ...Usages Printing Photos from a PictBridge Compliant Device Useful Software Applications Loading Paper Loading Paper Routine Maintenance Replacing an Ink Tank When Printing Becomes Faint or Colors Are Incorrect Cleaning the Paper Feed Roller Cleaning the Pad in the Cassette Opening the Maintenance Screens Appendix Legal Limitations on Use of Your Product and Use of Images Tips on How to Use Your Pri...

Page 3: ...nts Overview of the Printer Overview of the Printer This section shows the component names of the printer and describes their functions Main Components Front View Rear View Inside View Page top Page 3 of 437 pages Overview of the Printer ...

Page 4: ... a time See Loading Paper 4 Paper Support Open and pull out to load paper in the Rear Tray 5 Cassette Load A4 B5 A5 or Letter sized plain paper and insert it into the printer Two or more sheets of the same size of plain paper can be loaded at the same time and fed automatically one sheet at a time See Loading Paper 6 Direct Print Port Connect a PictBridge compliant device such as a digital camera ...

Page 5: ...wer on off feature You can set the printer to turn on or off automatically Auto Power On Automatically turns on the printer when print data is sent from the computer Auto Power Off Automatically turns off the printer when no print data is sent for a certain interval Specify this setting on the Maintenance sheet of the printer driver setup window Windows or in the Canon IJ Printer Utility Macintosh...

Page 6: ... Alarm lamp flashes orange alternately An error that requires contacting the service center may have occurred For details refer to Troubleshooting in the on screen manual Advanced Guide Rear View 14 USB Port Plug in the USB cable to connect the printer with a computer Important Do not touch the metal casing Do not plug in or unplug the USB cable while printing 15 Rear Cover Detach to remove jammed...

Page 7: ... Important Do not raise this lever after installing the Print Head 19 Print Head Holder Install the Print Head Note For details on installing the Print Head and ink tanks refer to the printed manual Getting Started Page top Page 7 of 437 pages Main Components ...

Page 8: ...y print photos taken with your digital camera by using Easy PhotoPrint EX supplied with the printer Printing Photos Easy PhotoPrint EX Using Various Functions of Easy PhotoPrint EX Printing Documents Windows Printing Documents Macintosh For Mac OS X v 10 5 x For Mac OS X v 10 4 x or Mac OS X v 10 3 9 Page top Page 8 of 437 pages Printing ...

Page 9: ... EX from the Setup CD ROM when it has not been installed or has been uninstalled To install Easy PhotoPrint EX select Easy PhotoPrint EX in Custom Install 1 Prepare for printing 1 Make sure that the printer is turned on See Front View 2 Load paper See Loading Paper Here we load 4 x 6 10 x 15 cm photo paper in the Rear Tray Note Load A4 or Letter sized plain paper in the Cassette and other sizes or...

Page 10: ... Calendar Stickers etc besides Photo Print See Using Various Functions of Easy PhotoPrint EX 3 Select a photo to print 1 Select the folder in which images are saved 2 Click the image to print The number of copies appears as 1 and the image you selected appears in the selected image area A You can select two or more images at the same time Note To print two or more copies click Up arrow to change t...

Page 11: ...sized plain paper when Automatically Select is selected in Paper Source the printer feeds the paper from the Cassette If you select other sizes or types of paper such as photo paper the printer feeds the paper from the Rear Tray If you select the wrong page size or media type the printer may feed paper from the wrong paper source or may not print with the proper print quality 4 Click Layout Print ...

Page 12: ...er may be ejected To display the printer status monitor click Canon XXX where XXX is your printer s name on the taskbar Click the printer icon in the Dock to display the list of print jobs in progress To cancel a print job in progress select the desired job in the Name list and click Delete To temporarily stop a job in progress click Hold To temporarily stop all the jobs in the list click Pause Pr...

Page 13: ...toPrint EX For details refer to the on screen manual Advanced Guide Creating Your Own Prints You can create an album or calendar using your photos Album Calendar Stickers Layout Print Correcting Images You can use Red Eye Correction Face Sharpener Digital Face Smoothing Brightness Contrast etc to adjust correct or enhance images automatically or manually Brightness Page top Page 13 of 437 pages Us...

Page 14: ... on See Front View 2 Load paper See Loading Paper Here we make sure that A4 plain paper is loaded in the Cassette Note Load A4 B5 A5 or Letter sized plain paper in the Cassette and other sizes or types of paper such as photo paper in the Rear Tray 3 Open the Paper Output Tray gently and extend the Output Tray Extension to open 4 Create or open a document to print using an appropriate software appl...

Page 15: ...selected Note The settings can be changed However after changing Printer Paper Size confirm that the setting for Page Size on the Page Setup sheet matches the setting set in the software application For details refer to the on screen manual Advanced Guide If you select A4 B5 A5 or Letter sized plain paper when Automatically Select is selected in Paper Source the printer feeds the paper from the Ca...

Page 16: ...nting check box Some software applications may not have a preview function You can specify detailed print settings on the Main sheet or Page Setup sheet For details refer to the on screen manual Advanced Guide 7 Start printing Click Print or OK to start printing Note To cancel a print job in progress press the RESUME CANCEL button on the printer or click Cancel Printing on the printer status monit...

Page 17: ...ading Paper Here we make sure that A4 plain paper is loaded in the Cassette Note Load A4 B5 A5 or Letter sized plain paper in the Cassette and other sizes or types of paper such as photo paper in the Rear Tray 3 Open the Paper Output Tray gently and extend the Output Tray Extension to open 4 Create or open a document to print using an appropriate software application 5 Open the Print dialog box Se...

Page 18: ...eed paper from the wrong paper source or may not print with the proper print quality 5 Make sure that Automatically Select is selected in Paper Source Note For details on other settings for Paper Source refer to the on screen manual Advanced Guide 6 Select the print quality in Print Quality Here we select Standard Note For details on the print quality refer to the on screen manual Advanced Guide N...

Page 19: ...ion are for printing with Mac OS X v 10 4 x 1 Make sure that the printer is turned on See Front View 2 Load paper See Loading Paper Here we make sure that A4 plain paper is loaded in the Cassette Note Load A4 B5 A5 or Letter sized plain paper in the Cassette and other sizes or types of paper such as photo paper in the Rear Tray 3 Open the Paper Output Tray gently and extend the Output Tray Extensi...

Page 20: ...lect the wrong page size or media type the printer may feed paper from the wrong paper source or may not print with the proper print quality 5 Make sure that Automatically Select is selected in Paper Source Note For details on other settings for Paper Source refer to the on screen manual Advanced Guide 6 Select the print quality in Print Quality Here we select Standard Note For details on the prin...

Page 21: ...e Name list and click Delete To temporarily stop a job in progress click Hold To temporarily stop all the jobs in the list click Stop Jobs After canceling the print job blank sheets of paper may be ejected If printed ruled lines are misaligned or print results are unsatisfactory adjust the print head position See Aligning the Print Head Page top Page 21 of 437 pages Printing Documents Macintosh ...

Page 22: ...ictBridge compliant device such as a digital camera connecting with a USB cable This section also introduces useful software applications you can use with the printer Printing Photos from a PictBridge Compliant Device Useful Software Applications Solution Menu My Printer Easy WebPrint EX Page top Page 22 of 437 pages Other Usages ...

Page 23: ... the instruction manual supplied with the device Connectable devices Any PictBridge compliant device can be connected to this printer regardless of the manufacturer or model as long as it is compliant with the PictBridge Standard Note PictBridge is the Standard to print your photos directly without using a computer connecting a device such as a digital still camera digital camcorder or camera equi...

Page 24: ...e the window size Note Install Solution Menu from the Setup CD ROM when it has not been installed or has been uninstalled To install Solution Menu select Solution Menu in Custom Install The buttons displayed on the screen may vary depending on the country or region of purchase To start Solution Menu from the Start menu select All Programs or Programs Canon Utilities Solution Menu then Solution Men...

Page 25: ...ff the sides of pages or preview and select the desired web pages to print Easy WebPrint EX is not available in Windows 2000 and Macintosh Important It is unlawful to reproduce or edit the copyrighted work of another person without permission from the copyright holder except for personal use use within the home or other use within the limited scope as defined by the copyright Additionally reproduc...

Page 26: ...ktop To install Easy WebPrint EX click the displayed guidance and follow the instructions on the screen You can also install Easy WebPrint EX from the Setup CD ROM To install Easy WebPrint EX select Easy WebPrint EX in Custom Install To install Easy WebPrint EX on your computer Internet Explorer 7 or later is required and the computer must be connected to the Internet Page top Page 26 of 437 pages...

Page 27: ...bes types of paper you can load and how to load printing paper in the Cassette or Rear Tray Loading Paper Paper Source to Load Paper Loading Paper in the Cassette Loading Paper in the Rear Tray Media Types You Can Use Media Types You Cannot Use Page top Page 27 of 437 pages Loading Paper ...

Page 28: ...print with the proper print quality For details on how to load paper in each paper source see Loading Paper in the Cassette or Loading Paper in the Rear Tray Loading Plain Paper in the Cassette When you use A4 B5 A5 or Letter sized plain paper load it in the Cassette The printer feeds paper from the Cassette automatically by selecting plain paper A4 B5 A5 or Letter size in the print settings with ...

Page 29: ...Page top Page 29 of 437 pages Loading Paper ...

Page 30: ... use for this printer see Media Types You Can Use 1 Prepare paper Align the edges of paper If paper is curled flatten it Note Align the edges of paper neatly before loading Loading paper without aligning the edges may cause paper jams If paper is curled hold the curled corners and gently bend them in the opposite direction until the paper becomes completely flat For details on how to flatten curle...

Page 31: ...th the mark of page size The Paper Guide B will stop when it aligns with the corresponding mark of page size Note There may be a little space between the Paper Guide B and the paper stack 3 Slide the Paper Guide C on the left to align completely with the side of the paper stack Note Do not load sheets of paper higher than the Load Limit Mark D Page 31 of 437 pages Loading Paper in the Cassette ...

Page 32: ...printer any further This can damage the printer or Cassette 4 Open the Paper Output Tray gently and extend the Output Tray Extension to open Note After loading paper Select the size and type of the loaded paper in Printer Paper Size or Paper Size and Media Type in the printer driver See Printing Documents Windows or Printing Documents Macintosh Page 32 of 437 pages Loading Paper in the Cassette ...

Page 33: ...Page top Page 33 of 437 pages Loading Paper in the Cassette ...

Page 34: ...nt it can cause paper jams 1 Prepare paper See Prepare paper in Loading Paper in the Cassette Align the edges of paper If paper is curled flatten it 2 Load paper 1 Open the Paper Support and pull it out 2 Open the Paper Output Tray gently and extend the Output Tray Extension to open 3 Slide the Paper Guides A to open them and load the paper in the center of the Rear Tray WITH THE PRINT SIDE FACING...

Page 35: ...er See Printing Documents Windows or Printing Documents Macintosh Loading Envelopes You can print on European DL and US Comm Env 10 sized envelopes The address is automatically rotated and printed according to the envelope s direction by specifying with the printer driver properly Important You cannot use the following envelopes Envelopes with an embossed or treated surface Envelopes with a double...

Page 36: ... inches 3 mm 2 Load envelopes 1 Open the Paper Support and pull it out See Load paper in Loading Photo Paper of Loading Paper in the Rear Tray 2 Open the Paper Output Tray gently and extend the Output Tray Extension to open See Load paper in Loading Photo Paper of Loading Paper in the Rear Tray 3 Slide the Paper Guides A to open them and load the envelopes in the center of the Rear Tray WITH THE A...

Page 37: ...dscape orientation in Orientation Important If you do not specify the envelope size or orientationproperly the address will be printed upside down or will be turned to 90 degrees Note In Windows if the print result is upside down open the printer driver setup window select Envelope in Commonly Used Settings then select the Rotate 180 degrees check box in Additional Features For details on the prin...

Page 38: ...prox 150 sheets Approx 50 sheets Plain Paper Envelopes 10 envelopes Not loadable 4 5 Envelope Canon genuine papers Name of Paper Model No 1 Paper Load Limit Paper Output Tray Load Limit Settings in Printer Driver Media Type Rear Tray Cassette For printing photos Photo Paper Pro Platinum PT 101 6 A4 Letter 8 5 x 11 5 x 7 13 x 18 cm and 8 x 10 20 x 25 cm 10 sheets 4 x 6 10 x 15 cm 20 sheets Not load...

Page 39: ...een manual Advanced Guide 4 Feeding this paper from the Cassette can damage the printer Always load in the Rear Tray 5 We recommend that you remove the previously printed sheet from the Paper Output Tray before continuously printing to avoid blurs and discoloration 6 When loading paper in stacks the print side may become marked as it is fed or paper may not feed properly In this case load one shee...

Page 40: ...9 x 676 0 mm Rear Tray 8 50 x 11 69 inches 215 9 x 297 0 mm Cassette Paper Weight 17 to 28 lb 64 to 105 g m2 except for Canon genuine paper Do not use heavier or lighter paper except for Canon genuine paper as it could jam in the printer Notes on Storing Paper Take out only the necessary number of paper from the package just before printing To avoid curling when you do not print put unused paper b...

Page 41: ...re than 28 lb 105 g m 2 except for Canon genuine paper Paper thinner than a postcard including plain paper or notepad paper cut to a small size when printing on paper smaller than A5 Picture postcards Postcards affixed with photos or stickers Envelopes with a double flap or sticker flaps Envelopes with an embossed or treated surface Envelopes whose gummed flaps are already moistened and adhesive A...

Page 42: ...Tank Replacing Procedure Checking the Ink Status When Printing Becomes Faint or Colors Are Incorrect Printing the Nozzle Check Pattern Examining the Nozzle Check Pattern Cleaning the Print Head Cleaning the Print Head Deeply Aligning the Print Head Cleaning the Paper Feed Roller Cleaning the Pad in the Cassette Opening the Maintenance Screens Opening the Printer Driver Setup Window Windows Opening...

Page 43: ...ed Canon brand ink tanks Refilling the ink is not recommended If you remove an ink tank replace it immediately Do not leave the printer with ink tanks removed Use new ink tanks for replacement Installing used ink tanks may cause the nozzles to clog Furthermore with such ink tanks the printer will not be able to inform you when to replace the ink tanks properly Once an ink tank has been installed d...

Page 44: ...r A when replacing the ink tank If the Inner Cover A is open after replacing the ink tank be sure to close it Note The printer may make operating noise when the Print Head Holder moves to the replacement position 3 Remove the ink tank with the lamp flashing fast Push the tab B and lift the ink tank to remove Do no touch the Print Head Lock Lever C Important Handle the ink tank carefully to avoid s...

Page 45: ...the ink from staining your fingers Discard the protective cap once it is removed Important Do not touch the electrical contacts F on the ink tank It can cause the printer to malfunction or become unable to print Important If you shake the ink tank the ink may spill out and stain your hands and the surrounding area Be careful to handle the ink tank Do not squeeze the side of ink tanks as this may c...

Page 46: ...nk tanks are installed Be sure to install all the ink tanks 6 Close the Top Cover Note If the Alarm lamp still flashes orange after the Top Cover is closed refer to Alarm Lamp Flashes Orange in Troubleshooting of the on screen manual Advanced Guide When you start printing after replacing the ink tank the printer starts cleaning the Print Head automatically Do not perform any other operations until...

Page 47: ...Page top Page 47 of 437 pages Replacing an Ink Tank ...

Page 48: ...ing for a while but we recommend you to have a new ink tank available Flashing fast at around 1 second intervals Repeats The ink tank is installed in the wrong position or it is empty Make sure that the ink tank is installed in the correct position as indicated by the label on the Print Head Holder If the position is correct but the lamp flashes the ink tank is empty Replace it with a new one Ink ...

Page 49: ...le Note An error message may appear while printing Confirm the message and take an appropriate action Follow the procedure below to open each of the confirmation screens 1 Open the printer driver setup window See Opening the Printer Driver Setup Window Windows 2 Click View Printer Status on the Maintenance sheet To confirm the ink tank information click the Ink Details menu Note You can also displ...

Page 50: ...Page top Page 50 of 437 pages Checking the Ink Status ...

Page 51: ...opriate action Increasing the print quality in the printer driver settings may improve the print result For details refer to the on screen manual Advanced Guide When the Print Results Are Blurred or Uneven Step 1 See Printing the Nozzle Check Pattern See Examining the Nozzle Check Pattern After cleaning the Print Head print and examine the nozzle check pattern If there are missing lines or horizon...

Page 52: ...Page top Page 52 of 437 pages When Printing Becomes Faint or Colors Are Incorrect ...

Page 53: ...tte 2 Open the Paper Output Tray gently and extend the Output Tray Extension to open If the Inner Cover is open close it 3 Hold down the RESUME CANCEL button until the Power lamp flashes green twice then release it immediately The nozzle check pattern will be printed Do not perform any other operations until the printer completes the printing of the nozzle check pattern Examine the nozzle check pa...

Page 54: ...pattern See Examining the Nozzle Check Pattern 1 Make sure that the power is turned on 2 Make sure that one or more sheets of A4 or Letter sized plain paper are loaded in the Cassette 3 Open the Paper Output Tray gently and extend the Output Tray Extension to open Important If the Inner Cover is open close it 4 Open the Canon IJ Printer Utility See Opening the Canon IJ Printer Utility Macintosh 5 ...

Page 55: ...er operations until the printer completes the printing of the nozzle check pattern Note Clicking Initial Check Items displays the items to be checked before printing the nozzle check pattern 6 Examine the nozzle check pattern See Examining the Nozzle Check Pattern Page top Page 55 of 437 pages Printing the Nozzle Check Pattern ...

Page 56: ...ack ink group PGBK A Good B Bad Lines are missing If there are horizontal white streaks in the pattern 2 Clean the print head nozzles of the Color ink group C M Y BK A Good B Bad Horizontal white streaks are present If there are missing lines in the pattern 1 and also there are horizontal white streaks in the pattern 2 Clean the print head nozzles of the All Colors ink group 2 Take the appropriate...

Page 57: ...assette Follow the procedure from 3 in step 5 Windows or Macintosh in Cleaning the Print Head to clean the Print Head Go to Select the ink group to clean in Cleaning the Print Head Go to Select the ink group to clean in Cleaning the Print Head Page top Page 57 of 437 pages Examining the Nozzle Check Pattern ...

Page 58: ... The printer starts cleaning the Print Head When the Power lamp is lit green after flashing the cleaning will be completed Print the nozzle check pattern to check the print head condition after cleaning See Examining the Nozzle Check Pattern If you click Cleaning on the Pattern Check dialog box that appears after printing the nozzle check pattern See When cleaning is required the printer starts cl...

Page 59: ...the items to be checked before cleaning the Print Head 5 Confirm the displayed message and click Print Check Pattern The nozzle check pattern will be printed Do not perform any other operations until the printer completes the printing of the nozzle check pattern 6 Examine the nozzle check pattern See Examining the Nozzle Check Pattern Note If the problem is not resolved after cleaning the Print He...

Page 60: ... clean Note This printer has two kinds of black ink PGBK pigment ink and BK dye ink Check the nozzle check pattern then click Black if there are missing lines in PGBK or click Color if there are horizontal white streaks in BK For details on the nozzle check pattern see Examining the Nozzle Check Pattern 4 Click OK The printer starts cleaning the Print Head when the Power lamp starts flashing green...

Page 61: ...ions until the printer completes the printing of the nozzle check pattern 6 Examine the nozzle check pattern See Examining the Nozzle Check Pattern Note If the problem is not resolved after cleaning the Print Head twice clean the Print Head deeply See Cleaning the Print Head Deeply Page top Page 61 of 437 pages Cleaning the Print Head ...

Page 62: ...ake sure that the power is turned on 2 Make sure that one or more sheets of A4 or Letter sized plain paper are loaded in the Cassette 3 Open the Paper Output Tray gently and extend the Output Tray Extension to open Important If the Inner Cover is open close it 4 Open the printer driver setup window See Opening the Printer Driver Setup Window Windows 5 Clean the Print Head deeply 1 Click the Mainte...

Page 63: ...es the printing of the nozzle check pattern 6 Examine the nozzle check pattern See step 1 in Examining the Nozzle Check Pattern If a particular color is not printed properly replace the ink tank of that color See Replacing an Ink Tank If the problem is not resolved open the Top Cover to confirm that the ink is remaining turn off the power then clean the Print Head deeply again after 24 hours If th...

Page 64: ...leaning of the Print Head This takes about 2 minutes 30 seconds Note Clicking Initial Check Items displays the items to be checked before cleaning the Print Head deeply 5 Confirm the displayed message and click Print Check Pattern The nozzle check pattern will be printed Do not perform any other operation until the printer completes the printing of the nozzle check pattern 6 Examine the nozzle che...

Page 65: ...If the problem is still not resolved the Print Head may be damaged Contact the service center Page top Page 65 of 437 pages Cleaning the Print Head Deeply ...

Page 66: ...Make sure that the power is turned on and load a sheet of A4 or Letter sized supplied paper or Canon Matte Photo Paper MP 101 in the Rear Tray Load it with the printing side whiter side facing you in the Rear Tray 2 Open the Paper Output Tray gently and extend the Output Tray Extension to open If the Inner Cover is open close it 3 Hold down the RESUME CANCEL button until the Power lamp flashes gre...

Page 67: ... be printed and the printer will adjust the print head position automatically Do not perform any other operations until the printer completes the printing of the print head alignment pattern This takes about 5 minutes to complete Note If the automatic adjustment of the print head position has failed the Alarm lamp flashes Refer to Eleven flashes of Alarm Lamp Flashes Orange in Troubleshooting of t...

Page 68: ...ou in the Rear Tray Important You cannot use the Cassette to align the Print Head automatically Be sure to load paper in the Rear Tray 3 Open the Paper Output Tray gently and extend the Output Tray Extension to open Important If the Inner Cover is open close it 4 Open the Canon IJ Printer Utility See Opening the Canon IJ Printer Utility Macintosh 5 Adjust the print head position 1 Select Test Prin...

Page 69: ...shes Refer to Eleven flashes of Alarm Lamp Flashes Orange in Troubleshooting of the on screen manual Advanced Guide If the print results are still not satisfactory after adjusting the print head position as described above align the Print Head manually Refer to the on screen manual Advanced Guide To print and check the current head position adjustment values click Print Alignment Value Page top Pa...

Page 70: ... necessary You need to prepare three sheets of A4 or Letter sized plain paper 1 Make sure that the power is turned on 2 Open the Paper Output Tray gently and extend the Output Tray Extension to open Important If the Inner Cover is open close it 3 Open the printer driver setup window See Opening the Printer Driver Setup Window Windows 4 Select Roller Cleaning 1 Click the Maintenance tab 2 Click Rol...

Page 71: ... Feed Roller 3 When the completion message appears click OK Note If the problem is not resolved after cleaning the Paper Feed Roller in the Rear Tray follow the procedure below 1 Turn off the power and unplug the power cord 2 Rotate and clean the Paper Feed Roller A located in the center inside the Rear Tray with the moistened cotton swab or the like in the direction of the arrow B Do not touch th...

Page 72: ...4 or Letter sized plain paper in the paper source you selected in 3 of step 4 2 Confirm the displayed message and click OK The printer starts cleaning The cleaning will be completed after the paper is ejected Do not perform any other operations until the printer completes the cleaning of the Paper Feed Roller Note If the problem is not resolved after cleaning the Paper Feed Roller in the Rear Tray...

Page 73: ...If the problem is still not resolved after cleaning the Paper Feed Roller as described above contact the service center Page top Page 73 of 437 pages Cleaning the Paper Feed Roller ...

Page 74: ...aper may be ejected Follow the procedure below to clean the Pad in the Cassette You need to prepare cotton swab 1 Pull out the Cassette from the printer and remove all the papers 2 Clean the Pad A sideways with a moistened cotton swab Important After cleaning the smeared Pad dry it completely If the problem is not resolved contact the service center Page top Page 74 of 437 pages Cleaning the Pad i...

Page 75: ...k Control Panel Printers and Other Hardware then Printers and Faxes When you are using Windows 2000 Click Control Panel and Printers 3 Right click the Canon XXX icon where XXX is your printer s name and select Printing Preferences The printer driver setup window will appear Note You can also open the printer driver setup window from your software application or My Printer on the desktop For detail...

Page 76: ...v 10 3 9 Follow the procedure below to open the Canon IJ Printer Utility 1 Select Applications from the Go menu 2 Double click the Utilities folder and double click Printer Setup Utility to open the Printer List dialog box 3 Select your printer s name in the Name list and click Utility 4 Select your printer s name in the Product list and click Maintenance The Canon IJ Printer Utility will start up...

Page 77: ...Advanced Guide Troubleshooting Contents Appendix Appendix Legal Limitations on Use of Your Product and Use of Images Tips on How to Use Your Printer Page top Page 77 of 437 pages Appendix ...

Page 78: ...ertificates of deposit Postage stamps canceled or uncanceled Identifying badges or insignias Selective service or draft papers Checks or drafts issued by governmental agencies Motor vehicle licenses and certificates of title Traveler s checks Food stamps Passports Immigration papers Internal revenue stamps canceled or uncanceled Bonds or other certificates of indebtedness Stock certificates Copyri...

Page 79: ...K and pigment ink PGBK The dye ink is used mainly for printing photos illustration etc and the pigment ink is used for text based documents Each has different purposes so that even if one runs out another will not be used instead If either of them runs out the ink tank replacement is required These two inks are automatically used depending on the type of printing paper or the settings of the print...

Page 80: ...actory print result See Printing and Media Types You Can Use There are various types of paper paper with special coating on the surface for printing photos with optimal quality and paper suitable for documents Media Type of the printer driver has different settings for each type of paper in advance such as using ink ejecting ink or distance from nozzles so that you can print on each paper with the...

Page 81: ...ys follow the following steps for optimal printing quality Follow the procedure below to disconnect the power plug 1 Press the Power button on the printer to turn it off 2 Make sure that the Power lamp is not lit 3 Disconnect the power plug from the wall outlet or turn off the extender cable connector If you press the Power button to turn off the power the printer caps the Print Head nozzles autom...

Page 82: ...Guide then resolve the error Power lamp flashes green and Alarm lamp flashes orange alternately An error that requires repair has occurred Contact the service center Colors are uneven and print results are blurred Tip Print the nozzle check pattern to check if the nozzles are clogged If the print head nozzles are clogged colors may become uneven or the print results may be blurred In this case Pri...

Page 83: ... a Photo Selecting the Paper Printing Creating an Album Starting Easy PhotoPrint EX Selecting the Paper and Layout Selecting a Photo Editing Printing Printing a DVD CD Printing Calendars Starting Easy PhotoPrint EX Selecting the Paper and Layout Selecting a Photo Editing Printing Printing Stickers Starting Easy PhotoPrint EX Selecting the Paper and Layout Selecting a Photo Editing Printing Printin...

Page 84: ... Photos on One Page Printing an Index Printing ID Photos ID Photo Print Printing Photo Information Saving Photos Opening Saved Files Other Settings Changing Layout Changing Background Adding Photos Swapping Positions of Photos Replacing Photos Changing Position Angle and Size of Photos Cropping Photos Framing Photos Printing Dates on Photos Attaching Comments to Photos Adding Text to Photos Saving...

Page 85: ...Driver Printing with ICC Profiles Adjusting Color Balance Adjusting Brightness Adjusting Intensity Adjusting Contrast Simulating an Illustration Representing Image Data with a Single Color Presenting Image Data with Vivid Colors Smoothing Jagged Outlines Changing Color Properties to Improve Coloration Reducing Photo Noise Overview of the Printer Driver Printer Driver Operations Canon IJ Printer Dr...

Page 86: ...ast as Expected Print Head Holder Does Not Move to the Position for Replacing Paper Does Not Feed Properly Paper Does Not Feed from the Paper Source Specified in the Printer Driver Paper Jams Paper Is Jammed in the Paper Output Slot or the Rear Tray Paper Is Jammed inside the Printer at the Transport Unit Jammed Paper Is Not Removed out When Automatic Duplex Printing In Other Cases Message Appears...

Page 87: ... The Inkjet Printer Scanner Fax Extended Survey Program Screen Is Displayed The Inkjet Printer Scanner Fax Extended Survey Program Icon Appears Cannot Print Properly with Automatic Duplex Printing For Windows Users Printer Status Monitor Is Not Displayed Error Message Appears on a PictBridge Compliant Device FAQs If You Cannot Resolve the Problem Instructions for Use Printer Driver Using Easy Phot...

Page 88: ...s Manual Operating the Contents Pane Operating the Explanation Window Printing This Manual Using Keywords to Find a Document Registering Documents to My Manual Symbols Used in This Document Trademarks Page top Page 88 of 437 pages How to Use This Manual ...

Page 89: ...ntents pane found to the left of the on screen manual the documents of that title are displayed in the explanation window on the right side When you click found to the left of the document titles found in the lower hierarchies are displayed Note Click to close or display the contents pane Page top Page 89 of 437 pages Operating the Contents Pane ...

Page 90: ...perating the Explanation Window Operating the Explanation Window 1 Click the green characters to jump to the corresponding document 2 The cursor jumps to the top of this document Page top Page 90 of 437 pages Operating the Explanation Window ...

Page 91: ...the Option Settings dialog box You can then set up the printing operation Print document title and page number When this check box is checked the manual name and the page number are printed in the header top of the document Print background color and images When this check box is checked the background color and the image are printed Some images are printed regardless of whether this check box is ...

Page 92: ... then click Yes The documents that are currently displayed are printed Print Selected Documents You can select and print the documents that you want printed 1 From Select Target select Selected Documents The titles of all documents are displayed in the Documents to Be Printed list 2 Select the documents to be printed From the Documents to Be Printed list select the title check boxes of the documen...

Page 93: ...fy simple print settings as necessary 4 Click Start Printing A message confirming the number of print pages is displayed 5 Execute print Confirm the number of pages to be printed and then click Yes All documents with selected check boxes are printed Print All Documents You can print all documents of the on screen manual 1 From Select Target select All Documents The titles of all documents are disp...

Page 94: ...heck the number of print pages displayed in the Print Page Count Confirmation dialog box The Print Preview dialog box allows you to scale the printing to the paper width or to set the zoom rate However if the print data extends outside the paper because of the new zoom rate that portion of the document will not be printed on the paper Page top Page 94 of 437 pages Printing This Manual ...

Page 95: ...t a space between the keywords Note You can enter up to 10 search keywords or up to 255 characters Uppercase and lowercase are not discriminated The program can also search for keywords that contain spaces A convenient way of quickly finding a document to be read is to enter keywords as described below To learn how to operate a function you are using Enter the menu name displayed on the operation ...

Page 96: ...re entered Documents Containing Any Keyword Documents containing at least one of the keywords that were entered 4 Display the document that you want to read From the search results list double click or select and press Enter the title of the document you want to read When the documents of that title are displayed the keywords found on those documents are highlighted Note If you modify the keyword ...

Page 97: ...of My Manual Note You can also add documents to My Manual by the following methods If you add a document to My Manual a mark is displayed in the document icons in the contents pane From the Recently Displayed Documents list double click the document title that you want to add to My Manual or select the document and press Enter key to display the title and then click Add Right click the document ti...

Page 98: ...itle displayed in List of My Manual that document is displayed in the explanation window Note To delete a document from List of My Manual select that document title from the list and then click Delete or press Delete Page top Page 98 of 437 pages Registering Documents to My Manual ...

Page 99: ...eration Caution Instructions that if ignored could result in personal injury or material damage caused by incorrect operation of the equipment These must be observed for safe operation Important Instructions including important information Be sure to read these indications Note Instructions as notes for operation or additional explanations Indicates operations in Windows Indicates operations in Ma...

Page 100: ... Mac are trademarks of Apple Inc registered in the U S and other countries Bonjour is a trademark of Apple Inc registered in the U S and other countries Adobe Adobe Photoshop Adobe RGB and Adobe RGB 1998 are either registered trademarks or trademarks of Adobe Systems Incorporated in the United States and or other countries Exif Print This printer supports Exif Print Exif Print is a standard for en...

Page 101: ...anced Guide Printing from a Computer Printing from a Computer Printing with the Bundled Application Software Printing with Other Application Software Page top Page 101 of 437 pages Printing from a Computer ...

Page 102: ...lication Software What Is Easy PhotoPrint EX Printing Photos Creating an Album Printing a DVD CD Printing Calendars Printing Stickers Printing Layout Correcting and Enhancing Photos Questions and Answers Photo Print Settings Other Settings Page top Page 102 of 437 pages Printing with the Bundled Application Software ...

Page 103: ...sy PhotoPrint EX is installed on a computer that already has Easy LayoutPrint installed Easy LayoutPrint will be replaced by Easy PhotoPrint EX Note Printing on paper larger than A4 is available with supported printers only See your printer manual for details See Help of Easy PhotoPrint EX for descriptions of Easy PhotoPrint EX screens Click Help in a screen or dialog box or select Easy PhotoPrint...

Page 104: ...following applications MP Navigator EX Ver 1 00 or later ZoomBrowser EX Ver 5 8 or later Supported Image File Formats Extensions BMP bmp JPEG jpg jpeg TIFF tif tiff PICT pict pct Easy PhotoPrint image files epp Important When selecting an image if there is a TIFF file in the selected folder the image may not be displayed correctly or Easy PhotoPrint EX may shut down depending on the TIFF format In...

Page 105: ...Page top Page 105 of 437 pages What Is Easy PhotoPrint EX ...

Page 106: ...PhotoPrint EX 2 Selecting a Photo 3 Selecting the Paper 4 Printing Try This Correcting and Enhancing Photos Printing on a DVD CD Printing Vivid Photos Reducing Photo Noise Cropping Photos Photo Print Printing Dates on Photos Photo Print Printing Multiple Photos on One Page Printing an Index Printing ID Photos ID Photo Print Printing Photo Information Saving Photos Opening Saved Files Questions and...

Page 107: ...How Do I Print with Even Margins Page top Page 107 of 437 pages Printing Photos ...

Page 108: ... Software Printing Photos Starting Easy PhotoPrint EX Starting Easy PhotoPrint EX 1 From the Start menu select All Programs Canon Utilities Easy PhotoPrint EX Easy PhotoPrint EX Easy PhotoPrint EX starts and Menu appears Page top Page 108 of 437 pages Starting Easy PhotoPrint EX ...

Page 109: ...ect the folder that contains the image you want to print from the folder tree area The images in the folder will be displayed as thumbnails miniatures Important If Easy PhotoPrint EX is started from another application MP Navigator EX ZoomBrowser EX or Digital Photo Professional the folder tree area will not be displayed The images opened in the application will be displayed as thumbnails 3 Click ...

Page 110: ...e the number of copies shown in the box click Down arrow You can change the order of photos using the list located at the top right corner of the screen You can select the printing order from Sort by Date and Sort by Name Note You can correct or enhance the selected image before printing Correcting and Enhancing Photos See Help for details on the Select Images screen Page top Page 110 of 437 pages...

Page 111: ...e Media Type Note The paper sizes and media types may vary depending on the printer See Help for details The paper sources may vary depending on the printer and the media type Note You can print directly on the DVD CD surface by selecting CD R for Paper Size Printing on a DVD CD You can print photos with more vivid colors or you can reduce the photo noise Printing Vivid Photos Reducing Photo Noise...

Page 112: ...o use Click a borderless layout to print borderless photos Note The layouts that can be selected may vary depending on the printer paper size and media type 3 Click Print Important When you print on large size paper such as A3 A3 some computers cannot print properly if you print more than one page or copy at a time It is recommended that you print page by page when you print on such paper While pr...

Page 113: ...d bottom may become wider than the other How Do I Print with Even Margins Note You can crop images or print dates on photos Cropping Photos Photo Print Printing Dates on Photos Photo Print You can correct or enhance the selected image before printing Correcting and Enhancing Photos You can specify advanced Photo Print settings number of copies print quality etc in the Preferences dialog box To dis...

Page 114: ...ting the Paper and Layout 3 Selecting a Photo 4 Editing 5 Printing Try This Correcting and Enhancing Photos Changing Layout Changing Background Adding Photos Swapping Positions of Photos Replacing Photos Changing Position Angle and Size of Photos Cropping Photos Framing Photos Printing Dates on Photos Attaching Comments to Photos Adding Text to Photos Saving Opening Saved Files Questions and Answe...

Page 115: ...How Can I Move or Copy the Saved File What Is C1 or C4 Page top Page 115 of 437 pages Creating an Album ...

Page 116: ...Software Creating an Album Starting Easy PhotoPrint EX Starting Easy PhotoPrint EX 1 From the Start menu select All Programs Canon Utilities Easy PhotoPrint EX Easy PhotoPrint EX Easy PhotoPrint EX starts and Menu appears Page top Page 116 of 437 pages Starting Easy PhotoPrint EX ...

Page 117: ...ptions dialog box select Front or Front Back for Cover and click Options Select the Double page album checkbox to enable the spread page layout consisting of two page master In a double page album you can arrange an image across the left and right pages You can customize the page numbers position font size etc in the Page Number Settings dialog box To display the Page Number Settings dialog box se...

Page 118: ...cover inside pages or back cover You can customize the date position size color etc in the Date Settings dialog box To display the Date Settings dialog box select the Print date checkbox in the Change Layout dialog box and click Date Settings 5 If you want to change the background click Background The Change Background dialog box appears In the Change Background dialog box you can paint the backgr...

Page 119: ...der tree area will not be displayed The images opened in the application will be displayed as thumbnails 3 Select the image s you want to print and click one of the buttons below To print on the front cover click Import to Front Cover To print on the inside pages click Import to Inside Pages To print on the back cover click Import to Back Cover The selected image s are displayed in the selected im...

Page 120: ...To delete all images from the selected image area click Delete All Imported Images Note See Help for details on the Select Images screen Page top Page 120 of 437 pages Selecting a Photo ...

Page 121: ...ition Angle and Size of Photos Cropping Photos Framing Photos Printing Dates on Photos Attaching Comments to Photos Adding Text to Photos Important The edit information will be discarded if you exit Easy PhotoPrint EX without saving the edited album It is recommended that you save the item if you want to edit it again The page numbers on the front and back covers of the album are displayed as foll...

Page 122: ...C4 Back cover Saving Note See Help for details on the Edit screen Page top Page 122 of 437 pages Editing ...

Page 123: ...rs if you select the Duplex Printing checkbox after selecting a printer that supports automatic duplex printing and media type that supports duplex printing Select this checkbox to print on both sides of the paper automatically The paper sources may vary depending on the printer and the media type You can set a custom print quality level in the Print Quality Settings dialog box To display the Prin...

Page 124: ...3 Click Print Note See Help for details on the Print Settings screen Page top Page 124 of 437 pages Printing ...

Page 125: ... CD LabelPrint CD LabelPrint allows you to print DVD CD labels easily For details on how to use CD LabelPrint install CD LabelPrint and refer to the application s manual as follows From the Start menu select All Programs CD LabelPrint Manual Important DVD CD Label is not displayed in Menu if CD LabelPrint is not installed on your computer Page top Page 125 of 437 pages Printing a DVD CD ...

Page 126: ...EX 2 Selecting the Paper and Layout 3 Selecting a Photo 4 Editing 5 Printing Try This Correcting and Enhancing Photos Changing Layout Changing Background Adding Photos Swapping Positions of Photos Replacing Photos Changing Position Angle and Size of Photos Cropping Photos Framing Photos Printing Dates on Photos Adding Text to Photos Setting Calendar Display Setting Holidays Saving Opening Saved Fi...

Page 127: ...Questions and Answers How Can I Move or Copy the Saved File Page top Page 127 of 437 pages Printing Calendars ...

Page 128: ...oftware Printing Calendars Starting Easy PhotoPrint EX Starting Easy PhotoPrint EX 1 From the Start menu select All Programs Canon Utilities Easy PhotoPrint EX Easy PhotoPrint EX Easy PhotoPrint EX starts and Menu appears Page top Page 128 of 437 pages Starting Easy PhotoPrint EX ...

Page 129: ...t can be selected You can add holidays to your calendar Setting Holidays 3 Select a layout for Design If necessary make advanced settings on the calendar and set the background Note You can customize the calendar display font colors of the dates and days of the week position and size of the calendar etc Setting Calendar Display You can paint the background in a single color or paste an image file ...

Page 130: ...See Help for details on the Page Setup screen Page top Page 130 of 437 pages Selecting the Paper and Layout ...

Page 131: ...iniatures 3 Select the image s you want to print and click Import to Inside Pages The selected image s are displayed in the selected image area You can also select the image s you want to print by dragging them into the selected image area Note To delete an image in the selected image area select the image you want to delete and click Delete Imported Image To delete all images from the selected im...

Page 132: ...tos Swapping Positions of Photos Replacing Photos Changing Position Angle and Size of Photos Cropping Photos Framing Photos Printing Dates on Photos Adding Text to Photos Setting Calendar Display Setting Holidays Important The edit information will be discarded if you exit Easy PhotoPrint EX without saving the edited calendar It is recommended that you save the item if you want to edit it again Sa...

Page 133: ...See Help for details on the Edit screen Page top Page 133 of 437 pages Editing ...

Page 134: ...f the paper Automatic appears if you select the Duplex Printing checkbox after selecting a printer that supports automatic duplex printing and media type that supports duplex printing Select this checkbox to print on both sides of the paper automatically The paper sources may vary depending on the printer and the media type You can set a custom print quality level in the Print Quality Settings dia...

Page 135: ...Note See Help for details on the Print Settings screen Page top Page 135 of 437 pages Printing ...

Page 136: ...Print EX 2 Selecting the Paper and Layout 3 Selecting a Photo 4 Editing 5 Printing Try This Correcting and Enhancing Photos Adding Photos Swapping Positions of Photos Replacing Photos Changing Position Angle and Size of Photos Cropping Photos Framing Photos Adding Text to Photos Saving Opening Saved Files Questions and Answers How Can I Move or Copy the Saved File Page top Page 136 of 437 pages Pr...

Page 137: ...Software Printing Stickers Starting Easy PhotoPrint EX Starting Easy PhotoPrint EX 1 From the Start menu select All Programs Canon Utilities Easy PhotoPrint EX Easy PhotoPrint EX Easy PhotoPrint EX starts and Menu appears Page top Page 137 of 437 pages Starting Easy PhotoPrint EX ...

Page 138: ...on Print date Use the same image in all frames Note Paper sizes other than Photo Stickers cannot be selected Select the Use the same image in all frames checkbox to use the same image in all the frames on the page You can customize the date position size color etc in the Date Settings dialog box To display the Date Settings dialog box select the Print date checkbox and click Date Settings Note See...

Page 139: ...iniatures 3 Select the image s you want to print and click Import to Inside Pages The selected image s are displayed in the selected image area You can also select the image s you want to print by dragging them into the selected image area Note To delete an image in the selected image area select the image you want to delete and click Delete Imported Image To delete all images from the selected im...

Page 140: ...ositions of Photos Replacing Photos Changing Position Angle and Size of Photos Cropping Photos Printing Dates on Photos Adding Text to Photos Important The edit information will be discarded if you exit Easy PhotoPrint EX without saving the edited stickers It is recommended that you save the item if you want to edit it again Saving Note See Help for details on the Edit screen Page top Page 140 of ...

Page 141: ... the printer and the media type You can set a custom print quality level in the Print Quality Settings dialog box To display the Print Quality Settings dialog box select Custom for Print Quality and click Quality Settings You can adjust the printing position in the Adjust Print Position dialog box To display the Adjust Print Position dialog box click Print Position You can specify the print range ...

Page 142: ...Page top Page 142 of 437 pages Printing ...

Page 143: ...EX 2 Selecting the Paper and Layout 3 Selecting a Photo 4 Editing 5 Printing Try This Correcting and Enhancing Photos Changing Layout Adding Photos Swapping Positions of Photos Replacing Photos Changing Position Angle and Size of Photos Cropping Photos Printing Dates on Photos Adding Text to Photos Saving Opening Saved Files Questions and Answers How Can I Move or Copy the Saved File Page top Page...

Page 144: ... Software Printing Layout Starting Easy PhotoPrint EX Starting Easy PhotoPrint EX 1 From the Start menu select All Programs Canon Utilities Easy PhotoPrint EX Easy PhotoPrint EX Easy PhotoPrint EX starts and Menu appears Page top Page 144 of 437 pages Starting Easy PhotoPrint EX ...

Page 145: ...gs section Paper Size Orientation Print date Note See Help on the paper size that can be selected You can customize the date position size color etc in the Date Settings dialog box To display the Date Settings dialog box select the Print date checkbox and click Date Settings 3 Select a layout from Layouts Note The layouts may vary depending on the Orientation Note See Help for details on the Page ...

Page 146: ...niatures 3 Select the image s you want to print and click Import to Inside Pages The selected image s are displayed in the selected image area You can also select the image s you want to print by dragging them into the selected image area Note To delete an image in the selected image area select the image you want to delete and click Delete Imported Image To delete all images from the selected ima...

Page 147: ...pping Positions of Photos Replacing Photos Changing Position Angle and Size of Photos Cropping Photos Printing Dates on Photos Adding Text to Photos Important The edit information will be discarded if you exit Easy PhotoPrint EX without saving the edited layout It is recommended that you save the item if you want to edit it again Saving Note See Help for details on the Edit screen Page top Page 14...

Page 148: ...u select the Duplex Printing checkbox after selecting a printer that supports automatic duplex printing and media type that supports duplex printing Select this checkbox to print on both sides of the paper automatically The paper sources may vary depending on the printer and the media type You can set a custom print quality level in the Print Quality Settings dialog box To display the Print Qualit...

Page 149: ...Note See Help for details on the Print Settings screen Page top Page 149 of 437 pages Printing ...

Page 150: ...ally analyze the captured scene and apply suitable corrections Using the Auto Photo Fix Function Red Eye Correction Function You can correct red eyes caused by a camera flash Using the Red Eye Correction Function Face Brightener Function You can brighten dark faces caused by bright background Using the Face Brightener Function Face Sharpener Function You can sharpen out of focus faces in a photo U...

Page 151: ...Adjusting Images Page top Page 151 of 437 pages Correcting and Enhancing Photos ...

Page 152: ...the File menu Once image is corrected with Auto Photo Fix and saved it cannot be corrected again with Auto Photo Fix Also Auto Photo Fix may not be available for images edited using an application digital camera etc manufactured by other companies 1 Select photos in the Select Images screen then click Correct Enhance Images The Correct Enhance Images window appears Note You can also display the Co...

Page 153: ...select the Apply to all images checkbox Select the Prioritize Exif Info checkbox to apply corrections primarily based on the settings made at the time of shooting Deselect this checkbox to apply corrections based on the image analysis results It is recommended that you normally select this setting 5 Click Save Selected Image or Save All Corrected Images You can save corrected images as new files N...

Page 154: ...nd select the Enable Red Eye Correction checkbox 1 Select photos in the Select Images screen then click Correct Enhance Images The Correct Enhance Images window appears Note You can also display the Correct Enhance Images window by clicking Correct Enhance Images in the Layout Print or Edit screen In that case only the image displayed in Preview can be corrected enhanced See Correct Enhance Images...

Page 155: ...heck the result Click Reset Selected Image to undo the correction operation If you want to apply the correction to all the selected images at once select the Apply to all images checkbox Manual Correction 3 Click Manual then click Correct Enhance 4 Click Red Eye Correction Note Effect levels can be changed using the slider below Red Eye Correction Move the cursor over the image The shape of the cu...

Page 156: ...orrected Images You can save corrected images as new files Note To save only the image you like click Save Selected Image To save all images click Save All Corrected Images Only JPEG Exif file format is available for corrected images 7 Click Exit Important The corrections will be lost if you exit before saving corrected images Page top Page 156 of 437 pages Using the Red Eye Correction Function ...

Page 157: ...lect Images screen then click Correct Enhance Images The Correct Enhance Images window appears Note You can also display the Correct Enhance Images window by clicking Correct Enhance Images in the Layout Print or Edit screen In that case only the image displayed in Preview can be corrected enhanced See Correct Enhance Images Window for details on the Correct Enhance Images window 2 Select the imag...

Page 158: ...ark appears on the upper left of the image Note You can also drag to rotate the selected area Click Undo to undo the preceding correction operation 6 Click Save Selected Image or Save All Corrected Images You can save corrected images as new files Note To save only the image you like click Save Selected Image To save all images click Save All Corrected Images Only JPEG Exif file format is availabl...

Page 159: ...pears Note You can also display the Correct Enhance Images window by clicking Correct Enhance Images in the Layout Print or Edit screen In that case only the image displayed in Preview can be corrected enhanced See Correct Enhance Images Window for details on the Correct Enhance Images window 2 Select the image you want to correct from the list displayed in the lower part of the Correct Enhance Im...

Page 160: ...ck Reset Selected Image to undo the correction operation If you want to apply the correction to all the selected images at once select the Apply to all images checkbox Manual Correction 3 Click Manual then click Correct Enhance 4 Click Face Sharpener Note Effect levels can be changed using the slider below Face Sharpener Move the cursor over the image The shape of the cursor changes to Cross 5 Dra...

Page 161: ...ion 6 Click Save Selected Image or Save All Corrected Images You can save corrected images as new files Note To save only the image you like click Save Selected Image To save all images click Save All Corrected Images Only JPEG Exif file format is available for corrected images 7 Click Exit Important The corrections will be lost if you exit before saving corrected images Page top Page 161 of 437 p...

Page 162: ...ce Images window appears Note You can also display the Correct Enhance Images window by clicking Correct Enhance Images in the Layout Print or Edit screen In that case only the image displayed in Preview can be corrected enhanced See Correct Enhance Images Window for details on the Correct Enhance Images window 2 Select the image you want to enhance from the list displayed in the lower part of the...

Page 163: ...k Reset Selected Image to undo the enhancement operation If you want to apply the enhancement to all the selected images at once select the Apply to all images checkbox Manual Enhancement 3 Click Manual then click Correct Enhance 4 Click Digital Face Smoothing Note Effect levels can be changed using the slider below Digital Face Smoothing Move the cursor over the image The shape of the cursor chan...

Page 164: ...n 6 Click Save Selected Image or Save All Corrected Images You can save enhanced images as new files Note To save only the image you like click Save Selected Image To save all images click Save All Corrected Images Only JPEG Exif file format is available for enhanced images 7 Click Exit Important The enhancements will be lost if you exit before saving enhanced images Page top Page 164 of 437 pages...

Page 165: ... window by clicking Correct Enhance Images in the Layout Print or Edit screen In that case only the image displayed in Preview can be corrected enhanced See Correct Enhance Images Window for details on the Correct Enhance Images window 2 Select the image you want to enhance from the list displayed in the lower part of the Correct Enhance Images window The image appears in Preview Note If only one ...

Page 166: ...ote Click Undo to undo the preceding enhancement operation 6 Click Save Selected Image or Save All Corrected Images You can save enhanced images as new files Note To save only the image you like click Save Selected Image To save all images click Save All Corrected Images Only JPEG Exif file format is available for enhanced images 7 Click Exit Important The enhancements will be lost if you exit bef...

Page 167: ...hance Images in the Layout Print or Edit screen In that case only the image displayed in Preview can be corrected enhanced See Correct Enhance Images Window for details on the Correct Enhance Images window 2 Select the image you want to adjust from the list displayed in the lower part of the Correct Enhance Images window The image appears in Preview Note If only one image is selected the thumbnail...

Page 168: ...ave adjusted images as new files Note To save only the image you like click Save Selected Image To save all images click Save All Corrected Images Only JPEG Exif file format is available for adjusted images 6 Click Exit Important The adjustments will be lost if you exit before saving adjusted images Page top Page 168 of 437 pages Adjusting Images ...

Page 169: ...s or Edit screen or in the Layout Print screen of Photo Print 1 Toolbar Toolbar Zoom In Zoom Out Displays the enlarged or reduced preview of the page Full Screen Displays the entire image in Preview Compare Displays the Compare Images window You can compare the images before and after the correction enhancement side by side The image before the correction enhancement is displayed on the left and t...

Page 170: ...for Photo Print Photo Print allows you to automatically apply suitable corrections to all photos when printing Select this option in Color correction for printing on the Advanced tab of the Preferences dialog box To display the Preferences dialog box click Settings in the Layout Print screen or select Preferences from the File menu Prioritize Exif Info Select this checkbox to apply corrections pri...

Page 171: ...ox Face Sharpener Sharpens out of focus faces You can adjust the effect level using the slider Digital Face Smoothing Enhances skin beautifully by removing blemishes and wrinkles You can adjust the effect level using the slider Apply to all images Automatically corrects all the images displayed in the list OK Applies the selected effect to the selected image or all images Reset Selected Image Canc...

Page 172: ... soften the image Show through Removal Removes show through of text from the reverse side or removes the base color Adjust the show through level to prevent text on the reverse side of thin document or the base color of the document from appearing on the image Move the slider to the right to increase the show through removal effect Defaults Resets each adjustment brightness contrast sharpness blur...

Page 173: ...pecify the area you want to apply the effect to You can adjust the effect level using the slider Digital Face Smoothing Enhances skin beautifully by removing blemishes and wrinkles You can specify the area you want to apply the effect to You can adjust the effect level using the slider Blemish Remover Removes moles You can specify the area you want to apply the effect to OK Applies the selected ef...

Page 174: ...Exit Click to close the Correct Enhance Images window Page top Page 174 of 437 pages Correct Enhance Images Window ...

Page 175: ...Application Software Questions and Answers Questions and Answers How Can I Move or Copy the Saved File Which Side of the Displayed Image Does the Printing Start from How Do I Print with Even Margins What Is C1 or C4 Page top Page 175 of 437 pages Questions and Answers ...

Page 176: ...ll For example when you save a file named MyAlbum el1 a folder named MyAlbum el1 Data is automatically created in the same folder that contains the MyAlbum el1 file If you want to move or copy the MyAlbum el1 file to another folder move or copy the MyAlbum el1 Data folder as well The MyAlbum el1 Data folder contains the photos used in the album Note The icons may vary depending on the items Import...

Page 177: ...the Displayed Image Does the Printing Start from As shown below printing starts from the left side of the image displayed in the Layout Print screen Outputs the paper in the direction as the arrow indicates See your printer manual for details on how to load paper to print on the front back etc Page top Page 177 of 437 pages Which Side of the Displayed Image Does the Printing Start from ...

Page 178: ...nding on the image and printer To always print with even margins select the Always crop images when selecting a layout with margins checkbox on the Advanced tab of the Preferences dialog box To display the Preferences dialog box click Settings in the Layout Print screen or select Preferences from the File menu Crop the photo to apply even margins individually Cropping Photos Photo Print Note This ...

Page 179: ...s What Is C1 or C4 What Is C1 or C4 When an album is printed labels such as C1 and C4 are printed as page numbers The C1 and C4 represent the front cover and back cover respectively C1 Front cover C2 Inside the front cover C3 Inside the back cover C4 Back cover Page top Page 179 of 437 pages What Is C1 or C4 ...

Page 180: ...Printing on a DVD CD Printing Vivid Photos Reducing Photo Noise Cropping Photos Photo Print Printing Dates on Photos Photo Print Printing Multiple Photos on One Page Printing an Index Printing ID Photos ID Photo Print Printing Photo Information Saving Photos Opening Saved Files Page top Page 180 of 437 pages Photo Print Settings ...

Page 181: ...print using CD LabelPrint Follow the steps for other items to complete image selection in the Select Images screen Selecting a Photo Important Do not attach the CD R Tray until the message asking you to load the DVD CD is displayed Doing so can damage the printer 1 Select CD R for Paper Size in the Select Paper screen Set the Printer and Media Type according to the printer and DVD CD to be used No...

Page 182: ...om the top of the image displayed in Preview Note You can adjust the printing position on the DVD CD in the Adjust dialog box To display the Adjust dialog box click Adjust Print Area Print Position You can specify advanced Photo Print settings number of copies print quality etc in the Preferences dialog box To display the Preferences dialog box click Settings or select Preferences from the File me...

Page 183: ... in a photo before printing Important This function is available only with a printer that supports Vivid Photo This function is not available when Enable ICC Profile is selected on the Advanced tab of the Preferences dialog box Note Even if you select the Vivid Photo checkbox this effect applies only to the print result The original image or preview image will not be affected Page top Page 183 of ...

Page 184: ...Photo Noise Reduction checkbox in the Select Paper screen to reduce noise in the image and make the printed photos more vivid Important This function is not available when Enable ICC Profile is selected on the Advanced tab of the Preferences dialog box Note When the noise is severe change Normal to Strong The noise reduction effect applies only to the print result The original image or preview ima...

Page 185: ...out Print screen or double click the preview image Move the white frame to the portion to print and click OK Note To move the cropping area place the cursor within the white frame and drag it Drag the white lines to enlarge reduce the cropping area Select the The Rule of Thirds checkbox to display white broken lines To create a balanced composition drag any of the intersecting points white squares...

Page 186: ...The cropping effect applies only to the print result The original image will not be cropped See Help for details on the Crop window Page top Page 186 of 437 pages Cropping Photos Photo Print ...

Page 187: ...rint To print the date the photo was taken on the photo click Date Settings in the Layout Print screen then select the Print date checkbox in the Date Settings dialog box Note The date is displayed in the short date format mm dd yyyy etc specified in your operating system See Help for details on setting dates Page top Page 187 of 437 pages Printing Dates on Photos Photo Print ...

Page 188: ...etails on how to select photos Selecting a Photo The available number of photos and layout may vary depending on the media type Photos are arranged in the following order Example Borderless x4 You can change the printing order in Printing Order on the Print tab of the Preferences dialog box You can select the printing order from By Date By Name and By Selection To display the Preferences dialog bo...

Page 189: ...x print will be disabled if you select any of the following paper sizes Credit Card CD R You can print up to 80 images on one page Note See the following section for details on how to select photos Selecting a Photo Photos are arranged in the following order Example Index x20 You can change the printing order in Printing Order on the Print tab of the Preferences dialog box You can select the print...

Page 190: ...Page top Page 190 of 437 pages Printing an Index ...

Page 191: ...Select Paper screen and select a layout of the ID photo from the layouts in the Layout Print screen Note See the following section for details on how to select photos Selecting a Photo Photos are arranged in the following order Example ID Photo 3 5x4 5cm You can change the printing order in Printing Order on the Print tab of the Preferences dialog box You can select the printing order from By Date...

Page 192: ...Page top Page 192 of 437 pages Printing ID Photos ID Photo Print ...

Page 193: ... Exif information side by side To print them select Letter 8 5 x11 or A4 for Paper Size in the Select Paper screen and select Captured Info from the layouts in the Layout Print screen Note See the following section for details on how to select photos Selecting a Photo This function is available only on paper sizes Letter 8 5 x11 and A4 Page top Page 193 of 437 pages Printing Photo Information ...

Page 194: ...in the Layout Print screen When the Save As dialog box appears specify the save location and file name then click Save Important If you edit a saved file and save it again the file will be overwritten To save a file again with a new name or to a different location select Save As from the File menu and save Note Save will not be displayed in the Select Images or Select Paper screen Page top Page 19...

Page 195: ...hen using 64bit Edition of Windows Vista or Windows XP the contents of files cannot be displayed on Explorer 2 Select the file you want to open and click Open The Layout Print screen appears Note Easy PhotoPrint EX supports the following file format extension Easy PhotoPrint EX Photo Print file el6 3 Edit the file if necessary Note You can open files created with Easy PhotoPrint EX with the follow...

Page 196: ...You can also open a recently used file by clicking the file name shown in the File menu Page top Page 196 of 437 pages Opening Saved Files ...

Page 197: ...ing Background Adding Photos Swapping Positions of Photos Replacing Photos Changing Position Angle and Size of Photos Cropping Photos Framing Photos Printing Dates on Photos Attaching Comments to Photos Adding Text to Photos Saving Setting Holidays Setting Calendar Display Opening Saved Files Page top Page 197 of 437 pages Other Settings ...

Page 198: ...he subsequent pages to fill all the frames in the new layout If the number of layout frames is decreased Pages with the new layout will be added until all the images on the pages with the current layout can be fitted If you change the current layout for the front or back cover to one that has fewer layout frames any image that does not fit in the new layout will be deleted starting with the last i...

Page 199: ...he following will happen If the number of layout frames is increased Images will move from the subsequent pages to fill all the frames in the new layout If the number of layout frames is decreased Pages with the new layout will be added until all the images on the pages with the current layout can be fitted Note The layouts that can be selected may vary depending on the Paper Size and Orientation ...

Page 200: ...of in the Edit screen then click Change Background Note The screens for Album printing are used as examples in the following descriptions The screens may vary depending on what you create Select the type of background you want to use in the Change Background dialog box When Select from samples is Selected Select the image you want to use from Samples and click OK Note Select from samples will be d...

Page 201: ...nternet connection fees apply This function may not be available in some regions Exit Easy PhotoPrint EX before installing backgrounds When Single color is Selected Select the color you want to use from Standard color or Custom color and click OK When Image file is Selected Set Image File Path and Image Layout then click OK Page 201 of 437 pages Changing Background ...

Page 202: ...Note See Help for details on how to set the background in the Change Background dialog box Page top Page 202 of 437 pages Changing Background ...

Page 203: ...you want to add from the thumbnail window on the right Note Click an image to select it background turns blue or deselect it background turns white You can also select multiple images Select an option for Add to and click OK Important You can add up to 20 images at one time to a single page Up to 99 of the same images can be added to all pages combined You cannot add two or more of the same image ...

Page 204: ... images Click Swap Image Positions in the Edit screen Note The screens for Album printing are used as examples in the following descriptions The screens may vary depending on what you create Select the target and source images you want to swap then click Swap When you finish swapping all images you want to swap click Back to Edit Page top Page 204 of 437 pages Swapping Positions of Photos ...

Page 205: ...d click the Imported Images tab and select the image you want to replace with from the thumbnail window and click OK Important You cannot select multiple images in the Replace Image dialog box Note If you select multiple images in the Edit screen and use the replacement function all the images selected in the Edit screen will be replaced with the image selected in the Replace Image dialog box When...

Page 206: ...to change the position or size in the Edit screen and click Edit Image or double click the image Set the Center Position Rotation and Size then click OK Note You can also change the position and size of an image by dragging it in the Edit screen Select an image in the Edit screen then click Free Rotate and drag a corner of the image to rotate it See Help for details on the position and size of ima...

Page 207: ...necessary portions of the image by selecting the necessary portions Select the image you want to crop in the Edit screen and click Edit Image or double click the image Click the Crop tab in the Edit Image dialog box Drag the white squares on the image to change the area to be cropped and click OK Note See Help for details on cropping Page top Page 207 of 437 pages Cropping Photos ...

Page 208: ...tickers and Layout Print Select the image you want to frame in the Edit screen and click Edit Image or double click the image Click the Frame tab in the Edit Image dialog box Select the frame you want to use from Frames and click OK Important You cannot print dates on framed photos Note Select the Apply to all images in the page checkbox to add the same frame to all the images on a Page 208 of 437...

Page 209: ...ou can download additional materials for free Internet connection is required to access the website Internet connection fees apply This function may not be available in some regions Exit Easy PhotoPrint EX before installing frames Search frames will be displayed only if Album has been selected See Help for details on frames Page top Page 209 of 437 pages Framing Photos ...

Page 210: ...t screen and click Edit Image or double click the image Click the Date tab in the Edit Image dialog box Select the Show date checkbox Set the Text Orientation Position Font Size and Color then click OK Important You cannot print dates on framed images Note The date is displayed in the short date format mm dd yyyy etc specified in your operating system See Help for details on setting dates Page 210...

Page 211: ...Page top Page 211 of 437 pages Printing Dates on Photos ...

Page 212: ...m in your album The photo name shooting date and comments are displayed from top to bottom in a comment box Important You cannot attach comments to Photo Print Calendar Stickers and Layout Print Select the image you want to attach comments to in the Edit screen and click Edit Image or double click the image Click the Comments tab in the Edit Image dialog box Page 212 of 437 pages Attaching Comment...

Page 213: ...t the checkboxes of the items you want to display and enter comments Set the size and color of font and position of the comments etc then click OK Note See Help for details on comments Page top Page 213 of 437 pages Attaching Comments to Photos ...

Page 214: ...are used as examples in the following descriptions The screens may vary depending on what you create Select the Text tab in the Edit Text Box dialog box and enter text Note In the Edit Text Box dialog box you can change the position angle and size of the text You can also set the color and line of the text box See Help for details To change the entered text select it and click Edit Text Box The Ed...

Page 215: ...wing descriptions The screens may vary depending on what you create When the Save As dialog box appears specify the save location and file name then click Save Important If you edit a saved file and save it again the file will be overwritten To save a file again with a new name or to a different location select Save As from the File menu and save Note Save will not be displayed in the Page Setup o...

Page 216: ...r click Setup Period Holiday in the Edit screen and click Set Holidays in the Calendar General Settings dialog box to display the Holiday Settings dialog box To add a holiday click Add The Add Edit Holiday dialog box appears To edit a saved holiday select it and click Edit To delete a holiday select it and click Delete To delete all the saved holidays within your calendar period click Clear Page 2...

Page 217: ... in Holiday Name and specify the date Select the Set as Holiday checkbox to display that day as a holiday in your calendar Note See Help for details on each dialog box Page top Page 217 of 437 pages Setting Holidays ...

Page 218: ...ition size etc Click Settings in the Page Setup screen of Calendar or select a calendar in the Edit screen and click Setup Calendar to display the Calendar Settings dialog box Important The Position Size tab is displayed only when the Calendar Settings dialog box is displayed from the Edit screen Note See Help for details on the Calendar Settings dialog box Page top Page 218 of 437 pages Setting C...

Page 219: ...dows Vista or thumbnail view Important When using 64bit Edition of Windows Vista or Windows XP the contents of files cannot be displayed on Explorer 2 Select the file you want to open and click Open The Edit screen appears Note Easy PhotoPrint EX supports the following file formats extensions Easy PhotoPrint EX Album file el1 Easy PhotoPrint EX Stickers file el2 Easy PhotoPrint EX Calendar file el...

Page 220: ...u can open files created with Easy PhotoPrint EX with the following methods besides from Library in Menu Double click or click the file From the File menu click Open then select the file you want to edit You can also open a recently used file by clicking the file name shown in the File menu Page top Page 220 of 437 pages Opening Saved Files ...

Page 221: ...ith Other Application Software Printing with Other Application Software Various Printing Methods Changing the Print Quality and Correcting Image Data Overview of the Printer Driver Page top Page 221 of 437 pages Printing with Other Application Software ...

Page 222: ...the Stapling Margin Borderless Printing Fit to Page Printing Scaled Printing Page Layout Printing Poster Printing Booklet Printing Duplex Printing Stamp Background Printing Registering a Stamp Registering Image Data to be Used as a Background Printing an Envelope Switching the Paper Source to Match the Purpose Displaying the Print Results before Printing Setting Paper Dimensions Custom Size Page t...

Page 223: ...lues that were preset 3 Select the print quality Select High Standard or Fast that matches your purpose for Print Quality 4 Select the paper source Select Automatically Select Rear Tray Cassette Continuous Autofeed or Paper Allocation that matches your purpose for Paper Source Important The paper source settings that can be selected may differ depending on the paper type and size 5 Complete the se...

Page 224: ...Click Save to register the specified settings For instructions on registering settings see Registering a Frequently Used Printing Profile Page top Page 224 of 437 pages Printing with Easy Setup ...

Page 225: ...pecify them with the application the procedure for selecting a page size and orientation is as follows You can also set page size and Orientation on the Quick Setup tab 1 Open the printer driver setup window 2 Select the paper size Select a page size from the Page Size list on the Page Setup tab 3 Set Orientation Select Portrait or Landscape for Orientation Check Rotate 180 degrees check box when ...

Page 226: ... Quick Setup tab 1 Open the printer driver setup window 2 Specify the number of copies to be printed For Copies on the Page Setup tab specify the number of copies to be printed 3 Specify the print order Check the Print from Last Page check box when you want to print from the last page in order When you do this you do not need to sort pages into their correct order after printing 4 Set up collated ...

Page 227: ...e application and this printer driver the number of copies may be multiplied numbers of the two settings or the specified printing order may not be enabled Print from Last Page and Collate appear grayed out and are unavailable when Booklet is selected for Page Layout Print from Last Page appears grayed out and is unavailable when Poster is selected for Page Layout Note By setting both Print from L...

Page 228: ...er driver setup window 2 Specify the side to be stapled Check the position of the stapling margin from Staple Side on the Page Setup tab The printer analyzes the Orientation and Page Layout settings and automatically selects the best staple position When you want to change the setting select from the list 3 Set the margin width If necessary click Specify Margin and set the margin width and then cl...

Page 229: ...e and margin width Important Staple Side and Specify Margin appear grayed out and are unavailable when Borderless Poster or Booklet is selected for Page Layout Scaled is selected for Page Layout When Duplex Printing is also selected only Staple Side can be specified Page top Page 229 of 437 pages Setting the Stapling Margin ...

Page 230: ...ch as a photo without providing any margin around it select borderless printing The procedure for performing borderless printing is as follows You can also set borderless printing in Additional Features on the Quick Setup tab Setting Borderless Printing 1 Open the printer driver setup window 2 Set borderless printing Select Borderless from the Page Layout list on the Page Setup tab Click OK when t...

Page 231: ... top and bottom depending on the type of the media used When the ratio of the height to the width differs from the image data a portion of the image may not be printed depending on the size of the media used In this case crop the image data with an application software according to the paper size Note When Plain Paper is selected for Media Type on the Main tab borderless printing is not recommende...

Page 232: ...Page top Page 232 of 437 pages Borderless Printing ...

Page 233: ...Layout list on the Page Setup tab 3 Select the paper size for the data Using Page Size select the page size that is set with your application 4 Select the print paper size Select the size of the paper loaded in the printer from the Printer Paper Size list When the Printer Paper Size is smaller than the Page Size the page image will be reduced When the Printer Paper Size is larger than the Page Siz...

Page 234: ...5 Complete the setup Click OK When you execute print the document will be enlarged or reduced to fit to the page size Page top Page 234 of 437 pages Fit to Page Printing ...

Page 235: ...ting Select Scaled from the Page Layout list on the Page Setup tab 3 Select the paper size for the data Using Page Size select the page size that is set with your application 4 Set the scaling rate by using one of the following methods Select a Printer Paper Size When the printer paper size is smaller than the Page Size the page image will be reduced When the printer paper size is larger than the ...

Page 236: ...will be printed with the specified scale Important When the application software with which you created the original has the scaled printing function configure the settings on your application software You do not need to configure the same setting in the printer driver When Scaled is selected the Staple Side list box appears grayed out and is unavailable when Duplex Printing is not selected Note P...

Page 237: ...Selecting Scaled changes the printable area of the document Page top Page 237 of 437 pages Scaled Printing ...

Page 238: ...g Select Page Layout from the Page Layout list on the Page Setup tab The current settings are displayed in the settings preview on the left side of the printer driver 3 Select the print paper size Select the size of the paper loaded in the printer from the Printer Paper Size list Setting the layout of two pages of the document from left to right is complete 4 Set the number of pages to be printed ...

Page 239: ...er To change the page arrangement order select an icon from the list to change the page placement order Page Border To print a page border around each document page check this check box 5 Complete the setup Click OK on the Page Setup tab When you execute print the specified number of pages will be arranged on each sheet of paper in the specified order Page top Page 239 of 437 pages Page Layout Pri...

Page 240: ...arge print like a poster The procedure for performing poster printing is as follows Setting Poster Printing 1 Open the printer driver setup window 2 Set poster printing Select Poster from the Page Layout list on the Page Setup tab The current settings are displayed in the settings preview on the left side of the printer driver 3 Select the print paper size Select the size of the paper loaded in th...

Page 241: ...he page number you want to print To print multiple pages specify by separating the pages with commas or entering a hyphen between the page numbers Note You can also specify the print range by clicking the pages in the settings preview 5 Complete the setup Click OK on the Page Setup tab When you execute print the document will be divided into several pages during printing After all poster pages hav...

Page 242: ...ting the page selection click OK When you execute print only specified pages will be printed Important When Poster is selected the Duplex Printing Staple Side and Print from Last Page appear grayed out and are unavailable Since poster printing enlarges the document when printing it the print results may become coarse Page top Page 242 of 437 pages Poster Printing ...

Page 243: ...the center The procedure for performing booklet printing is as follows 1 Open the printer driver setup window 2 Set booklet printing Select Booklet from the Page Layout list on the Page Setup tab The current settings are displayed in the settings preview on the left side of the window 3 Select the print paper size Select the size of the paper loaded in the printer from the Printer Paper Size list ...

Page 244: ...Setup tab When you execute print the document is automatically printed first on one side of a sheet of paper and then on the opposite side When the printing is complete fold the paper at the center of the margin and make a booklet Important Booklet cannot be selected when a media type other than Plain Paper Hagaki A or Hagaki is selected for Media Type When Booklet is selected Duplex Printing Stap...

Page 245: ...ut having to turn over the paper 1 Open the printer driver setup window 2 Set automatic duplex printing Check the Duplex Printing check box on the Page Setup tab and confirm that Automatic is checked 3 Select the layout Select Normal size or Fit to Page Scaled or Page Layout from the Page Layout list 4 Set the print area When you perform duplex printing the print area of the document becomes sligh...

Page 246: ...ue from the list 6 Set the margin width If necessary click Specify Margin and set the margin width and then click OK 7 Complete the setup Click OK on the Page Setup tab When you execute print duplex printing will be started Performing Duplex Printing Manually You can perform the duplex printing manually 1 Open the printer driver setup window 2 Set duplex printing Check the Duplex Printing check bo...

Page 247: ... selected from the Page Layout list When Booklet is selected from the Page Layout list Duplex Printing and Staple Side appear grayed out and are unavailable After printing the front page there is an ink drying wait time before starting to print the back page Operation stops temporarily Do not touch the paper during the time You can change the ink drying wait time at Custom Settings on the Maintena...

Page 248: ...date time and user name The Background function allows you to print a light illustration behind the document data The procedure for performing stamp background printing is as follows Printing a Stamp CONFIDENTIAL IMPORTANT and other stamps that are used often in companies are pre registered 1 Open the printer driver setup window 2 Click Stamp Background on the Page Setup tab The Stamp Background d...

Page 249: ...ground Two bitmap files are pre registered as samples 1 Open the printer driver setup window 2 Click Stamp Background on the Page Setup tab The Stamp Background dialog box opens 3 Select the background Check the Background check box and select a desired background from the list The current settings are displayed in the settings preview on the left side of the Page Setup tab 4 Set the background de...

Page 250: ...function of booklet printing Related Topics Registering a Stamp Registering Image Data to be Used as a Background Page top Page 250 of 437 pages Stamp Background Printing ...

Page 251: ...ate and register a new stamp You can also change and register some of the settings of an existing stamp Unnecessary stamps can be deleted at any time The procedure for registering a new stamp is as follows Registering a New Stamp 1 Open the printer driver setup window 2 Click Stamp Background on the Page Setup tab The Stamp Background dialog box opens 3 Click Define Stamp The Stamp Settings dialog...

Page 252: ... Text appears grayed out and is unavailable when Date Time User Name is selected Placement tab Select the stamp position from the Position list You can also select Custom from the Position list and specify coordinates for X Position and Y Position You can also change the stamp position by dragging the stamp in the preview window To change the stamp position angle type a value in the Orientation bo...

Page 253: ...the setup Click OK The Stamp Background dialog box opens again The registered title appears in the Stamp list Deleting an Unnecessary Stamp 1 Click Define Stamp in the Stamp Background dialog box The Stamp Settings dialog box opens 2 Select the stamp to be deleted Select the title of the stamp you want to delete from the Stamps list on the Save settings tab Then click Delete Click OK when the conf...

Page 254: ... register it as a new background You can also change and register some of the settings of an existing background An unnecessary background can be deleted at any time The procedure for registering image data to be used as a background is as follows Registering New Background 1 Open the printer driver setup window 2 Click Stamp Background on the Page Setup tab The Stamp Background dialog box opens 3...

Page 255: ...Save settings tab and enter a title in the Title box and then click Save Click OK when the confirmation message appears 7 Complete the setup Click OK The Stamp Background dialog box opens again The registered title appears in the Background list Changing and Registering Some Background Settings 1 Select the background for which the settings are to be changed Check the Background check box in the S...

Page 256: ...log box The Background Settings dialog box opens 2 Select the background to be deleted Select the title of the background you want to delete from the Backgrounds list on the Save settings tab and then click Delete Click OK when the confirmation message appears 3 Complete the setup Click OK The Stamp Background dialog box opens again Page top Page 256 of 437 pages Registering Image Data to be Used ...

Page 257: ...lows 1 Load an envelope into the printer Fold down the envelope flap Orient the envelope so that the flap is on the left and the folded surface is facing down and load in the rear tray 2 Open the printer driver setup window 3 Select the media type Select Envelope from Commonly Used Settings on the Quick Setup tab 4 Select the paper size Select Comm Env 10 DL Env Youkei 4 105x235mm or Youkei 6 98x1...

Page 258: ...on the envelope Important When you execute envelope printing guide messages are displayed To hide the guide messages check the Do not show this message again check box To show the guide again click the View Printer Status button on the Maintenance tab and start the Canon IJ Status Monitor Then click Envelope Printing from Display Guide Message of the Option menu and change the setting to on Page t...

Page 259: ...hes your purpose Automatically Select Plain paper whose Page Size is Letter 8 5 x11 A5 A4 or B5 is fed from the cassette Other sizes of plain paper and paper types other than plain paper are fed from the rear tray Rear Tray Paper is always fed from the rear tray Cassette Paper is always fed from the cassette Important Plain paper that is not Letter 8 5 x11 A5 A4 or B5 and paper types other than pl...

Page 260: ...location setting the printer automatically feeds paper from the cassette If not the printer feeds paper from the rear tray To change the paper allocation settings click Paper Allocation specify the Paper Size to be loaded in the cassette and then click OK When you load frequently used plain paper in the cassette the printer feeds paper from the rear tray when the print data uses a different type o...

Page 261: ... for displaying the print result before printing is as follows You can also set the print results display on the Quick Setup tab 1 Open the printer driver setup window 2 Set the preview Check the Preview before printing check box on the Main tab 3 Complete the setup Click OK The Canon IJ Preview will start and the print result will be displayed before printing Related Topic Canon IJ Preview Page t...

Page 262: ...up tab 1 Set the custom size in the application software On your application s paper size feature specify the custom size Important When the application software that created the document has a function for specifying the height and width values use the application software to set the values When the application software does not have such a function or if the document does not print correctly use...

Page 263: ... the Width and Height of the paper to be used Then click OK 5 Complete the setup Click OK on the Page Setup tab When you execute print the data is printed with the specified paper size Page top Page 263 of 437 pages Setting Paper Dimensions Custom Size ...

Page 264: ...pecifying Color Correction Optimal Photo Printing of Image Data Adjusting Colors with the Printer Driver Printing with ICC Profiles Adjusting Color Balance Adjusting Brightness Adjusting Intensity Adjusting Contrast Simulating an Illustration Representing Image Data with a Single Color Presenting Image Data with Vivid Colors Smoothing Jagged Outlines Changing Color Properties to Improve Coloration...

Page 265: ...ftoning Method You can individually set the combined representation method for the print quality level and the halftoning method The procedure for setting the print quality level and the halftoning method is as follows 1 Open the printer driver setup window 2 Select the print quality Select Custom for Print Quality on the Main tab and click Set The Custom dialog box opens Page 265 of 437 pages Sel...

Page 266: ...ect Auto the data is printed with the optimal halftoning method for the selected print quality 4 Complete the setup Click OK on the Main tab When you execute print the data is printed with the specified quality level and halftoning method Important Certain print quality levels and halftoning methods cannot be selected depending on the settings of Media Type Note When the part of the object is not ...

Page 267: ...grayscale printing Check the Grayscale Printing check box on the Main tab 3 Complete the setup Click OK When you execute print the document is converted to grayscale data It allows you to print the color document in monochrome Important When the Grayscale Printing check box is checked the printer driver processes image data as sRGB data In this case actual colors printed may differ from those in t...

Page 268: ...During Grayscale Printing color inks may be used as well as black ink Page top Page 268 of 437 pages Printing a Color Document in Monochrome ...

Page 269: ... image data effectively select ICM When you want to use an application software to specify a printing ICC profile select None The procedure for specifying color correction is as follows You can also set color correction on the Quick Setup tab by choosing Photo Printing under Commonly Used Settings and then choosing Color Intensity Manual Adjustment under Additional Features 1 Open the printer driv...

Page 270: ...l Canon paper in an application software to print data 4 Complete the setup Click OK on the Main tab When you execute print the data is printed with the specified color correction method Important When ICM is disabled in the application software ICM is unavailable for Color Correction and the printer may not be able to print the image data properly When the Grayscale Printing check box on the Main...

Page 271: ...thod depends on the color space Adobe RGB or sRGB of the image data or the application software to be used There are two typical printing methods Check the color space Adobe RGB or sRGB of the image data and the application software to be used and then select the printing method suited to your purpose Adjusting Colors with the Printer Driver Describes the procedure for printing sRGB data by using ...

Page 272: ...ify them use a printing ICC profile in the application software and select settings for color management The procedure for adjusting colors with the printer driver is as follows 1 Open the printer driver setup window 2 Select the media type Select the type of paper loaded in the printer from the Media Type list on the Main tab 3 Select the print quality Select High Standard or Fast that matches yo...

Page 273: ...te the setup Click OK on the Main tab When you execute print the printer driver adjusts the colors when printing the data Related Topics Selecting a Combination of the Print Quality Level and a Halftoning Method Specifying Color Correction Adjusting Color Balance Adjusting Brightness Adjusting Intensity Adjusting Contrast Page top Page 273 of 437 pages Adjusting Colors with the Printer Driver ...

Page 274: ...he input ICC profile specified in the image data To use this printing method use your application software to select color management items and specify an input ICC profile and a printing ICC profile in the image data Even if you print using a printing ICC profile that you created yourself or one for special Canon paper from your application software be sure to select color management items from y...

Page 275: ...y an ICC Profile with the Printer Driver and then Print Print from a program that cannot identity input ICC profiles or does allow you to specify one by specifying input ICC profiles from printer profiles of the printer driver When printing Adobe RGB data you can print the data with the Adobe RGB color space even if the application software does not support Adobe RGB 1 Open the printer driver setu...

Page 276: ...y and click Set Manual Color Adjustment dialog box opens 5 Select color correction Click Matching tab and select ICM for Color Correction 6 Select the input profile Select an Input Profile that matches the color space of the image data For sRGB data or data without an input ICC profile Select Standard For Adobe RGB data Page 276 of 437 pages Printing with ICC Profiles ...

Page 277: ...ssary click Color Adjustment tab and adjust the color balance of Cyan Magenta Yellow and adjust Brightness Intensity and Contrast settings and then click OK 8 Complete the setup Click OK on the Main tab When you execute print the data is printed with the color space of the selected image data Related Topics Selecting a Combination of the Print Quality Level and a Halftoning Method Specifying Color...

Page 278: ... intensify cyan and to diminish yellow so that the overall colors are more uniform No adjustment Adjust Color Balance The procedure for adjusting color balance is as follows You can also set color balance on the Quick Setup tab by choosing Photo Printing under Commonly Used Settings and then choosing Color Intensity Manual Adjustment under Additional Features 1 Open the printer driver setup window...

Page 279: ...tup Click OK on the Main tab When you execute print the document is printed with the adjusted color balance Important When the Grayscale Printing check box on the Main tab is checked Cyan Magenta and Yellow appear grayed out and are unavailable Related Topics Selecting a Combination of the Print Quality Level and a Halftoning Method Specifying Color Correction Adjusting Brightness Adjusting Intens...

Page 280: ...specification is changed Light is selected Normal is selected Dark is selected The procedure for adjusting brightness is as follows You can also set brightness on the Quick Setup tab by choosing Photo Printing under Commonly Used Settings and then choosing Color Intensity Manual Adjustment under Additional Features 1 Open the printer driver setup window 2 Select the manual color adjustment On the ...

Page 281: ...ata is printed at the specified brightness Related Topics Selecting a Combination of the Print Quality Level and a Halftoning Method Specifying Color Correction Adjusting Color Balance Adjusting Intensity Adjusting Contrast Page top Page 281 of 437 pages Adjusting Brightness ...

Page 282: ...or adjusting intensity is as follows You can also set intensity on the Quick Setup tab by choosing Photo Printing under Commonly Used Settings and then choosing Color Intensity Manual Adjustment under Additional Features 1 Open the printer driver setup window 2 Select the manual color adjustment Select Manual for Color Intensity on the Main tab and click Set The Manual Color Adjustment dialog box ...

Page 283: ...cute print the image data is printed with the adjusted intensity Related Topics Selecting a Combination of the Print Quality Level and a Halftoning Method Specifying Color Correction Adjusting Color Balance Adjusting Brightness Adjusting Contrast Page top Page 283 of 437 pages Adjusting Intensity ...

Page 284: ...dure for adjusting contrast is as follows You can also set contrast on the Quick Setup tab by choosing Photo Printing under Commonly Used Settings and then choosing Color Intensity Manual Adjustment under Additional Features 1 Open the printer driver setup window 2 Select the manual color adjustment On the Main tab select Manual for Color Intensity and click Set The Manual Color Adjustment dialog ...

Page 285: ...execute print the image is printed with the adjusted contrast Related Topics Selecting a Combination of the Print Quality Level and a Halftoning Method Specifying Color Correction Adjusting Color Balance Adjusting Brightness Adjusting Intensity Page top Page 285 of 437 pages Adjusting Contrast ...

Page 286: ...rocedure for performing Simulate Illustration is as follows 1 Open the printer driver setup window 2 Set the Simulate Illustration If necessary check the Simulate Illustration check box on the Effects tab and adjust the Contrast Moving the slider to the right lightens the image data and moving the slider to the left darkens the image data The current settings are displayed in the settings preview ...

Page 287: ... follows 1 Open the printer driver setup window 2 Set Monochrome Effects Check the Monochrome Effects check box on the Effects tab and select your desired color When you use Select Color move the Color slider to specify the color you want The current settings are displayed in the settings preview on the left side of the printer driver 3 Complete the setup Click OK When you execute print the image ...

Page 288: ...grayed out and is unavailable Page top Page 288 of 437 pages Representing Image Data with a Single Color ...

Page 289: ... the human skin color natural By using this function you can make vivid hues appear even more vivid The procedure for performing Vivid Photo is as follows You can also set vivid photos on the Quick Setup tab by choosing Photo Printing under Commonly Used Settings and then choosing Additional Features 1 Open the printer driver setup window 2 Set Vivid Photo Check the Vivid Photo check box on the Ef...

Page 290: ... printing low resolution images from Web pages The procedure for performing Image Optimizer is as follows 1 Open the printer driver setup window 2 Set image optimizer Check the Image Optimizer check box on the Effects tab 3 Complete the setup Click OK The photos and graphics will be printed with jagged outlines smoothed Note Depending on application software or resolution of image data the image o...

Page 291: ...Page top Page 291 of 437 pages Smoothing Jagged Outlines ...

Page 292: ...O is as follows 1 Open the printer driver setup window 2 Set Photo Optimizer PRO Check the Photo Optimizer PRO check box on the Effects tab Normally there is no need to check the Apply Throughout Page check box Images within each page are optimized on an image by image basis Note Check the Apply Throughout Page check box when printing image data that has been processed such as being cropped or rot...

Page 293: ...box on the Page Setup tab Define Stamp is selected in the Stamp Background dialog box on the Page Setup tab and the bitmapped stamp is configured Note Depending on images the Photo Optimizer PRO may have no discernible effect Page top Page 293 of 437 pages Changing Color Properties to Improve Coloration ...

Page 294: ...ure for performing Photo Noise Reduction is as follows 1 Open the printer driver setup window 2 Set Photo Noise Reduction Check the Photo Noise Reduction check box on the Effects tab and select Normal or Strong for the level 3 Complete the setup Click OK When you execute print the image will be printed with the digital camera noise being reduced Note It is recommended to select Normal for most cas...

Page 295: ...r resolution of image data effects of digital camera noise reduction may not be obvious When this function is used for other than photos taken by digital cameras image may be distorted Page top Page 295 of 437 pages Reducing Photo Noise ...

Page 296: ...are Overview of the Printer Driver Overview of the Printer Driver Printer Driver Operations Canon IJ Printer Driver How to Open the Printer Driver Setup Window Maintenance Tab Canon IJ Status Monitor Canon IJ Preview Page top Page 296 of 437 pages Overview of the Printer Driver ...

Page 297: ... Representing Image Data with a Single Color Presenting Image Data with Vivid Colors Smoothing Jagged Outlines Changing Color Properties to Improve Coloration Reducing Photo Noise Changing Printer Settings from Your Computer Changing the Print Options Registering a Frequently Used Printing Profile Setting the Paper Source for Plain Paper Managing the Printer Power Reducing the Printer Noise Changi...

Page 298: ... Driver Help You can display the Help describing the driver setting items through the printing preferences screen of the Canon IJ printer driver To view all descriptions of a tab Click the Help button on each tab A dialog box opens displaying a description of each item on the tab You can also click the link found in the description of an item to display a description of the linked dialog box To se...

Page 299: ...ary and there may be more steps For details refer to the user s manual of your application software Open the Printer Driver Setup Window through the Start Menu Follow the procedure below to perform maintenance operations such as print head cleaning or to configure printing profile that are common for all application software 1 Select items from the Start menu as shown below In Windows Vista select...

Page 300: ...printer maintenance or change the settings of the printer Features Cleaning the Print Heads Cleaning the Paper Feed Rollers Aligning the Print Head Position Checking the Print Head Nozzles Setting the Paper Source for Plain Paper Cleaning Inside the Printer Managing the Printer Power Related Features Reducing the Printer Noise Changing the Printer Operation Mode Page top Page 300 of 437 pages Main...

Page 301: ...ches automatically when data is sent to the printer When launched the Canon IJ Status Monitor appears as a button on the task bar Click the status monitor button displayed on the task bar The Canon IJ Status Monitor appears Note To open the Canon IJ Status Monitor when the printer is not printing open the printer driver setup window and click View Printer Status on the Maintenance tab When Errors ...

Page 302: ...et within the printer driver and allows you to check the document layout print order and number of pages You can also change the media type and paper source settings When you want to display a preview before printing open the printer driver setup window click the Quick Setup tab or the Main tab and check the Preview before printing check box When you do not want to display a preview before printin...

Page 303: ...Advanced Guide Printing on DVD CDs Printing on DVD CDs Printing on the Label Side of DVD CDs Troubleshooting Page top Page 303 of 437 pages Printing on DVD CDs ...

Page 304: ...g on the Label Side of DVD CDs Items to Prepare Cautions When Printing on DVD CDs Attaching Removing the CD R Tray Printing on the Label Side of DVD CDs Printing with CD LabelPrint from the Computer Printing Area Page top Page 304 of 437 pages Printing on the Label Side of DVD CDs ...

Page 305: ...de 8 cm CD R Adapter Needed only when printing on 8 cm DVD CDs Attached to the CD R Tray when shipped Printable DVD CDs Obtain a 12 cm or 8 cm DVD CD with a label surface compatible with inkjet printing A printable disc differs from regular DVD CDs in that its label surface has been specially processed to be printed on by an inkjet printer Page top Page 305 of 437 pages Items to Prepare ...

Page 306: ... the ink has dried Do not attach the CD R Tray while the printer is in operation Do not remove the CD R Tray while printing on DVD CDs Doing so may damage the printer the CD R Tray or the disc Do not get dirt or scratches on the reflectors of the CD R Tray The printer may not be able to recognize loading of the DVD CD or printing may become misaligned If the reflectors on the CD R Tray become dirt...

Page 307: ...ng you to load the DVD CD is displayed then open the Inner Cover B 3 Place the DVD CD on the CD R Tray Important Make sure that there is no dirt on the CD R Tray before placing a DVD CD on the CD R Tray When placing a DVD CD on the CD R Tray do not touch the printing surface of the disc or the reflectors C on the CD R Tray 12 cm DVD CD 1 Place the disc on the CD R Tray with the printable surface f...

Page 308: ...nstructions to attach the CD R Tray 5 Insert the CD R Tray straight until the arrow on the Inner Cover is almost aligned with the arrow on the CD R Tray D Keep the CD R Tray level when inserting it E Align the arrow on the CD R Tray with the arrow on the Inner Cover Important Do not insert the CD R Tray beyond the arrow on the Inner Cover Removing the CD R Tray 1 Pull out the CD R Tray Page 308 of...

Page 309: ...Do not touch the printing surface when removing the disc from the CD R Tray Note Dry the printing surface sufficiently before removing the disc If you see printing on the CD R Tray or the transparent parts on inner or outer diameter of DVD CD wipe them off after the printing surface has dried 12 cm DVD CD 1 Remove the disc from the CD R Tray 8 cm DVD CD Page 309 of 437 pages Attaching Removing the...

Page 310: ... from the CD R Tray 2 Remove the 8 cm disc from the CD R Tray Important The CD R Tray cannot be used if it becomes warped Be sure to keep the CD R Tray on a flat place Page top Page 310 of 437 pages Attaching Removing the CD R Tray ...

Page 311: ...ws the printing of images on printable DVD CDs CD LabelPrint is bundled application software that allows you to edit and modify data before printing Install it on your computer to use it Printing with CD LabelPrint from the Computer Note We recommend that you test print on an unneeded printable DVD CD first Page top Page 311 of 437 pages Printing on the Label Side of DVD CDs ...

Page 312: ...sert the Setup CD ROM into the computer s disc drive then perform Custom Install and select CD LabelPrint For details on how to print with CD LabelPrint refer to its manual If you are using a Windows computer click Start All Programs or Programs in Windows 2000 CD LabelPrint Manual If you are using a Macintosh open the Applications folder in the location where the MP Drivers have been installed CD...

Page 313: ...f DVD CDs Printing Area Printing Area Printable DVD CDs The printing area of both printable DVDs and CDs is the area excluding the 1 mm area from the internal and external diameters of the label Recommended printing area Page top Page 313 of 437 pages Printing Area ...

Page 314: ...Advanced Guide Printing on DVD CDs Troubleshooting Troubleshooting Message Appears on the Computer Screen Cannot Print on DVD CDs Page top Page 314 of 437 pages Troubleshooting ...

Page 315: ...k 3 Unrecognizable DVD CD may be placed Canon recommends that you use DVD CDs specially processed to be printed on by an inkjet printer Check 4 Is the DVD CD on the CD R Tray already printed If you place a DVD CD on which has already been printed on the CD R Tray the CD R Tray may be ejected In this case change the settings of the printer driver and try printing again Clear the Detects a printable...

Page 316: ...the DVD CD on the CD R Tray already printed If you place a DVD CD on which has already been printed on the CD R Tray the CD R Tray may be ejected In this case change the settings of the printer driver and try printing again Clear the Detects a printable disc in the CD R tray check box in Custom Settings on the Canon IJ Printer Utility dialog box then click Send When printing is over select the Det...

Page 317: ...ting is in progress the printer stops initializing If you press the RESUME CANCEL button the printer resumes initializing Try the operation again following the on screen instructions CD R Tray Does Not Feed Properly Check 1 Is the CD R Tray placed properly Properly place the CD R Tray again then press the RESUME CANCEL button Make sure that you are using the CD R Tray supplied with the printer G i...

Page 318: ...CD loaded Selecting the check box prevents the CD R Tray from getting dirty CD R Tray Jammed Pull out the CD R Tray gently If the CD R Tray cannot be pulled out turn the printer off then turn the printer back on again The CD R Tray will automatically be ejected When the CD R Tray is pulled out place the CD R Tray G is on the upper side again then retry printing Place the DVD CD properly Attaching ...

Page 319: ...raphs Directly from a Compliant Device Printing Photographs Directly from a Compliant Device Printing Photographs Directly from a Compliant Device Page top Page 319 of 437 pages Printing Photographs Directly from a Compliant Device ...

Page 320: ...ting Photographs Directly from a Compliant Device Printing Photographs Directly from a Compliant Device Printing Photographs Directly from a Compliant Device About PictBridge Print Settings Page top Page 320 of 437 pages Printing Photographs Directly from a Compliant Device ...

Page 321: ...a print mode compliant with PictBridge before connecting the device You may also have to turn on the device or select Play mode manually after connecting the device to the printer Perform necessary operations on the PictBridge compliant device before connecting it to this printer according to instructions given in the device s instruction manual 1 Make sure that the printer is turned on 2 Load pap...

Page 322: ...idge Compliant Device 6 Start printing from your PictBridge compliant device Important Never disconnect the USB cable during printing unless when explicitly allowed to by the PictBridge compliant device When disconnecting the USB cable between the PictBridge compliant device and printer follow the instructions given in the device s instruction manual Page top Page 322 of 437 pages Printing Photogr...

Page 323: ...Photo Paper Plus Glossy II PP 201 Glossy Photo Paper Everyday Use GP 501 Photo Paper Glossy GP 502 Photo Paper Plus Semi gloss SG 201 Photo Stickers When printing on sticker paper select 10 x 15 cm 4 x 6 in Paper size Do not set Layout to Borderless Fast Photo Photo Paper Pro II PR 201 Plain A4 Letter When Paper type is set to Plain borderless printing will be disabled even when Layout is set to B...

Page 324: ...Page top Page 324 of 437 pages About PictBridge Print Settings ...

Page 325: ...Advanced Guide Maintenance Maintenance Cleaning Your Printer Performing Maintenance from a Computer Page top Page 325 of 437 pages Maintenance ...

Page 326: ...ed Guide Maintenance Cleaning Your Printer Cleaning Your Printer Cleaning Cleaning the Exterior of the Printer Cleaning the Protrusions Inside the Printer Page top Page 326 of 437 pages Cleaning Your Printer ...

Page 327: ...h the surface Paper tissue powder or fine threads may remain inside the printer and cause problems such as print head blockage and poor printing results Be sure to use a soft cloth Never use volatile liquids such as thinners benzene acetone or any other chemical cleaner to clean the printer as this may cause a malfunction or damage the printer s surface Cleaning the Exterior of the Printer Cleanin...

Page 328: ...oth and wipe off dirt on the surface gently Smooth out wrinkles on the cloth if necessary before cleaning Important Be sure to turn off the power and disconnect the power plug before cleaning the printer Do not use tissue paper paper towels rough textured cloth or similar materials as this may scratch the surface Page top Page 328 of 437 pages Cleaning the Exterior of the Printer ...

Page 329: ...sions Inside the Printer If protrusions inside the printer are stained wipe off any ink from the protrusions using a cotton swab or the like Important Be sure to turn off the power and disconnect the power plug before cleaning the printer Page top Page 329 of 437 pages Cleaning the Protrusions Inside the Printer ...

Page 330: ...g Maintenance from a Computer Cleaning the Print Heads Cleaning the Paper Feed Rollers Aligning the Print Head Position Manual Print Head Alignment Checking the Print Head Nozzles Cleaning Inside the Printer Page top Page 330 of 437 pages Performing Maintenance from a Computer ...

Page 331: ... Check dialog box opens after the confirmation message 5 Check the results To check whether the print quality has improved click Print Check Pattern To cancel the check process click Cancel If cleaning the head once does not resolve the print head problem clean it once more Deep Cleaning Deep Cleaning is more thorough than cleaning Perform deep cleaning when two Cleaning attempts do not resolve th...

Page 332: ...ete your printer s ink supply Consequently perform cleaning only when necessary Note If there is no sign of improvement after Deep Cleaning switch off the printer wait 24 hours and then perform Deep Cleaning again If there is still no sign of improvement the ink may have run out or the print head may be worn For details on the remedial action to be taken see Printer Moves But Ink Is Not Ejected Re...

Page 333: ...not be properly fed 2 Open the printer driver setup window 3 Click Roller Cleaning on the Maintenance tab The Roller Cleaning dialog box opens 4 Select Rear Tray or Cassette and click OK The confirmation message appears 5 Execute paper feed roller cleaning Make sure that the printer is on and click OK Paper feed roller cleaning starts 6 Complete paper feed roller cleaning After the rollers have st...

Page 334: ...e Maintenance tab and then check the Align heads manually check box The procedure for performing print head alignment is as follows Print Head Alignment 1 Open the printer driver setup window 2 Click Print Head Alignment on the Maintenance tab The Start Print Head Alignment dialog box opens 3 Load paper in the printer Load a sheet of A4 size or Letter size Matte Photo Paper MP 101 into the rear tr...

Page 335: ...t Tray Extension 4 Print the pattern 1 Open the printer properties dialog box Open the Printer Properties Dialog Box through the Start Menu 2 Click the Maintenance tab then Custom Settings 3 Select the Align heads manually check box then click Send 4 Confirm the displayed message and click OK 5 In the Maintenance sheet click Print Head Alignment 6 Confirm the displayed message and click Align Prin...

Page 336: ...ck OK For column F and G pick the setting that produces the least noticeable horizontal streaks Note If it is difficult to pick the best pattern pick the setting that produces the least noticeable horizontal white streaks C Less noticeable horizontal white streaks D More noticeable horizontal white streaks 3 Confirm the displayed message and click OK The second pattern is printed Important Do not ...

Page 337: ...tical white streaks F More noticeable vertical white streaks 2 Repeat the procedure until you finish inputting the pattern number for column Q then click OK 3 Confirm the displayed message and click OK The third pattern is printed Important Do not open the Top Cover while printing is in progress 7 Look at the third printout and adjust the print head position 1 Check the printed patterns and select...

Page 338: ...and click OK 1 Make sure that the printer is turned on 2 Load three sheets of A4 or Letter sized plain paper in the Cassette 3 Open the Paper Output Tray and extend the Output Tray Extension 4 Print the pattern 1 Open the Canon IJ Printer Utility dialog box Opening the Canon IJ Printer Utility Macintosh 2 Select Custom Settings in the pop up menu 3 Select the Align heads manually check box then cl...

Page 339: ...r of the pattern in column A that has the least noticeable vertical streaks Note If it is difficult to pick the best pattern pick the setting that produces the least noticeable vertical white streaks A Less noticeable vertical white streaks B More noticeable vertical white streaks 2 Repeat the procedure until you finish inputting the pattern number for column G then click Send For column F and G p...

Page 340: ...ess 6 Look at the second printout and adjust the print head position 1 Check the printed patterns and select the number of the pattern in column H that has the least noticeable vertical streaks Note If it is difficult to pick the best pattern pick the setting that produces the least noticeable vertical white streaks E Less noticeable vertical white streaks F More noticeable vertical white streaks ...

Page 341: ...ion 1 Check the printed patterns and select the number of the pattern in column a that has the least noticeable horizontal streaks Note If it is difficult to pick the best pattern pick the setting that produces the least noticeable horizontal white streaks G Less noticeable horizontal white streaks H More noticeable horizontal white streaks 2 Repeat the procedure until you finish inputting the pat...

Page 342: ... opens To display a list of items that you should check before printing the check pattern click Initial Check Items 3 Load paper in the printer Load a sheet of A4 size or Letter size plain paper into the cassette 4 Print a nozzle check pattern Make sure that the printer is on and click Print Check Pattern The nozzle check pattern is printed Click OK when the confirmation message appears The Patter...

Page 343: ...ing is as follows Bottom Plate Cleaning 1 Open the printer driver setup window 2 Click Bottom Plate Cleaning on the Maintenance tab The Bottom Plate Cleaning dialog box opens 3 Load paper in the printer As instructed in the dialog box fold the A4 size or Letter size plain paper in half horizontally and then unfold the sheet Load the paper into the rear tray in the portrait orientation with the cre...

Page 344: ...Advanced Guide Changing the Printer Settings Changing the Printer Settings Changing Printer Settings from Your Computer Page top Page 344 of 437 pages Changing the Printer Settings ...

Page 345: ...Settings from Your Computer Changing the Print Options Registering a Frequently Used Printing Profile Setting the Paper Source for Plain Paper Managing the Printer Power Reducing the Printer Noise Changing the Printer Operation Mode Page top Page 345 of 437 pages Changing Printer Settings from Your Computer ...

Page 346: ... the image data is cut off the paper source during printing differs from the driver settings or printing fails The procedure for changing the print options is as follows 1 Open the printer driver setup window 2 Click Print Options on the Page Setup tab The Print Options dialog box opens 3 Change the individual settings If necessary change the setting of each item and then click OK The Page Setup t...

Page 347: ... 1 Open the printer driver setup window 2 Set the necessary items From Commonly Used Settings on the Quick Setup tab select the printing profile to be used and if necessary change the settings after Additional Features You can also set necessary items on the Main Page Setup and Effects tab 3 Click Save The Save Commonly Used Settings dialog box opens 4 Save the settings Set Name then click OK If n...

Page 348: ... is deleted register the print settings again Deleting Unnecessary Printing Profile 1 Select the printing profile to be deleted Select the printing profile you want to delete from the Commonly Used Settings list on the Quick Setup tab 2 Delete the printing profile Click Delete When the confirmation message appears click OK The selected printing profile is deleted from the Commonly Used Settings li...

Page 349: ... Paper 1 Open the printer driver setup window 2 Click Paper Source Setting for Plain Paper on the Maintenance tab The Paper Source Setting for Plain Paper dialog box opens 3 Transmit the settings Select the paper source for plain paper and then click the Send button The selected settings are enabled hereafter Important The descriptions in the printer manual assume that the plain paper is supplied ...

Page 350: ...rns on the printer upon reception of print data 1 Open the printer driver setup window 2 Make sure that the printer is on and then click Auto Power on the Maintenance tab The Auto Power Settings dialog box opens Note If the printer is off or bi directional communication is disabled a message may appear because the computer cannot collect the printer status If this happens click OK to display the m...

Page 351: ...monitor message varies depending on the Auto Power On setting When Auto Power On is enabled Printer is standing by is displayed When Auto Power On is disabled Printer is offline is displayed Page top Page 351 of 437 pages Managing the Printer Power ...

Page 352: ...ing items Do not use quiet mode The operating noise of the printer is at normal volume Always use quiet mode Select this option when you wish to reduce the operating noise of the printer Use quiet mode within specified time The operating noise of the printer can be reduced during a specified period of time Set the Start time and End time when you wish the quiet mode to be activated Important The t...

Page 353: ...ting to prevent paper abrasion Check this check box to use this function Align heads manually The Print Head Alignment function on the Maintenance tab is normally set to automatic head alignment but you can change it to manual head alignment If the printing results of automatic print head alignment are not satisfactory see Manual Print Head Alignment and perform manual head alignment Check this ch...

Page 354: ...mpleted Printer Moves But Ink Is Not Ejected Printing Speed Is Not as Fast as Expected Print Head Holder Does Not Move to the Position for Replacing Paper Does Not Feed Properly Paper Does Not Feed from the Paper Source Specified in the Printer Driver Paper Jams Message Appears on the Computer Screen Cannot Print Properly with Automatic Duplex Printing For Windows Users Error Message Appears on a ...

Page 355: ...ter is out of paper or paper is jammed a troubleshooting message is displayed automatically Take the appropriate action described in the message The message may vary depending on the version of your operating system In Mac OS X v 10 5 x In Mac OS X v 10 4 x or Mac OS X v 10 3 9 Page 355 of 437 pages If an Error Occurs ...

Page 356: ...Page top Page 356 of 437 pages If an Error Occurs ...

Page 357: ... plug is securely plugged into the Power Cord Connector of the printer then turn it back on Check 3 Unplug the printer from the power supply then plug the printer back in and turn the printer back on after leaving it for at least 3 minutes If the problem is not resolved contact the service center Page top Page 357 of 437 pages The Printer Cannot Be Powered On ...

Page 358: ...r Paper Jams Four flashes Ink tank is not installed properly Ink may have run out If the lamp on the ink tank is not lit the ink tank may not be installed properly Install an appropriate ink tank If the lamp on the ink tank is flashing ink may have run out Replacing the ink tank is recommended If printing is in progress and you want to continue printing press the printer s RESUME CANCEL button wit...

Page 359: ...e connecting your device referring to its instruction manual If the error is still not resolved check if you can print another photograph Ten flashes Cannot perform duplex printing The size of paper may not be compatible with automatic duplex printing The sizes of media suitable for auto duplex printing are A4 Letter A5 and 5 x 7 Make sure that the size of the paper loaded in the printer is correc...

Page 360: ...e Maintenance Fifteen flashes Ink tank cannot be recognized An ink tank error has occurred The lamp on the ink tank is off Replace the ink tank Routine Maintenance Sixteen flashes Ink has run out Ink has run out The lamp on the ink tank flashes Replace the ink tank and close the Top Cover Routine Maintenance Printing under the current condition may damage the printer If you want to continue printi...

Page 361: ...tely A printer problem has occurred Disconnect the printer cable from the printer turn the printer off and then unplug the printer from the power supply Plug the printer back in and turn the printer back on If the problem is not resolved contact the service center Page top Page 361 of 437 pages Power Lamp Flashes Green and Alarm Lamp Flashes Orange Alternately ...

Page 362: ... icon on the displayed window If the contents of the CD ROM are displayed double click MSETUP4 EXE Double click the CD ROM icon on your desktop to start installation Note If the CD ROM icon is not displayed try the following Remove the CD ROM from your computer then insert it again Restart your computer If the icon is still not displayed try different discs and see if they are displayed If other d...

Page 363: ...it on the PIXMA XXX screen then remove the CD ROM 5 Turn the printer off 6 Restart the computer 7 Make sure that you have no application software running 8 Insert the CD ROM again then perform Easy Install to install the printer driver In other cases Follow the procedure described in your setup manual for proper installation If the driver was not installed correctly uninstall the printer driver re...

Page 364: ...Does the USB port on your computer support Hi Speed USB connection Do the USB cable and the USB hub if you are using one support Hi Speed USB connection Be sure to use a certified Hi Speed USB cable We recommend that the cable is no longer than around 10 feet 3 meters Does the operating system of your computer support Hi Speed USB connection Obtain and install the latest update for your computer D...

Page 365: ... device Confirm by using your PictBridge compliant device Printing Photographs Directly from a Compliant Device To print from a computer Confirm by using the printer driver Printing with Easy Setup Check 2 Make sure that the appropriate print quality is selected according to the media type and printing data referring to the table in Check 1 Select a print quality option suitable for the paper and ...

Page 366: ... the size of the print data extremely large Click Print Options on the Page Setup sheet Then select the Prevent loss of print data check box in the displayed dialog Check 2 Is the space of your computer s hard disk sufficient Delete unnecessary files to free disk space Page top Page 366 of 437 pages Cannot Print to End of Job ...

Page 367: ... driver Important Reduced printing may affect the layout depending on your document 1 Open the printer properties dialog box Opening the Printer Properties Dialog Box Windows Click Here Printer Driver Before clicking here to open the printer properties dialog box quit the running application software 2 Click Print Area Setup in the Page Setup sheet and select Use reduced printing 1 Open the Print ...

Page 368: ...t Satisfactory No Printing Results Printing Is Blurred Colors Are Wrong White Streaks No Printing Results Printing Is Blurred Colors Are Wrong White Streaks Page 368 of 437 pages No Printing Results Printing Is Blurred Colors Are Wrong White Streaks ...

Page 369: ...s not empty If the Nozzle Check Pattern is not printed correctly though ink is sufficient perform the Print Head Cleaning and try printing the Nozzle Check Pattern again If the problem is not resolved after performing the Print Head Cleaning twice Perform the Print Head Deep Cleaning If the problem is not resolved after performing the Print Head Deep Cleaning turn off the printer and perform anoth...

Page 370: ...te If the problem is not resolved after performing the Print Head Alignment perform Print Head Alignment manually referring to Manual Print Head Alignment Check 3 Is the size of the print data extremely large Click Print Options on the Page Setup sheet Then select the Prevent loss of print data check box in the displayed dialog Check 4 Is the Page Layout Printing performed or the Binding margin fu...

Page 371: ...y printing again If you are using plain paper to print images with high intensity the paper may absorb too much ink and become wavy causing paper abrasion Confirm the intensity using the printer driver Adjusting Intensity Check 3 Is Photo Paper used for printing photographs When printing data with high color saturation such as photographs or images in deep color we recommend using Photo Paper Plus...

Page 372: ...ed at the top and bottom edges of the paper Printing Area Check 3 Load the paper after correcting its curl For Plain Paper Turn the paper over and reload it to print on the other side Leaving the paper loaded on the Rear Tray for a long time may cause the paper to curl In this case load the paper with the other side facing up It may resolve the problem We recommend putting unused paper back into t...

Page 373: ...is complete If not this setting remains enabled for all subsequent print jobs Open the printer properties dialog box and in Custom Settings in the Maintenance sheet select the Prevent paper abrasion check box and then click Send To open the printer properties dialog box see Opening the Printer Properties Dialog Box Windows In the Canon IJ Printer Utility select Custom Settings in the pop up menu s...

Page 374: ...ler will wear the roller so perform this procedure only when necessary Check 8 Is inside of the printer dirty When performing duplex printing the inside of the printer may become stained with ink causing the printout to become smudged Perform the Bottom Plate Cleaning to clean the inside of the printer Cleaning Inside the Printer Note To prevent the inside of the printer from stains set the paper ...

Page 375: ...nk Drying Wait Time slide bar to set the wait time and then click Send 5 Confirm the message and click OK Check 10 Is the paper scratched by other loaded paper Depending on the media type the paper may be scratched by other loaded paper when feeding from the Rear Tray In this case load one sheet at a time Page top Page 375 of 437 pages Paper Is Smudged Printed Surface Is Scratched ...

Page 376: ...e paper and print quality settings Print Results Not Satisfactory Check 2 Perform the Bottom Plate Cleaning to clean the inside of the printer Cleaning Inside the Printer Note When performing borderless printing duplex printing or too much printing the inside may become stained with ink Page top Page 376 of 437 pages Back of the Paper Is Smudged ...

Page 377: ...r than that specified in the printer driver Set the paper size correctly according to the paper you loaded Print Results Not Satisfactory Note The direction of the vertical line pattern may vary depending on the image data or the print setting This printer performs automatic cleaning when necessary to keep printouts clean A small amount of ink is ejected for cleaning Although ink is usually ejecte...

Page 378: ...nted correctly Check to see if a particular color s ink tank is not empty If the Nozzle Check Pattern is not printed correctly though ink is sufficient perform the Print Head Cleaning and try printing the Nozzle Check Pattern again If the problem is not resolved after performing the Print Head Cleaning twice Perform the Print Head Deep Cleaning If the problem is not resolved after performing the P...

Page 379: ...e Note If the problem is not resolved after performing the Print Head Alignment perform Print Head Alignment manually referring to Manual Print Head Alignment Page top Page 379 of 437 pages Colors Are Uneven or Streaked ...

Page 380: ...o place Check 5 Make sure that the USB cable is securely plugged in to the printer and the computer then check the followings If you are using a relay device such as a USB hub disconnect it connect the printer directly to the computer and try printing again If printing starts normally there is a problem with the relay device Consult the reseller of the relay device for details There could also be ...

Page 381: ...s In Windows 2000 click Control Panel then Printers 3 Right click the Canon XXX icon then select Properties 4 Click the Ports tab to confirm the port settings Make sure that a port named USBnnn where n is a number with Canon XXX appearing in the Printer column is selected for Print to the following port s If the setting is incorrect reinstall the printer driver or change the printer port to the co...

Page 382: ...rinter may stop printing to protect the Print Head In this case printing will not resume automatically Turn the printer off for at least 15 minutes Caution The Print Head and the surrounding area can become extremely hot inside the printer Never touch the Print Head or nearby components Check 3 Is the paper loaded Make sure that paper is loaded in the Rear Tray or Cassette Confirm the paper source...

Page 383: ... is not resolved after performing the Print Head Cleaning twice Perform the Print Head Deep Cleaning If the problem is not resolved after performing the Print Head Deep Cleaning turn off the printer and perform another Print Head Deep Cleaning after 24 hours If the problem is not resolved after performing the Print Head Deep Cleaning twice If Print Head Deep Cleaning does not resolve the problem t...

Page 384: ...rinter Properties Dialog Box Windows Click Here Printer Driver Before clicking here to open the printer properties dialog box quit the running application software 2 On the Main sheet select Fast for the Print Quality setting Depending on the media type the Fast option may not be available 1 Open the Print dialog box Opening the Page Setup and Print Dialog Box Macintosh 2 Select Quality Media in t...

Page 385: ...rror and then reopen it For details on how to resolve the error see Alarm Lamp Flashes Orange Check 3 Has the Top Cover been left open for 10 minutes or longer If the Top Cover is left open for more than 10 minutes the Print Head Holder moves to the right to prevent the Print Head from drying out Close and reopen the Top Cover to return the Print Head Holder to the center Check 4 Has the printer b...

Page 386: ...e Cassette load the paper with the print side facing DOWN Align the right edge of the paper stack against the right edge of the Cassette and slide the Paper Guides against the left and bottom edges of the stack Loading Paper Check 2 Check to see if the paper you are printing on is not too thick or curled Loading Paper Check 3 Make sure of the following when you load envelopes When printing on enve...

Page 387: ...er Routine Maintenance Note Cleaning the Paper Feed Roller will wear the roller so perform this procedure only when necessary Check 9 If two or more sheets of paper feed from the Cassette at once clean the inside of the Cassette For information on cleaning the inside of the Cassette refer to Routine Maintenance Check 10 Is the Rear Cover closed completely Paper may be jammed if the Rear Cover is n...

Page 388: ...lication software setting corresponding to the printer driver setting or click the Print Options on the Page Setup sheet in the printer driver and select Disable the paper source setting of the application software on the Print Options screen When the paper source setting is inconsistent between an application program and the printer driver the application software setting takes precedence Page to...

Page 389: ...printing press the RESUME CANCEL button to cancel print jobs before turning off the printer Paper Is Jammed in the Paper Output Slot or the Rear Tray Paper Is Jammed inside the Printer at the Transport Unit Jammed Paper Is Not Removed out When Automatic Duplex Printing In Other Cases Page top Page 389 of 437 pages Paper Jams ...

Page 390: ...f and turn it back on The paper may be ejected automatically 2 Reload the paper and press the RESUME CANCEL button on the printer If you turned off the printer in step 1 all print jobs in the queue are canceled Reprint if necessary Note When reloading the paper confirm that you are using the correct paper and are loading it correctly Loading Paper A5 sized paper is suited to printing documents con...

Page 391: ...ly Note Be careful not to touch the components inside the printer If you cannot pull the paper out turn the printer off and turn it back on The paper may be ejected automatically 3 Attach the Rear Cover Push the left side of the Rear Cover until it is closed completely If you were not able to remove the paper out in step 2 4 Remove the Cassette 5 Pull the paper out slowly Page 391 of 437 pages Pap...

Page 392: ...confirm that you are using the correct paper and are loading it into the printer correctly Loading Paper 7 Insert the Cassette into the printer again and press the RESUME CANCEL button on the printer If you turned off the printer in step 2 all print jobs in queue are canceled Reprint if necessary If you cannot remove the paper or the paper tears inside the printer or if the paper jam error continu...

Page 393: ... left side down 4 Slowly pull the jammed paper out so that the paper does not tear Note Set the printer back to its original position immediately after removing the jammed paper 5 Align the paper then reload it in the Cassette Reload paper in the Rear Tray if necessary Note When reloading the paper into the printer confirm that you are using the correct paper and are loading it into the printer co...

Page 394: ... Check 2 Are there any foreign objects in the Rear Tray If there are any foreign objects in the Rear Tray be sure to turn off the printer unplug it from the power supply then remove the foreign object Check 3 Is the Rear Cover closed completely Check 4 Is the paper curled Check 3 Load the paper after correcting its curl Page top Page 394 of 437 pages In Other Cases ...

Page 395: ...r Scanner Fax Extended Survey Program Screen Is Displayed The Inkjet Printer Scanner Fax Extended Survey Program Icon Appears Error Number B200 A printer error has occurred Turn the printer off and unplug the power cord of the printer from the power supply Then contact the service center Is Displayed Turn off the printer and unplug the power cord of the printer from the power supply Contact the se...

Page 396: ...ver In the following instructions XXX signifies your printer s name 1 Log on as a user account with administrator privilege 2 Click Control Panel then Printer under Hardware and Sound In Windows XP click Control Panel Printers and Other Hardware then Printers and Faxes In Windows 2000 click Control Panel then Printers 3 Right click the Canon XXX icon then select Properties 4 Click the Ports tab to...

Page 397: ...lem with the device If a device error is displayed refer to Windows help to resolve the error Error Number 300 Is Displayed Check 1 If the Power lamp is off make sure that the power plug is plugged in then turn the printer on While the Power lamp is flashing green the printer is initializing Wait until the Power lamp stops flashing and remains lit green Check 2 Make sure that the USB cable is secu...

Page 398: ...ge and take the appropriate action Error Number 2500 Is Displayed See Eleven flashes in Alarm Lamp Flashes Orange and take the appropriate action Other Error Messages Check If an error message is displayed outside the printer status monitor check the following Could not spool successfully due to insufficient disk space Delete any unnecessary files to increase the amount of free space on the disk C...

Page 399: ...m name is IJPLMUI exe then allow it If you deselect the Send automatically from the next time check box the information will not be sent automatically from the second time onward and a confirmation screen will be displayed at the time of the next survey To send the information automatically see Changing the confirmation screen setting If you do not agree to participate in the survey program Click ...

Page 400: ...inter Scanner Fax Extended Survey Program Icon Appears If the Inkjet Printer Scanner Fax Extended Survey Program is installed the printer usage information is scheduled to be sent three months and then six months after the installation After that it is scheduled to be sent every six months for about four years The Inkjet Printer Scanner Fax Extended Survey Program icon appears in the Dock when it ...

Page 401: ... Utilities folder then the Inkjet Extended Survey Program folder 3 Place the Canon Inkjet Printer Scanner Fax Extended Survey Program app file into the Trash 4 Restart the computer Empty the Trash and restart your computer Changing the setting To display the confirmation screen every time the printer usage information is sent or to resume surveying follow the procedure below 1 Select Applications ...

Page 402: ... may not be available depending on the version of the application software Make sure that the type of loaded paper is suitable for automatic duplex printing on the Main sheet Windows or the Quality Media sheet on the Print dialog box Macintosh To switch to manual duplex printing follow the procedure below Open the printer properties dialog box clear the Automatic check box on the Page Setup sheet ...

Page 403: ...sure that Enable Status Monitor is selected on the Option menu of the printer status monitor 1 Open the printer properties dialog box Opening the Printer Properties Dialog Box Windows 2 On the Maintenance sheet click View Printer Status 3 Select Enable Status Monitor on the Option menu if it is not selected Page top Page 403 of 437 pages For Windows Users ...

Page 404: ... you can also press the RESUME CANCEL button on the printer instead of selecting Continue on the device Paper Error If the Paper Output Tray is closed open it The printer resumes printing If the Inner Cover is opened close it and select Stop in the display on your PictBridge compliant device to stop printing Paper jam Select Stop in the display on your PictBridge compliant device to stop printing ...

Page 405: ...White Streaks Printer Moves But Ink Is Not Ejected Cannot Install the Printer Driver Printing Does Not Start Printing Stops Before It Is Completed Writing Error Output Error Communication Error Print Results Not Satisfactory Paper Jams Paper Does Not Feed Properly Page top Page 405 of 437 pages FAQs ...

Page 406: ...ately Unplug the power cord from the outlet and contact the seller or the service center Never attempt to repair or disassemble the printer yourself Attempts by customers to repair or take apart the printer will invalidate any warranty regardless of whether the warranty has expired Before contacting the service center confirm the following Product name Your printer s name is located on the front c...

Page 407: ...Preview before printing on the Main tab Prevent loss of print data in the Print Options dialog box Page Layout Poster Booklet Duplex Printing manually Specify Margin Print from Last Page Collate and Stamp Background on the Page Setup tab Since the resolution in the preview display differs from the printing resolution text and lines in the preview display may appear different from the actual print ...

Page 408: ...up window specify Page Layout on the Page Setup tab and click OK 3 Without starting printing close the Print dialog box 4 Open Word s Print dialog box again 5 Open the printer driver setup window again and click OK 6 Start printing Illustrator Adobe Systems Inc If bitmap printing takes effect printing may take time or some data may not be printed Print after unchecking the Bitmap Printing check bo...

Page 409: ...inter Driver Uninstalling the On Screen Manuals Transporting the Printer Opening the Printer Properties Dialog Box Windows Opening the Page Setup and Print Dialog Box Macintosh Opening the Canon IJ Printer Utility Macintosh Sharing the Printer on a Network Page top Page 409 of 437 pages Appendix ...

Page 410: ...G 201 Photo Paper Pro Platinum PT 101 Photo Paper Plus Glossy II PP 201 Photo Paper Pro II PR 201 Matte Photo Paper MP 101 This paper can be used only when printing from your computer Performing Borderless Printing on any other type of paper may substantially reduce printing quality and or result in printouts with altered color hues Borderless Printing on plain paper may result in printouts with r...

Page 411: ...03 2 x 289 0 mm B5 6 90 x 9 80 inches 175 2 x 249 0 mm 4 x 6 10 x 15 cm 3 73 x 5 69 inches 94 8 x 144 4 mm 4 x 8 10 x 20 cm 3 73 x 7 69 inches 94 8 x 195 2 mm 5 x 7 13 x 18 cm 4 73 x 6 69 inches 120 2 x 169 8 mm 8 x 10 20 x 25 cm 7 73 x 9 69 inches 196 4 x 246 0 mm Wide 3 73 x 6 80 inches 94 8 x 172 6 mm Recommended printing area Printable area Page top Page 411 of 437 pages Other Sizes than Lette...

Page 412: ...rea Letter Legal Letter Legal Size Printable Area width x height Letter 8 00 x 10 69 inches 203 2 x 271 4 mm Legal 8 00 x 13 69 inches 203 2 x 347 6 mm Recommended printing area Printable area Page top Page 412 of 437 pages Letter Legal ...

Page 413: ...Area Envelopes Envelopes Size Recommended Printing Area width x height European DL 4 06 x 7 07 inches 103 2 x 179 6 mm US Comm Env 10 3 86 x 7 91 inches 98 0 x 200 9 mm Recommended printing area Page top Page 413 of 437 pages Envelopes ...

Page 414: ... the print jobs Click Display Print Queue The print queue window opens 3 Delete the print jobs Select Cancel All Documents from the Printer menu When the confirmation message appears click Yes The deletion of the print job is complete Important Users who have not been granted access permission for printer management cannot delete the print job of another user Note When you perform this operation a...

Page 415: ...nter Driver Updating the Printer Driver Obtaining the Latest Printer Driver Deleting the Unnecessary Printer Driver Before Installing the Printer Driver Installing the Printer Driver Page top Page 415 of 437 pages Updating the Printer Driver ...

Page 416: ...ss our web site through the Internet and download the latest printer driver for your model Important You can download the printer driver for free but any Internet access charges incurred are your responsibility Before installing the latest printer driver delete the previously installed version For information on how to delete the printer driver see Deleting the Unnecessary Printer Driver Related T...

Page 417: ...ntinue Some applications require an administrator account to continue When you are logged on to a standard account switch to an administrator account and restart the operation from the beginning 2 Execute the uninstaller Click Execute When the confirmation message appears click Yes When all the files have been deleted click Complete The deletion of the printer driver is complete When There is No U...

Page 418: ...ox click Yes When data collection is completed in the Remove Driver Package dialog box click Delete 5 Click OK The deletion of the printer driver is complete Important You may not be able to delete the printer driver properly from the Installed printer drivers list If this happens restart your computer and try again Page top Page 418 of 437 pages Deleting the Unnecessary Printer Driver ...

Page 419: ...e in the manual Getting Started Turn off the printer Checking the Personal Computer Settings Terminate all running applications In Windows Vista log on as a user who has the administrator rights In Windows XP log on as the computer administrator In Windows 2000 log on as a member of the Administrators group Note When an old version of the printer driver is already installed first delete uninstall ...

Page 420: ...inue When you are logged on to a standard account switch to an administrator account and restart the operation from the beginning 3 Install the driver At the Welcome window click Next Read the contents of the License Agreement window After checking the contents click Yes Installation of the printer driver begins After the Installation Complete window is displayed check that the printer and the com...

Page 421: ...Page top Page 421 of 437 pages Installing the Printer Driver ...

Page 422: ...ll 2 Click OK when the confirmation message appears Note When the message prompting you to restart your computer is displayed click OK to restart your computer On screen manuals other than printer driver s help are uninstalled at a time 1 Select Applications on the Go menu 2 Double click the Canon Utilities folder and then the IJ Manual folder 3 Drag the folder of your printer s name into the tras...

Page 423: ...mp is lit or flashing green as it may cause malfunction or damage to the printer making the printer unable to print 3 Retract the Paper Support and the Output Tray Extension then close the Paper Output Tray 4 Disconnect the printer cable from the computer and from the printer and then disconnect the power plug from the printer 5 Use adhesive tape to secure all the covers on the printer to keep the...

Page 424: ...Properties Dialog Box through the Start Menu Follow the procedure below to perform maintenance operations such as print head cleaning or to configure print settings that are common for all application software 1 Select items from the Start menu as shown below In Windows Vista select the Start menu Control Panel Hardware and Sound Printers In Windows XP select the Start menu Control Panel Printers ...

Page 425: ...etup Dialog Box Open the Page Setup dialog box to specify page paper settings before printing 1 Select Page Setup on the File menu in your application program The Page Setup dialog box opens Opening the Print Dialog Box Open the Print dialog box to specify print settings before printing 1 Select Print on the File menu in your application program The Print dialog box opens Page top Page 425 of 437 ...

Page 426: ... 5 x 1 Select System Preferences on the Apple menu 2 Click Print Fax 3 Select your printer s name in the Printers and click Open Print Queue The job list of your printer is displayed 4 Click Utility The Printer List opens 5 Select your printer s name in the Product list and click Maintenance The Canon IJ Printer Utility starts up Page 426 of 437 pages Opening the Canon IJ Printer Utility Macintosh...

Page 427: ...hen double click the Printer Setup Utility icon The Printer List opens 3 Select your printer s name in the Name list and click Utility 4 Select your printer s name in the Product list and click Maintenance The Canon IJ Printer Utility starts up Page top Page 427 of 437 pages Opening the Canon IJ Printer Utility Macintosh ...

Page 428: ...h the network is as follows When you execute print the data is sent through the print server system to the printer Important In case an error occurred when a document is printed by the client system to a shared printer the error message of Canon IJ Status Monitor will be displayed both on the client system and the print server system For regular printing Canon IJ Status Monitor will be displayed o...

Page 429: ...n your keyboard and then select Run as administrator Sharing from the displayed File menu In Windows XP or Windows 2000 select Sharing from the File menu Important In Windows Vista a confirmation warning dialog box may appear when installing uninstalling or starting software This dialog box appears when administrative rights are required to perform a task When you are logged on to an administrator...

Page 430: ...erver system to be shared and then click Next Note If the icon for the printer is not displayed check that the printer is actually connected to the print server It may take some time for the icon for the printer to appear 4 Complete the setup Take the appropriate action as described on the screen and then click Finish The icon for the shared printer will be created in the Printers window The setup...

Page 431: ...rver system Click the icon for the printer that you have configured on the print server system to be shared and then click Next Note If the icon for the printer is not displayed check that the printer is actually connected to the print server 4 Complete the setup Take the appropriate action as described on the screen and then click Finish The icon for the shared printer will be created in the Prin...

Page 432: ... the computer The bi directional communication function is disabled and the correct printer status may not be recognized When a client user opens the printer driver properties and then clicks OK with the Enable bidirectional support check box on the Ports tab unchecked the bi directional function of the printer server system may also be disabled In this case check Enable bidirectional support chec...

Page 433: ...photo album is an easy task if you use Easy PhotoPrint EX All you need to do is select which photos to use select a layout then load paper into your printer and print After you bind the printed sheets you ll have the one and only album of your memories You can change the layout and background and attach comments to photos You can also select the size and orientation You can arrange a photo across ...

Page 434: ... own calendar using your favorite photos It ll be exciting to turn the calendar pages You can use all kinds of photos You can also create 2 month 6 month and 12 month calendars Create Stickers Create stickers easily with Easy PhotoPrint EX Create stickers of your favorite photos and share them with your friends CHECK You can add text to photos Page 434 of 437 pages Using Easy PhotoPrint EX ...

Page 435: ...Page top Page 435 of 437 pages Using Easy PhotoPrint EX ...
Page 436: ... the Canon Solution Menu icon on the desktop Alternatively from the Start menu select All Programs Canon Utilities Solution Menu Solution Menu From the next time Solution Menu starts when Windows starts If the Start Solution Menu when Windows starts checkbox at the bottom left of the window is not selected Solution Menu does not start when Windows starts Note Solution Menu will start automatically...
Page 437: ...ne product information Important Internet connection is required to access the online information Internet connection fees apply Exiting Solution Menu Click Close on the title bar Restriction on Use of Solution Menu This software is subject to the following restriction Keep this point in mind when using it All icons of the installed applications that support Solution Menu are displayed in the wind...

Reviews: