Continued on the following page >>
7. Processing the Image (QA Mode Screen)
– 77 –
7.6 DEP (Display Enhancement Processing)
NOTE:
When parameters are set to excessively high values, artifacts may be
generated or effective image information may be degraded.
If you think the image looks as if it has been over-processed, set the
parameters to lower values, or void the process.
NOTE:
If you wish to adjust both the LUT (
→
page 70) and the DEP, void the DEP by
touching the DEP button in DEP mode so the word is not highlighted. Adjust
the LUT of the main area of interest in LUT mode first. Then, adjust the area
of lesser interest with DEP parameters.
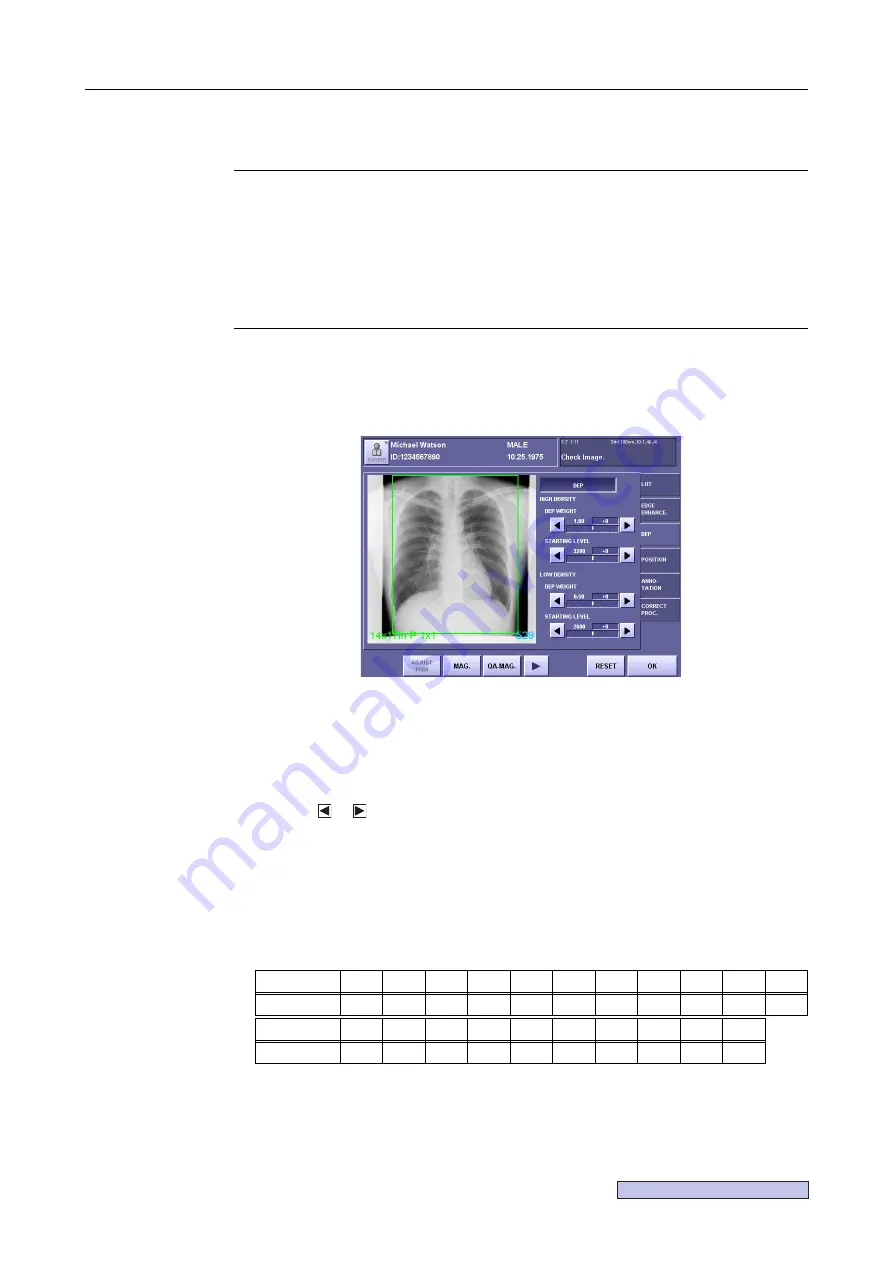
DEP widens the range that can be viewed on film or monitor by narrowing the pixel value range
of areas of lesser interest without changing the view of the microstructure of the area of main
interest.
The effect of changes by modifying the parameters can be checked in the QA screen.
DEP Screen
1
Enable DEP.
Touch and highlight (white character)
[DEP]
.
2
Set the high density effect.
Touch or to select a setting from
+10 to -10
.
The value on the left is the value analyzed automatically (DEP analysis value). The value
on the right is the effectivity that will be added to the analyzed value on the left side
(table below).
The larger the number, the stronger the processing.
However, too large a value can make the parts of the image not covered by the patient
very light, resulting in a poorer image.
Table 7.6.1: Setting Values – Corresponding Efficacy (high density)
Setting
-10
-9
-8
-7
-6
-5
-4
-3
-2
-1
0
Efficacy
0.50
0.45
0.40
0.35
0.30
0.25
0.20
0.15
0.10
0.05
0.00
Setting
+1
+2
+3
+4
+5
+6
+7
+8
+9
+10
Efficacy
-0.05 -0.10 -0.15 -0.20 -0.25 -0.30 -0.35 -0.40 -0.45 -0.50
Summary of Contents for CXDI-1
Page 9: ...Starting Up Shutting Down 1 Starting Up Shutting Down the CXDI ...
Page 15: ...Exposure and Output 2 Taking an Image 3 Output Control Process Viewer ...
Page 38: ...2 Taking an Image 30 ...
Page 60: ...5 Viewing Multiple Images Multi View Screen 52 ...
Page 70: ...6 Browsing Completed Studies Study List 62 ...
Page 71: ...Processing the Image 7 Processing the Image QA Mode Screen ...
Page 103: ...CXDI Adjustment 8 Calibration 9 Self test ...
Page 110: ...8 Calibration 102 ...
Page 116: ...9 Self test 108 ...
Page 117: ...Troubleshooting 10 Before Calling a Service Engineer 11 Questions and Answers ...
Page 136: ...11 Questions and Answers 128 ...
Page 156: ...B Using the Rejection Reason Input Function 148 ...
Page 162: ...C Using the Sensor Unit Attach Detach Function 154 ...
Page 169: ......


