4. Browsing Images (Preview Image Screen)
– 42 –
Retaking and rejecting images
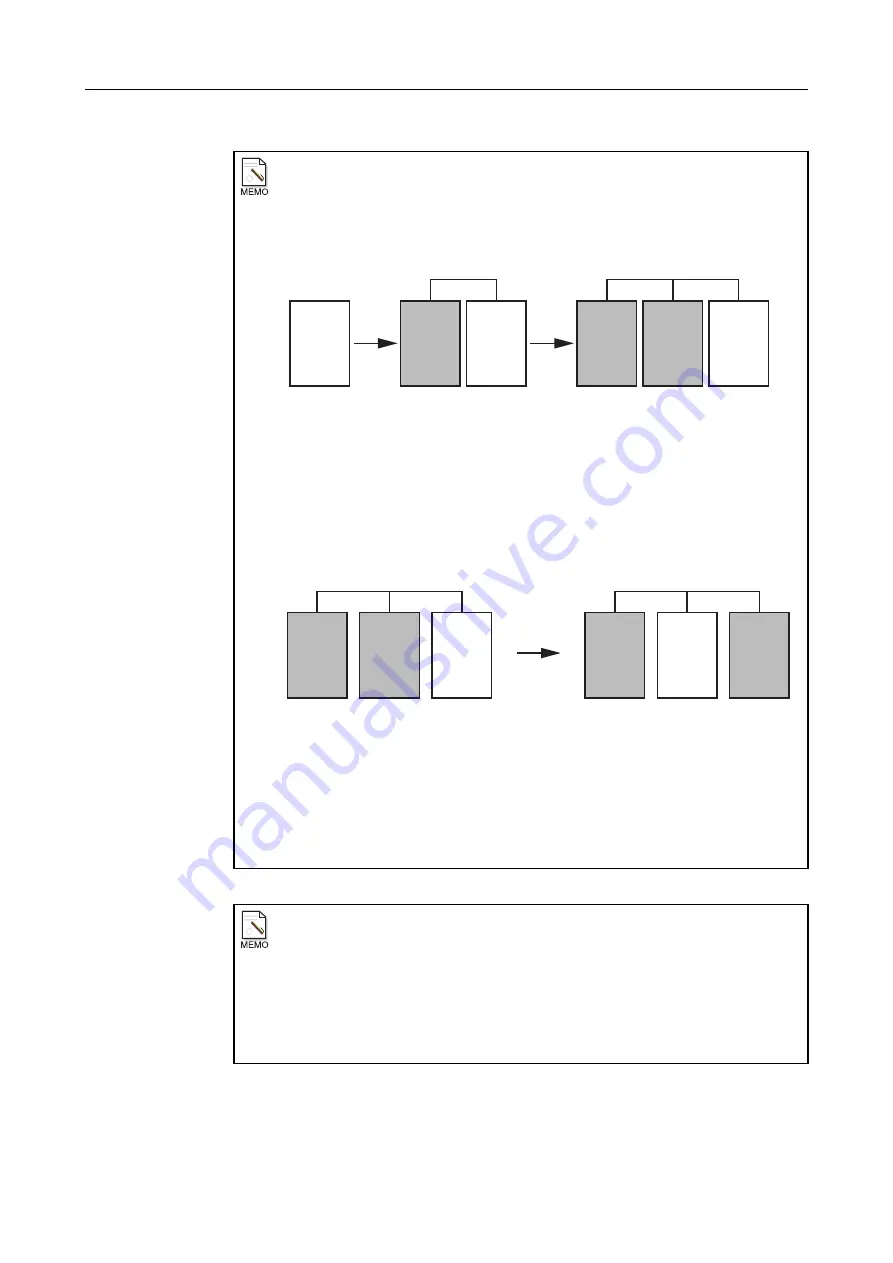
When an image is retaken multiple times in succession, all images that are retaken will
be rejected, so only the last image can be output (valid image). The example below
shows the flow of operation when an image is retaken twice.
Flow of operation when an image is retaken twice
An invalid image can be changed to a valid image from the preview image screen.
However, because only one image can be chosen as valid, the image that was
previously valid will automatically be invalidated when another image is validated.
In the example below, the lower image shows a case in which the second image taken
in the above figure is changed to the valid image.
Changing the valid image
When you touch
[Reject]
for a rejected image on the preview image screen and make
that image the valid image, a window will open and the confirmation message
“The
No.
n image [Exposure Mode] will be rejected. (“n” is the exposure number of
the valid image.)”
will be displayed. Touch
[OK]
.
Also, you can invalidate all the valid images from the preview image screen.
When image processing parameters have been changed before retaking the
image
When parameters are changed on the QA screen after exposure and then
[RETAKE]
is
touched to retake an image, the parameters used are as follows.
• Changes made to the print setting, mark (except “ROTATE” and “FLIP”), and
“Marker” parameters are valid.
• For other parameters, those that applied when the first image was taken will be
used.
Valid
image
Valid
image
Valid
image
First
image
taken
First
image
taken
First
image
taken
Second
image
taken
Second
image
taken
Third
image
taken
First retake
Second retake
Invalid
image
Invalid
image
Invalid
image
Retake
Retake
Valid
image
First
image
taken
Second
image
taken
Third
image
taken
Invalid
image
Invalid
image
First
image
taken
Second
image
taken
Third
image
taken
Valid
image
Invalid
image
Invalid
image
Before the change
After validating the second image
The case when the
second image
taken in the above
figure is changed
to the valid image.
Summary of Contents for CXDI-1
Page 9: ...Starting Up Shutting Down 1 Starting Up Shutting Down the CXDI ...
Page 15: ...Exposure and Output 2 Taking an Image 3 Output Control Process Viewer ...
Page 38: ...2 Taking an Image 30 ...
Page 60: ...5 Viewing Multiple Images Multi View Screen 52 ...
Page 70: ...6 Browsing Completed Studies Study List 62 ...
Page 71: ...Processing the Image 7 Processing the Image QA Mode Screen ...
Page 103: ...CXDI Adjustment 8 Calibration 9 Self test ...
Page 110: ...8 Calibration 102 ...
Page 116: ...9 Self test 108 ...
Page 117: ...Troubleshooting 10 Before Calling a Service Engineer 11 Questions and Answers ...
Page 136: ...11 Questions and Answers 128 ...
Page 156: ...B Using the Rejection Reason Input Function 148 ...
Page 162: ...C Using the Sensor Unit Attach Detach Function 154 ...
Page 169: ......


