2004 Buell Lightning: Chassis
2-85
HOME
LEFT TAIL SECTION AND BATTERY PAN
2.37
DISASSEMBLY
1.
Remove seat. See
2.41 SEAT
.
1
1
WARNING
1
WARNING
Always disconnect the negative battery cable first. If the
positive battery cable should contact ground with the
negative cable installed, the resulting sparks may cause
a battery explosion which could result in death or seri-
ous injury.
2.
See
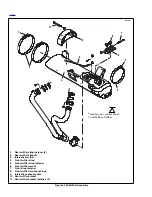
Figure 2-113.
Unthread fastener and remove battery
negative cable (black) from battery negative (-) terminal.
3.
Pull back terminal cover boot on battery positive cable
(red).
4.
Unthread fastener and remove battery positive cable
from battery positive (+) terminal.
5.
Remove battery.
6.
See
Figure 2-113.
Disconnect:
●
Wire harness ground (2) [GRD 2].
●
Rear brake light switch connector (5) [121].
●
ECM connectors (7) [10 & 11].
●
BAS (bank angle sensor) connector (9) [134].
●
Right turn signal connector (11) [19].
●
Left turn signal connector (10) [18].
●
License plate lamp connector (12) [45].
●
Tail light connectors (13) [93].
●
Ground terminals on right side tail section (6)
[GRD1] & [GRD 3].
●
Active exhaust system (1200 models only)
7.
Remove the rear shock absorber reservoir. See
2.22
REAR SHOCK ABSORBER
.
8.
Cut cable strap loosely attaching BAS wire harness to
seat latch cable.
9.
See
Figure 2-113.
Remove fuse block and relay center
from support bracket.
10. Move rear main harness and shock absorber reservoir to
right side of vehicle.
11. Remove left side passenger footrest support assembly.
See
2.30 FOOTPEG, HEEL GUARD AND MOUNT
.
12. See
Figure 2-113.
Remove the following fasteners:
●
Left front trunk pan to left side tail section (14).
●
Left rear tail section to center tail section (15).
●
Left tail section to main frame/fuel tank assembly.
13. Remove left tail section from vehicle.
NOTE
In order to remove trunk pan it will be necessary to remove
the following fasteners and components.
14. Remove two fasteners securing trunk pan to center tail
section.
15. See
Figure 2-113.
Remove fastener securing right front
trunk pan to right side tail section.
16. Remove right side passenger footrest support assembly.
See
2.30 FOOTPEG, HEEL GUARD AND MOUNT
.
17. Slide trunk pan with battery pan, seat latch, bank angle
sensor, rear shock reservoir mounting bracket and ECM
out left side of vehicle.
18. Remove remaining components on trunk pan as needed.
CLEANING
CAUTION
Do not use wheel care products or other compounds
developed specifically for cleaning and polishing pow-
dercoat. These cleaners could potentially damage the tail
section finish.
The cast aluminum tail section has a powder coat. Because
the surface is not bare polished aluminum, it must be cleaned
using only mild soap and warm water. After washing, always
dry the surface using a clean, soft cloth.
Summary of Contents for 2004 XB9S
Page 2: ......
Page 35: ...D 2 2004 Buell Lightning Appendix D HOME Rear Brake Systems Top View b1115xbsx ...
Page 36: ...2004 Buell Lightning Appendix D D 3 HOME Rear Brake Systems Left Side View b1116xcsx ...
Page 44: ...2004 Buell Lightning Appendix D D 11 HOME Clutch Cable Right Side View b1124xasx ...
Page 47: ...HOME NOTES ...
Page 49: ......
Page 103: ......
Page 201: ...HOME NOTES ...
Page 203: ......
Page 275: ...HOME NOTES ...
Page 307: ...HOME NOTES ...
Page 311: ...HOME NOTES ...
Page 351: ...HOME NOTES ...
Page 441: ......
Page 463: ...HOME NOTES ...
Page 465: ......
Page 517: ...HOME NOTES ...
Page 519: ......
Page 595: ...HOME NOTES ...
Page 597: ......

