


7-6
2004 Buell Lightning: Electrical
HOME
REMOVAL
1.
Remove seat. See
2.41 SEAT.
1
WARNING
1
WARNING
To protect against accidental start-up of vehicle, discon-
nect the negative battery cable before proceeding. Inade-
quate safety precautions could result in death or serious
injury.
2.
Disconnect negative battery cable.
3.
Remove windscreen.
4.
See
Figure 7-3.
Disconnect:
●
Turn signal flasher [30]
●
Turn signals [31]
●
Left [24] and right [22] handlebar wiring harnesses
●
Instrument cluster [39]
●
Horn [122]
5.
Remove horn (12) from horn mount (10).
6.
Cut cable strap (7) that loosely holds main wiring har-
ness (8) to the ignition switch (6) and disconnect ignition
switch connector [33].
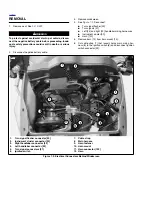
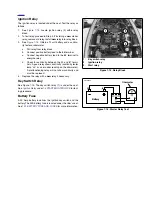
Figure 7-3. Electrical Connectors Behind Windscreen
1.
Turn signal flasher connector [30]
2.
Instrument cluster connector [39]
3.
Right handlebar connector [22]
4.
Left handlebar connector [24]
5.
Turn signal connectors [31]
6.
Ignition switch
7.
Cable strap
8.
Main harness
9.
Horn fastener
10. Horn mount
11. Horn connector [122]
12. Horn
9
4
8
3
2
1
5
5
10
11
12
6
7
8905a
Summary of Contents for 2004 XB9S
Page 2: ......
Page 35: ...D 2 2004 Buell Lightning Appendix D HOME Rear Brake Systems Top View b1115xbsx ...
Page 36: ...2004 Buell Lightning Appendix D D 3 HOME Rear Brake Systems Left Side View b1116xcsx ...
Page 44: ...2004 Buell Lightning Appendix D D 11 HOME Clutch Cable Right Side View b1124xasx ...
Page 47: ...HOME NOTES ...
Page 49: ......
Page 103: ......
Page 201: ...HOME NOTES ...
Page 203: ......
Page 275: ...HOME NOTES ...
Page 307: ...HOME NOTES ...
Page 311: ...HOME NOTES ...
Page 351: ...HOME NOTES ...
Page 441: ......
Page 463: ...HOME NOTES ...
Page 465: ......
Page 517: ...HOME NOTES ...
Page 519: ......
Page 595: ...HOME NOTES ...
Page 597: ......