


2004 Buell Lightning: Drive/Transmission
6-51
HOME
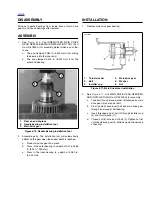
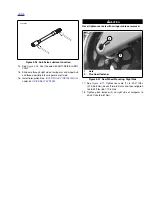
14. See
Figure 2-96.
Coat the axle with ANTI-SEIZE LUBRI-
CANT.
15. Slide axle through right side of swing arm and wheel hub
and thread partially into swingarm on left side.
16. Install idler pulley. See
IDLER PULLEY INSTALLATION-
under
6.6 DRIVE BELT SYSTEM
.
1
CAUTION
Never tighten rear axle with swingarm brace removed.
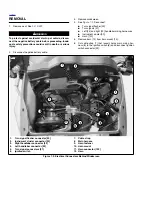
17. See
Figure 6-97.
Tighten rear axle (1) to 23-27 ft-lbs
(31.2-36.6 Nm), back off two full turns and then retighten
to 48-52 ft-lbs (65.1-70.5 Nm).
18. Tighten pinch fastener (2) on right side of swingarm to
40-45 ft-lbs (54-61 Nm).
Figure 2-96. Anti-Seize Lubricant Location
b1036x2x
Figure 6-97. Rear Wheel Mounting, Right Side
8420
2
1.
Axle
2.
Pinch bolt fastener
1
Summary of Contents for 2004 XB9S
Page 2: ......
Page 35: ...D 2 2004 Buell Lightning Appendix D HOME Rear Brake Systems Top View b1115xbsx ...
Page 36: ...2004 Buell Lightning Appendix D D 3 HOME Rear Brake Systems Left Side View b1116xcsx ...
Page 44: ...2004 Buell Lightning Appendix D D 11 HOME Clutch Cable Right Side View b1124xasx ...
Page 47: ...HOME NOTES ...
Page 49: ......
Page 103: ......
Page 201: ...HOME NOTES ...
Page 203: ......
Page 275: ...HOME NOTES ...
Page 307: ...HOME NOTES ...
Page 311: ...HOME NOTES ...
Page 351: ...HOME NOTES ...
Page 441: ......
Page 463: ...HOME NOTES ...
Page 465: ......
Page 517: ...HOME NOTES ...
Page 519: ......
Page 595: ...HOME NOTES ...
Page 597: ......