2004 Buell Lightning: Chassis
2-27
HOME
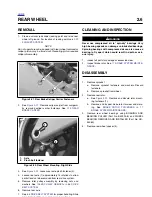
ASSEMBLY
Front Master Cylinder
1.
Obtain PISTON ASSEMBLY KIT.
2.
See
Figure 2-39.
Assemble new piston components
placing small end of spring (5) behind primary seal of
piston (4).
3.
Lubricate master cylinder body and piston seals with
special lubricant found in the service parts kit.
1
1
WARNING
1
WARNING
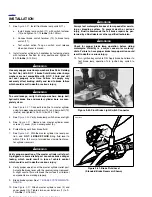
When installing circlip to secure master cylinder, be sure
the circlip snaps into place. Failure to do so can result in
improper brake operation which could result in death or
serious injury.
4.
See
Figure 2-37.
Insert piston assembly (6), spring first,
into master cylinder reservoir (4).
5.
See
Figure 2-38.
Secure piston assembly (1) with a new
circlip (2).
6.
See
Figure 2-39.
Install ridge on boot (1) into groove on
piston (3).
Brake Hand Lever
1.
See
Figure 2-37.
Lubricate pivot bolt (16) with LOCTITE
ANTI-SEIZE.
2.
Align hole in hand lever (8) with hole in hand lever pivot
and install pivot bolt (16) through top of hand lever pivot
and tighten nut to 80-120 in-lbs (9-14 Nm).
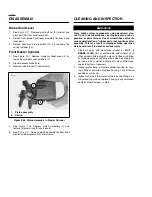
Figure 2-39. Front Master Cylinder Piston Assembly
b0977x2x
1.
Ridge on rubber boot
2.
Circlip
3.
Groove on piston
4.
Primary seal of piston
5.
Spring
1
2
5
4
3
Summary of Contents for 2004 XB9S
Page 2: ......
Page 35: ...D 2 2004 Buell Lightning Appendix D HOME Rear Brake Systems Top View b1115xbsx ...
Page 36: ...2004 Buell Lightning Appendix D D 3 HOME Rear Brake Systems Left Side View b1116xcsx ...
Page 44: ...2004 Buell Lightning Appendix D D 11 HOME Clutch Cable Right Side View b1124xasx ...
Page 47: ...HOME NOTES ...
Page 49: ......
Page 103: ......
Page 201: ...HOME NOTES ...
Page 203: ......
Page 275: ...HOME NOTES ...
Page 307: ...HOME NOTES ...
Page 311: ...HOME NOTES ...
Page 351: ...HOME NOTES ...
Page 441: ......
Page 463: ...HOME NOTES ...
Page 465: ......
Page 517: ...HOME NOTES ...
Page 519: ......
Page 595: ...HOME NOTES ...
Page 597: ......


