2004 Buell Lightning: Drive/Transmission
6-23
HOME
DRIVE BELT INSTALLATION
CAUTION
When removing or installing belt, do not bend or twist
belt, partially slide belt onto sprocket and "roll" wheel or
belt damage will occur.
1.
Slide belt onto sprocket.
2.
Install swingarm brace and tighten fasteners to 25-27 ft-
lbs (34-37 Nm). See
2.19 SWINGARM AND BRACE
.
3.
Apply ANTI-SEIZE LUBRICANT to hole in right side of
swingarm where rear axle slides through.
4.
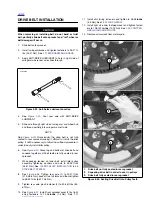
See
Figure 2-39.
Coat rear axle with ANTI-SEIZE
LUBRICANT.
5.
Slide axle through right side of swing arm and wheel hub
and thread partially into swingarm on left side.
NOTE
See
Figure 6-40.
Occasionally the drive belt is not fully
seated in rear sprocket making it difficult to install the idler
pulley. It will be necessary to follow the outlined procedure in
order to easily install idler pulley.
6.
See
Figure 6-40.
Grasp top and bottom of drive belt and
squeeze together until belt teeth are fully seated in rear
sprocket.
7.
While keeping tension on lower belt, install idler pulley
assembly tightening washers and nuts to 33-35 ft-lbs
(45-47 Nm). See
IDLER PULLEY INSTALLATION
in
6.6
DRIVE BELT SYSTEM
.
8.
See
Figure 6-38.
Tighten rear axle (1) to 23-27 ft-lbs
(31.2-36.6 Nm), back off two full turns and then retighten
to 48-52 ft-lbs (65.1-70.5 Nm).
9.
Tighten rear axle pinch fastener (2) to 40-45 ft-lbs (54-
61 Nm).
10. See
Figure 6-37.
Install front sprocket cover (2) by tight-
ening fasteners to 12-36 in-lbs (1-4 Nm). See
2.31
SPROCKET COVER
.
11. Install chin fairing fasteners and tighten to 36-48 in-lbs
(4-5 Nm). See
2.34 CHIN FAIRING
.
12. Install right side rider footpeg mount and tighten fasten-
ers to 108-132 in-lbs (12-15 Nm). See
2.30 FOOTPEG,
HEEL GUARD AND MOUNT
.
13. Remove scissor jack from motorcycle.
Figure 2-39. Anti-Seize Lubricant Location
b1036x2x
Figure 6-40. Seating Drive Belt Into Pulley Teeth
1.
Drive belt not fully seated in rear sprocket
2.
Squeezing drive belt in order to seat in pulleys
3.
Drive belt fully seated in rear sprocket
1
3
2
Summary of Contents for 2004 XB9S
Page 2: ......
Page 35: ...D 2 2004 Buell Lightning Appendix D HOME Rear Brake Systems Top View b1115xbsx ...
Page 36: ...2004 Buell Lightning Appendix D D 3 HOME Rear Brake Systems Left Side View b1116xcsx ...
Page 44: ...2004 Buell Lightning Appendix D D 11 HOME Clutch Cable Right Side View b1124xasx ...
Page 47: ...HOME NOTES ...
Page 49: ......
Page 103: ......
Page 201: ...HOME NOTES ...
Page 203: ......
Page 275: ...HOME NOTES ...
Page 307: ...HOME NOTES ...
Page 311: ...HOME NOTES ...
Page 351: ...HOME NOTES ...
Page 441: ......
Page 463: ...HOME NOTES ...
Page 465: ......
Page 517: ...HOME NOTES ...
Page 519: ......
Page 595: ...HOME NOTES ...
Page 597: ......

